Configure GoPro Max2 for Spatial Data Collection
This article introduces how to correctly configure the GoPro Max2 panoramic camera, including key steps such as hardware preparation, firmware refresh, camera parameter settings, physical installation requirements, and environment checks, to ensure high-quality data is collected for EasyAR Mega spatial map construction.
Note
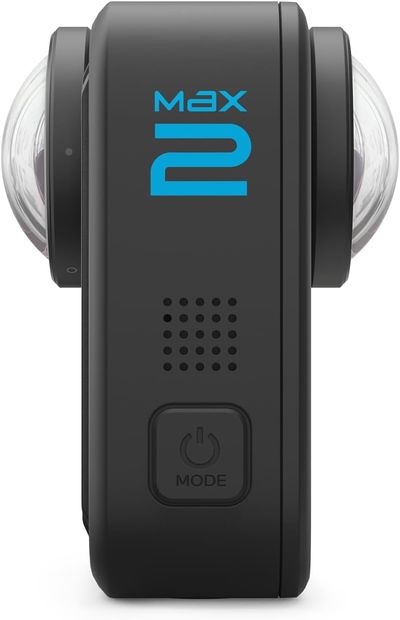
There is a prominent Max2 label on the side of the Max2 body, and the two lenses are on the same axis, as shown in the side view below. It can be easily distinguished from the Max (where the two lenses are not on the same axis). If your device is a GoPro Max, please refer to the GoPro Max Configuration Guide for configuration.
Note
The GoPro Max2 needs to refresh the specified version of the official beta Labs firmware and be configured by scanning the specified QR code with the camera before it can be used. Not all GoPro beta firmwares can be used. Please download the dedicated firmware according to the link provided on this page.
Use the Specified Firmware on GoPro Max2
The panoramic videos taken by the default firmware of the GoPro Max2 cannot be directly uploaded to the EasyAR Mega server. You need to refresh the official beta (Labs) firmware of the specified version and configure it by scanning the specified QR code with the camera before it can be used. To use the GoPro Max2 for EasyAR Mega, you need to complete the steps of downloading the firmware, flashing the firmware, and scanning the code to configure the machine in sequence.
flowchart LR

A[Download Firmware] --> B[Flash Firmware] --> C[Scan Code for Settings]
Download the Specified Firmware
We provide download links on Baidu Netdisk and Google Drive. Please download the required firmware according to your needs.
Baidu Netdisk Download Link Extraction Code:
njutGoogle Drive Download Link
Note
The beta firmware of the GoPro Max2 is provided by the GoPro official and will not damage the camera or affect the warranty. By flashing the firmware, you can flexibly configure the advanced functions of the camera and use it in Mega. You can also easily flash back to the official version firmware when not using Mega.
Flash the Beta Firmware
After downloading the above firmware, you need to flash the firmware into your GoPro Max2 camera according to the following steps.
- Unzip the downloaded firmware file to a computer folder.
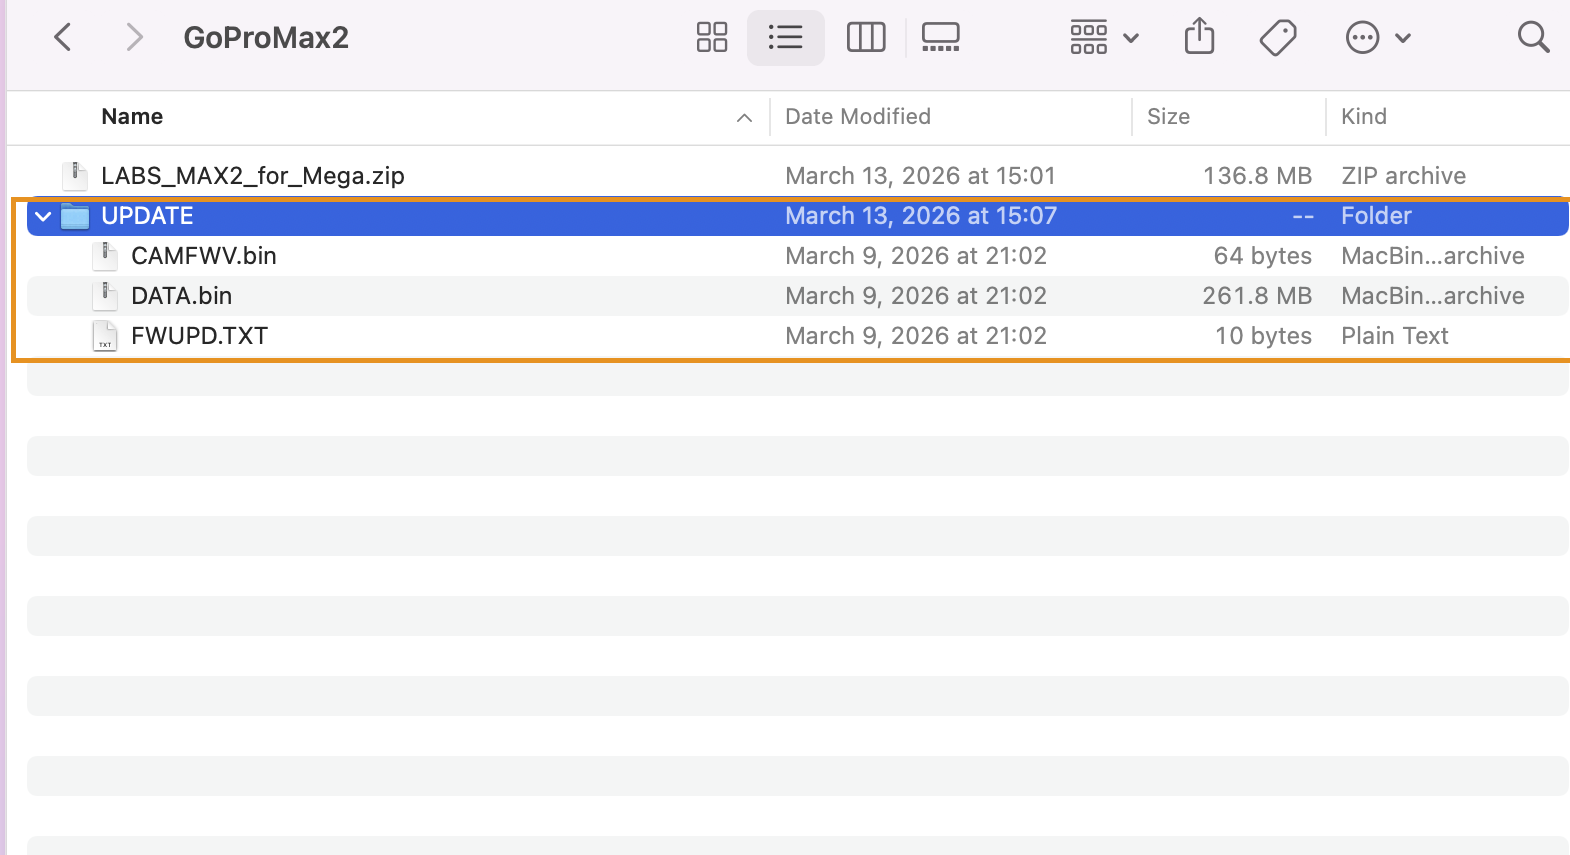
- Copy the entire unzipped
updatefolder to the root directory of the SD card.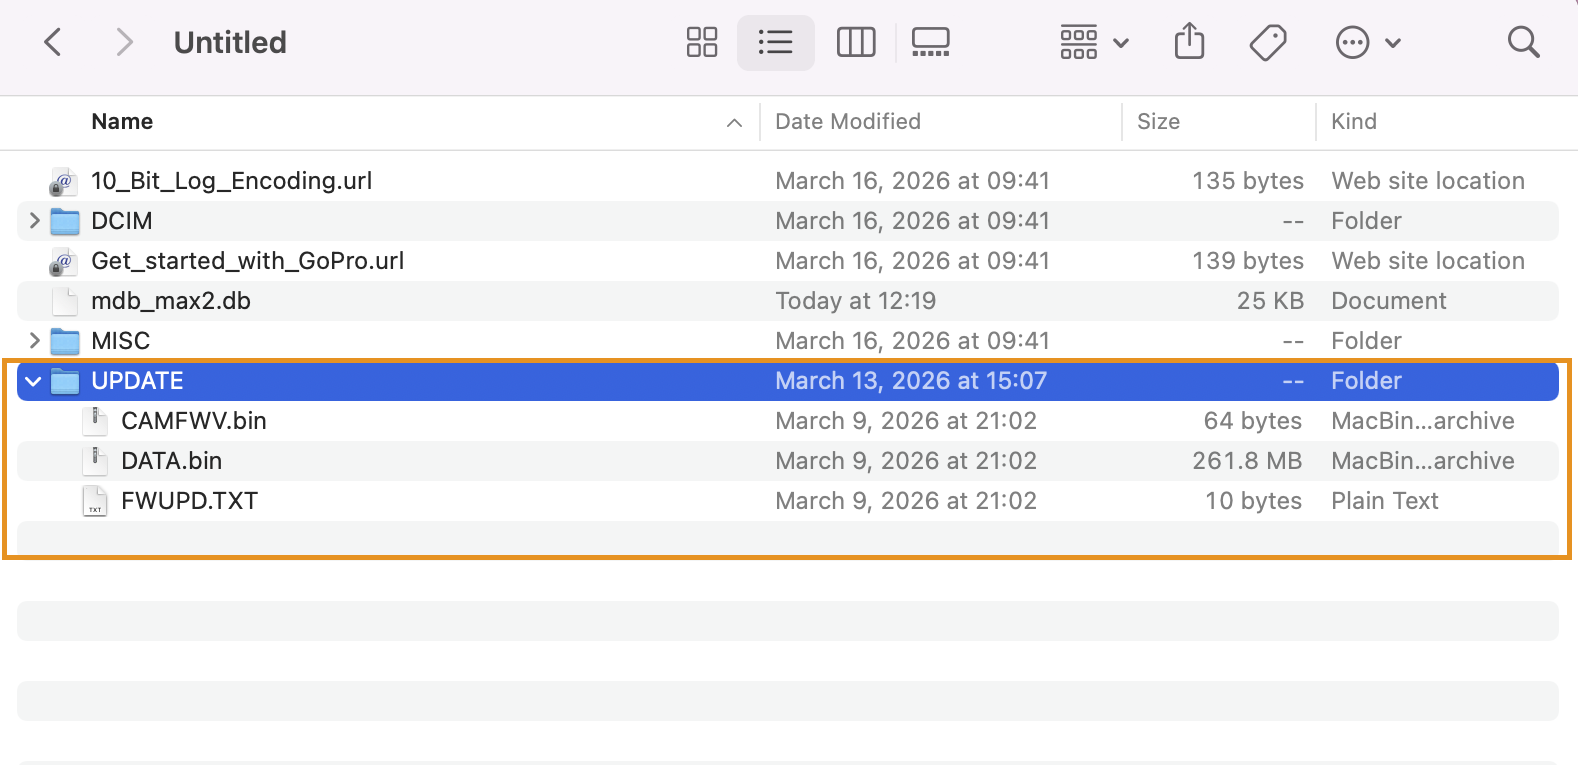
- Insert the SD card into the turned-off Max2 camera.
- Make sure the camera battery is above 20%. After turning on the camera, the screen prompts
Updating..., which means the firmware is being updated.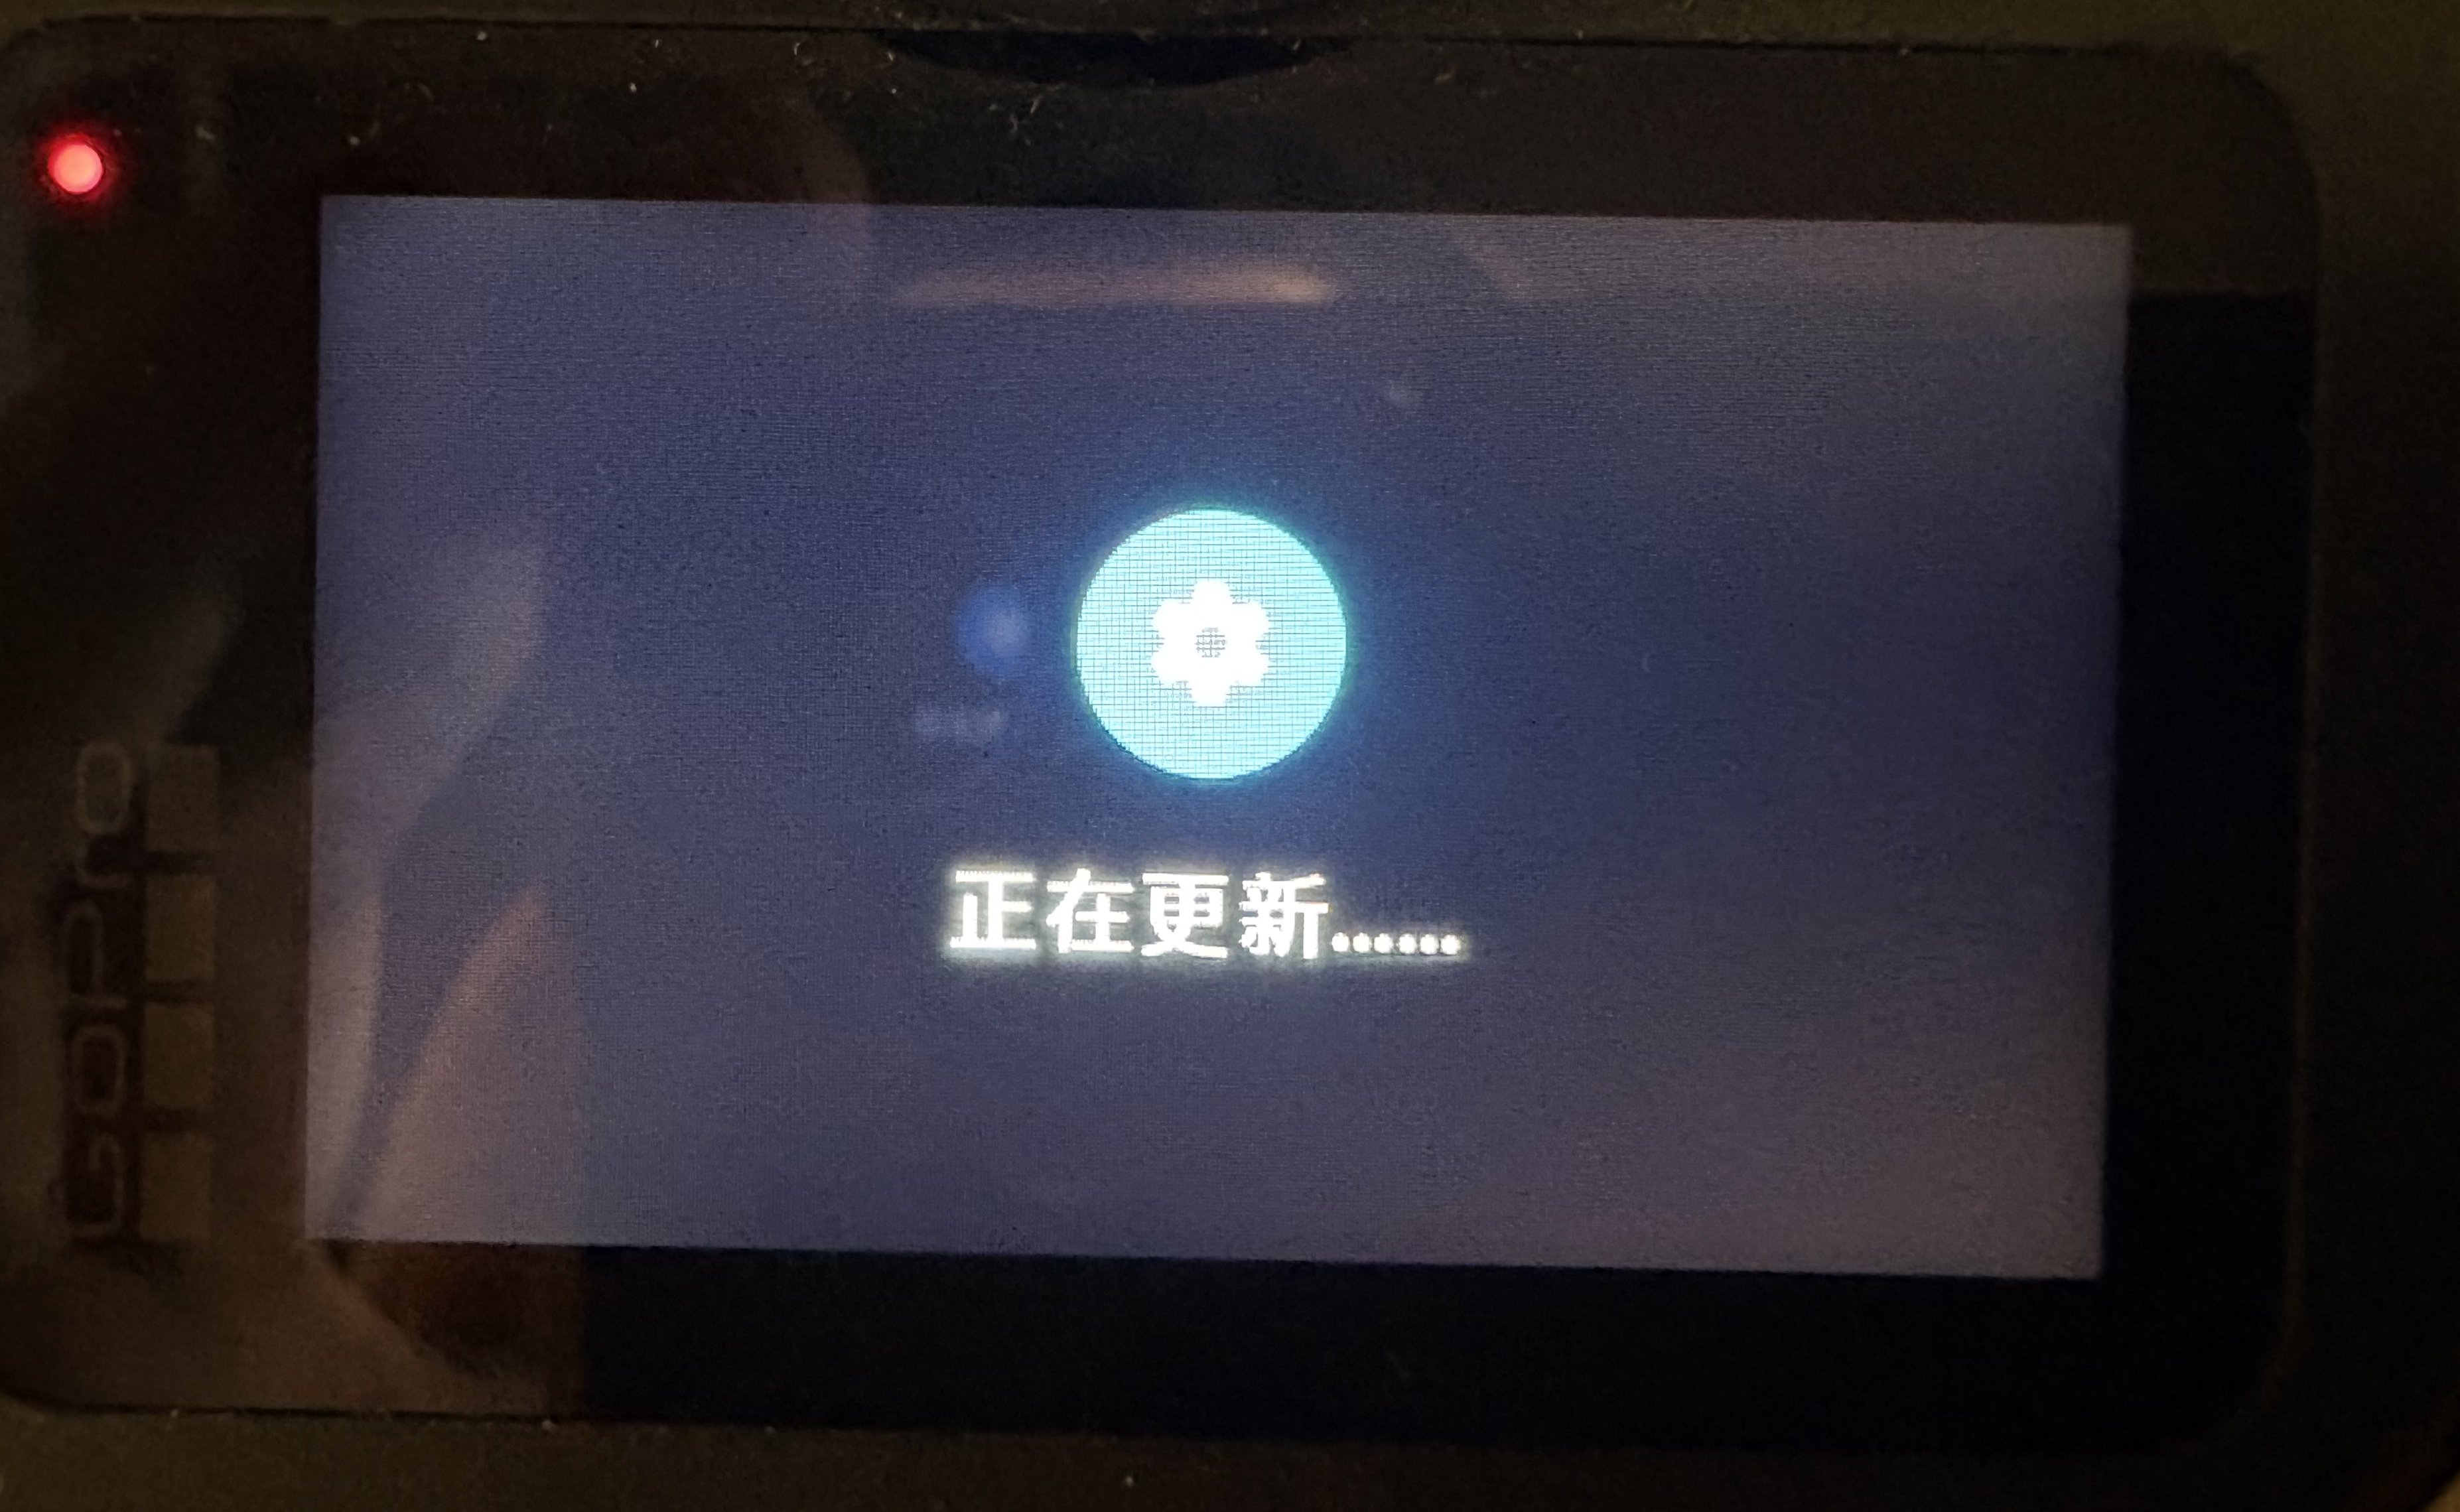
- After the update is completed, the system prompts that the update is completed and restarts. Enter the standby state.
Note
If the GoPro Quik App prompts that there is new firmware, do not upgrade.
Scan the Code to Set the Camera
After installing the above Labs firmware, scan the following QR code, which contains the necessary settings for Mega.

Restart the machine. If the following screen appears when the machine is turned on, it means that the firmware refresh and camera configuration are effective.
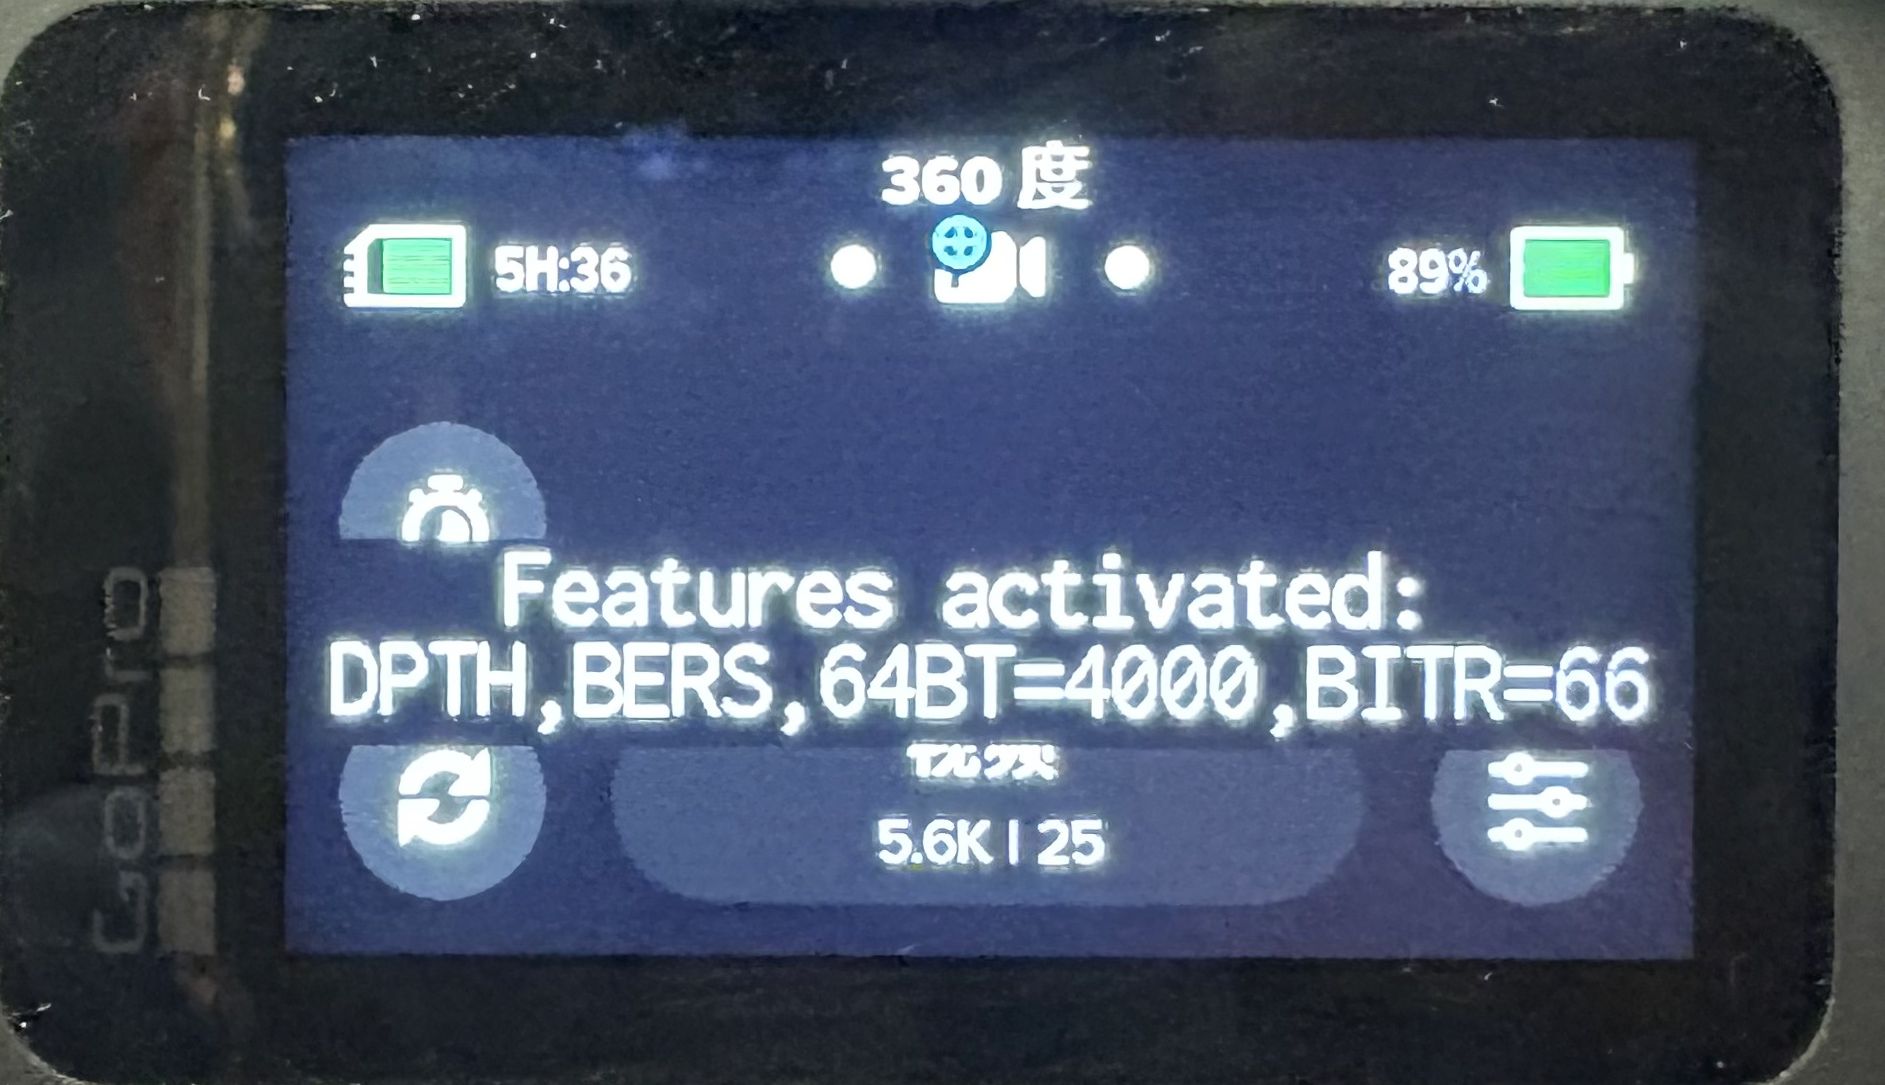
Note
Please download the Labs firmware from the link we provide. Firmware downloaded from non-above channels, even if the firmware version is the same, cannot be used for Mega.
Prepare Camera Accessories
In addition to the GoPro Max2 camera, you also need the following accessories.
GoPro Max2 camera adapter
Selfie stick 120 cm (it is recommended to use the GoPro official selfie stick)
High-speed SD memory card
- It is recommended to use a memory card with a speed level of SanDisk V30 or UHS-3 or above.
- It is recommended that the capacity be
256GBor more.
Reason: The write volume of panoramic videos is extremely large. A low-speed card will cause recording interruption or frame dropping, making the data unusable.
Original GoPro Max2 battery
- Panoramic video recording consumes power quickly. It is recommended to prepare at least 1 - 2 additional batteries or use a large-capacity power bank to directly supply power to the camera.
- Note: Do not replace the battery during a single collection process. Bringing extra batteries is only for multiple collections.
- Summer tip: When collecting outdoors in summer, remove the battery and only use the power bank (using the battery in summer will cause the GoPro Max2 to overheat and shut down).
GoPro Max2 lens cap
Type-C data cable
Power bank (optional, recommended)
GNSS Positioning Settings
The Mega service relies on GNSS (GPS, Beidou, etc.) data to determine the geographic coordinate system of the spatial map. Please make sure the GPS status is On.
Swipe down from the main screen. The left side of the following figure shows the GNSS/GPS On state, and the right side shows the GNSS/GPS Off state.
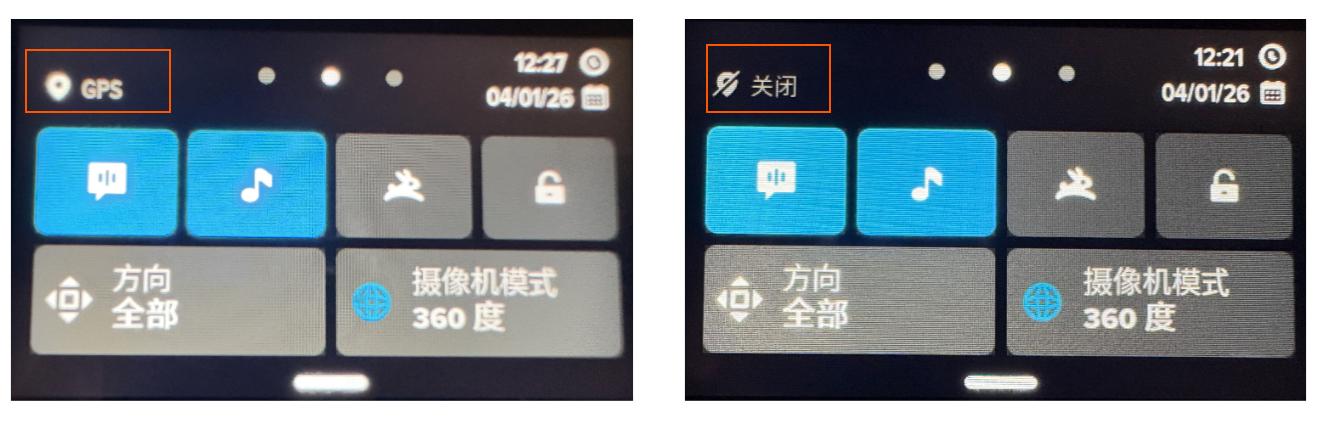
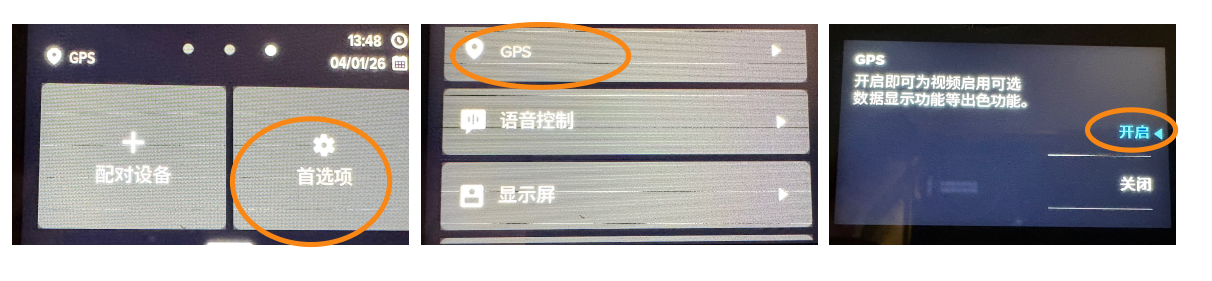
If your GNSS/GPS shows Off, you can turn it on according to the following process, that is, Preferences -> GPS -> On.
Must-Read Before Collection: Confirm GNSS Lock
During collection, before clicking the recording button, please wait quietly in an open outdoor area for 1 - 2 minutes. Observe that the GPS icon on the screen becomes bright/solid (indicating that the satellite is locked).
Note
If you collect in areas without GNSS signals such as indoors or basements, the Mega positioning service can still work normally. Turning on GNSS outdoors can improve the accuracy of Mega.
Set Anti-Flicker
The anti-flicker setting needs to be determined according to the alternating current in the area where you are shooting.
In mainland China, set the anti-flicker of the camera to 50 Hz. The specific steps are as shown in the following figure, that is, Preferences -> Region -> Region Format -> 50Hz(PAL).

For overseas countries or regions, if the alternating current frequency of the local power grid is 60Hz, you need to set it to 60Hz accordingly.
Note
If you are not sure about the alternating current frequency of the country or region you are in, you can check on the corresponding page. Note that the alternating current frequency in some countries may vary according to different regions.
Set the Video Format
Check and set the video format to 360-degree video, and select the resolution as 5.6K.
The frame rate of the video needs to be set accordingly according to the anti-flicker setting in the previous step.
In mainland China, the anti-flicker is set to 50Hz, and the shooting frame rate is selected as 25fps, as shown in the following figure.

For overseas countries or regions, if the alternating current frequency of the local power grid is 60Hz, the shooting frame rate is selected as 30fps.
Note
You can only see the required shooting frame rate after correctly setting the anti-flicker.
Physical Installation and Environment Check
Check and Wipe the Lenses
Check that the lenses cannot have any scratches. Blurry images caused by scratched lenses will directly affect map building.
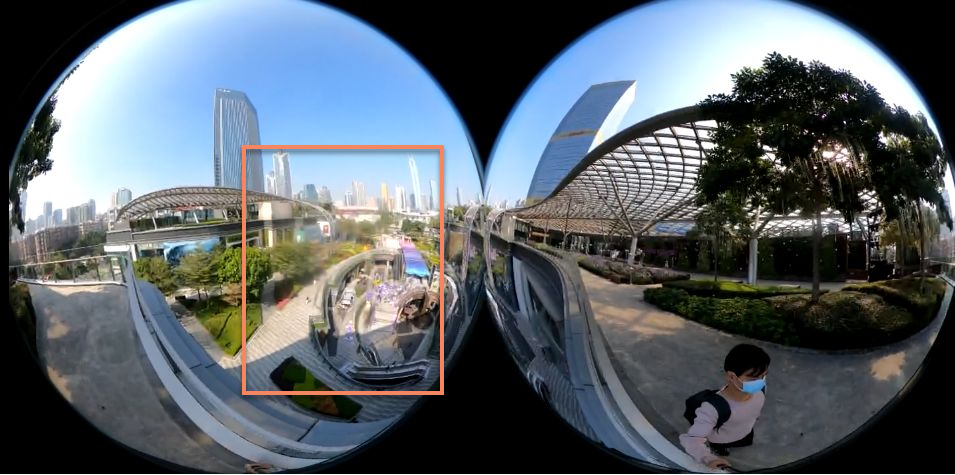
Please wipe the device lenses before collection, and do not wipe the lenses during the collection process.
Note
The lenses of the panoramic camera are very prominent and are extremely prone to getting fingerprints. The oil on the lenses will form glare (Flare) under strong light, directly destroying the image features and causing "ghosting" or positioning drift in map building.
Remember to remove the lens protection cover before collection.
Camera Installation and Holding Method
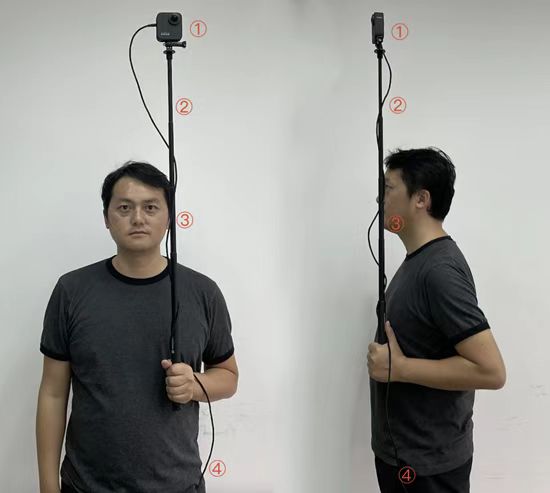
Camera Direction: The side of the camera without the screen faces forward, the side with the screen faces yourself, and all the lens caps are removed.
Selfie Stick Adjustment: Stretch the selfie stick and make it higher than your head by one head.
Holding Posture:
- Keep the pole vertical throughout the process and close to your ear to ensure that the camera is directly above your head as much as possible. Do not rest it on your shoulder.
- Hold the selfie stick with both hands. During the collection process, hold the device steadily and move it while keeping the camera stable. At the same time, prevent the lenses from being blocked by foreign objects.
- Do not play with your phone while walking.
- Try not to rotate in place during the collection process, and do not make sudden and large movements.
- If the panoramic camera bumps or slips during the collection process, you need to interrupt the collection, re-fix it, and start the collection from the beginning.
Device Connection: Put the power bank connected to the GoPro with a data cable in your pocket.
Installation Height
- Install the camera on the top of the selfie stick.
- Raise the selfie stick to keep the camera height between 1.5 meters and 1.8 meters (the height of the camera on the mobile phone or XR glasses when the end user uses them).
- Keep the selfie stick vertical and minimize the proportion of the collector's body in the picture.
Height Requirements for Different Environments
| Environment Type | Recommended Height Range |
|---|---|
| Outdoor Environment | 1.6 meters ~ 1.9 meters |
| Indoor Open Environment | 1.6 meters ~ 1.8 meters |
| Indoor Low Ceiling Height Environment | 1.55 meters ~ 1.65 meters |
Important
Outdoor Collection: When collecting outdoors, the camera should be held a little above your head, more than 20cm. Otherwise, the shooter will occupy a large area in the picture, affecting the final map building effect.
Indoor Closed Low Ceiling Height Environment Collection: When collecting in places such as offices, corridors, and exhibition halls, appropriately lower the height of the selfie stick to ensure that the height of the GoPro does not exceed 1.65 meters to avoid the shooter's body occupying too large a proportion in the picture and affecting the map building effect.
Next Steps
After the device configuration is completed, please continue to read the relevant precautions for collection:
- Collection Route Planning
- Collection Method
- Large-Scale Spatial Data Collection Method
- Collection Points Checklist
- Export Collection Data
Further Reading
You can learn more about the GoPro Max2 and GoPro Labs.