How to use EasyAR capabilities on Apple Vision Pro
This guide will walk you through configuring Unity and Xcode projects to unlock all EasyAR core capabilities, including Mega cloud localization, for Apple Vision Pro applications.
Before you begin
- Learn how to use headset samples
- Ensure your development environment meets the following requirements:
- visionOS 2.0 or higher
- Xcode 16.0 or higher corresponding to the visionOS version, with visionOS simulator installed
- Recommended Unity version: LTS version 6000.0.23 or higher
Apply for enterprise-level API license from Apple Inc.
Since obtaining camera images and parameters on Apple Vision Pro requires an entitlement through an enterprise-level API, you need to apply to Apple Inc. for a license file containing this entitlement. For application and usage methods of this license, refer to Building spatial experiences for business apps with enterprise APIs for visionOS.
Important
The Bundle ID in the entitlement obtained from Apple must exactly match the one filled in when creating the EasyAR Sense License Key.
How to choose visionOS app mode
Apps running on visionOS can only obtain ARKit data in Immersive Space. Unity editor-built apps in Immersive Space require choosing between RealityKit with PolySpatial or Metal Rendering with Compositor Services modes based on different rendering processes and APIs.
For definitions of Immersive Space, refer to Apple's official documentation.
For detailed introduction to Unity's App Mode, refer to visionOS Platform Overview in Unity PolySpatial documentation.
Tip
App mode selection recommendations
First recommendation: RealityKit with PolySpatial
If you're new to visionOS, prioritize this mode. Its advantage lies in deep integration with visionOS system-level rendering features, offering high stability and excellent rendering quality. This mode doesn't support custom code shaders (HLSL/ShaderLab), requiring Shader Graph, and only supports features passing PolySpatial compatibility checks (converted to MaterialX).
Unity's built-in
Standard (Built-in)andLit (URP)shaders have been pre-adapted by the official and can be used directly.Advanced/specific needs: Metal Rendering with Compositor Services
Suitable for projects requiring migration of large existing 3D assets or complex projects needing custom shaders. Since Unity handles all rendering logic in this mode, bypassing the system's RealityKit pipeline, rendering quality is generally inferior to RealityKit and may encounter unforeseen rendering issues.
EasyAR integration recommendations:
When integrating EasyAR, always start with RealityKit with PolySpatial mode to establish the basic workflow. This effectively isolates variables, preventing difficulties in troubleshooting due to intertwined Metal adaptation issues and AR-related problems.
Configuration in Unity project
The following configurations are required in the Unity project:
Import necessary packages for Unity project
Unity 6 (recommended):
com.unity.xr.visionos(2.0.4+)com.unity.polyspatial(2.0.4+)com.unity.polyspatial.visionos(2.0.4+)
Important
Version numbers for all packages must remain strictly consistent.
Prioritize using Unity 6, as some early Unity 2023.x versions don't yet support visionOS.
Unity 2022.3:
com.unity.xr.visionos(1.2.3)com.unity.polyspatial(1.2.3)com.unity.polyspatial.visionos(1.2.3)
Important
Version numbers for all packages must remain strictly consistent.
1.3.x versions are not supported; always lock to 1.2.3.
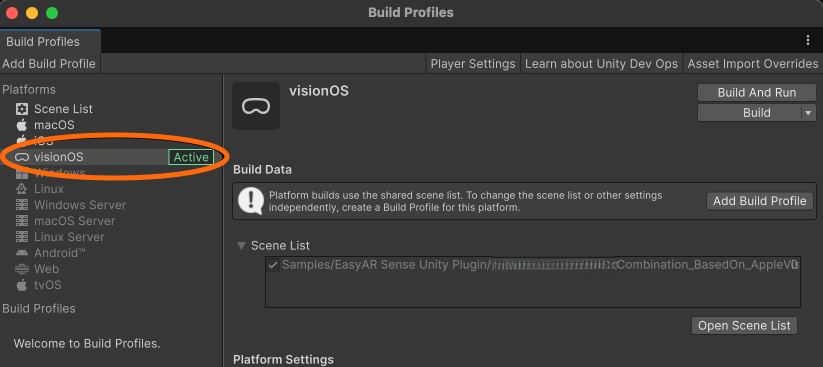
Select build platform
Click File > Build Profiles in the menu bar to switch Platform to visionOS.
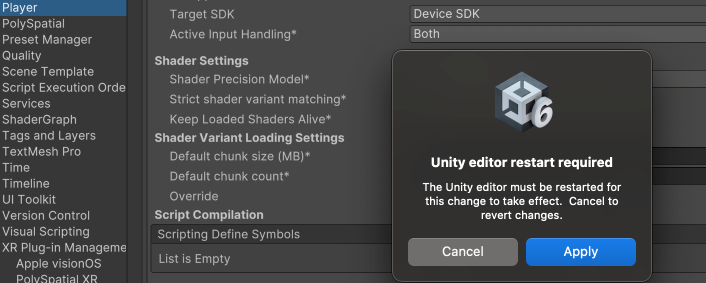
Configure input system
Ensure you use the newer Input System Package:
Click Edit > Project Settings > Player, set the Active Input Handling slot to Input System Package(New).
Unity may then require a project restart; click Apply to make changes effective.
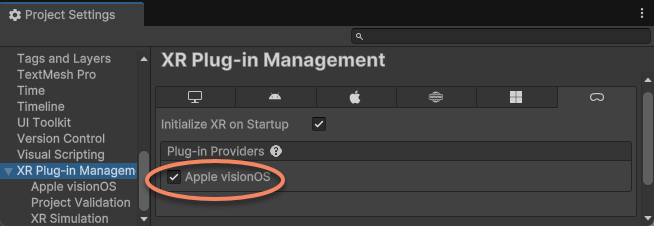
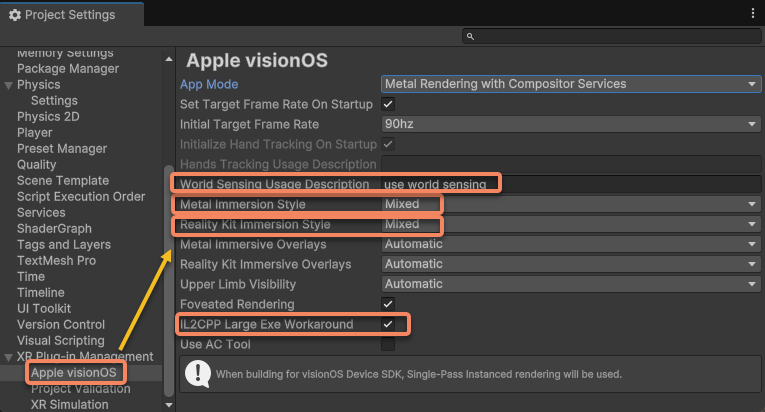
Configure XR plug-in management
Click Edit > Project Settings > XR Plug-in Management, under the visionOS tab in Plug-in Providers, check Apple visionOS.
Configure Apple visionOS plugin
Click Edit > Project Settings > XR Plug-in Management > Apple visionOS.
Select the appropriate App Mode based on previous introduction.
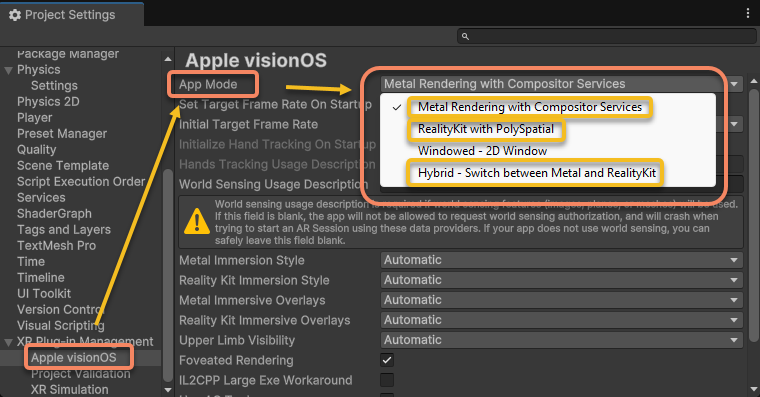
Note
Windowed mode cannot use AR capabilities since it doesn't run in Immersive Space.
Hybrid mode requires manual switching between Metal and RealityKit modes. Due to its complexity, it's not recommended. For details, refer to Unity's official explanation of this mode.
Make the following modifications on the same page:
Add a description in the World Sensing Usage Description slot.
Set Metal Immersion Style to Mixed.
Set Reality Kit Immersion Style to Mixed.
Check IL2CPP Large Exe Workaround.
[RealityKit mode only] Import TextMesh Pro essentials
Click Edit > Project Settings > TextMesh Pro > click Import TMP Essentials
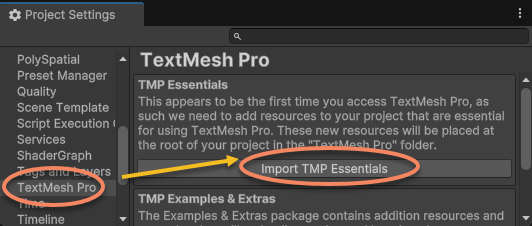
Note
Currently, RealityKit with PolySpatial mode only supports TextMesh Pro text. Without importing, text cannot be rendered.
[RealityKit mode only] PolySpatial related settings
Click Edit > Project Settings > PolySpatial, make the following modifications on this page:
Set Default Volume Camera Window Config to
Default Unbounded Configuration.Check Auto-Create Volume Camera
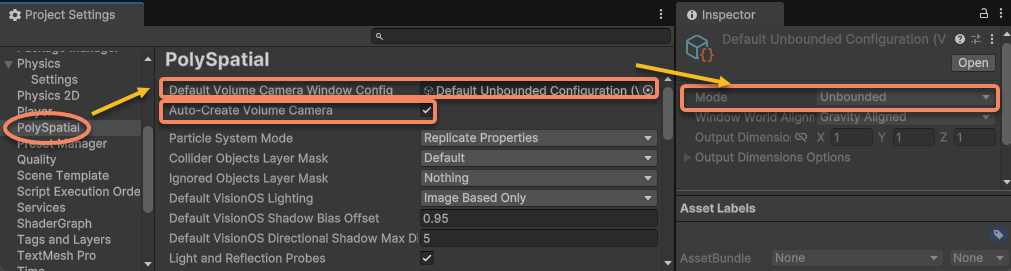
If you need to specify another Default Volume Camera Window Config, ensure its Mode is Unbounded.
If there is a Volume Camera in the scene, delete it.
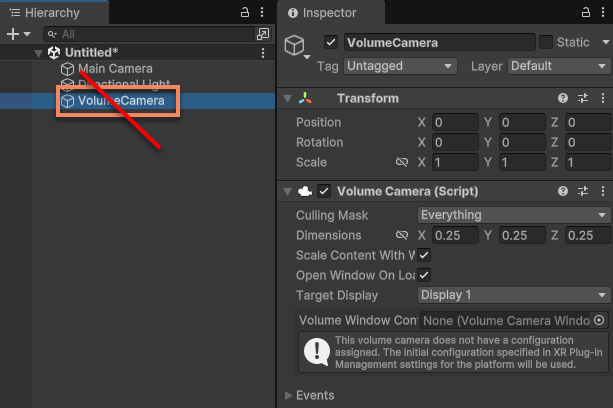
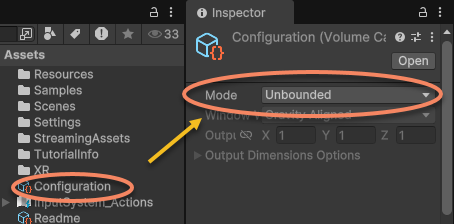
Warning
Volume CamerawithWorld Transformvalues not set toidentityare not supported.- If you need to add a unique custom
Volume Camerafor special reasons, ensure:- Set its
World Transformtoidentity. - Ensure its
Volume Camera Window ConfigurationModeis set toUnbounded. - Use it only after fully understanding its meaning and purpose in Unity's official documentation.
- Set its
[When using Mega] Add location usage description
Caution
If Location permission is enabled in EasyAR configuration (when using Mega functionality), permission description information must be added; otherwise, Build will fail.
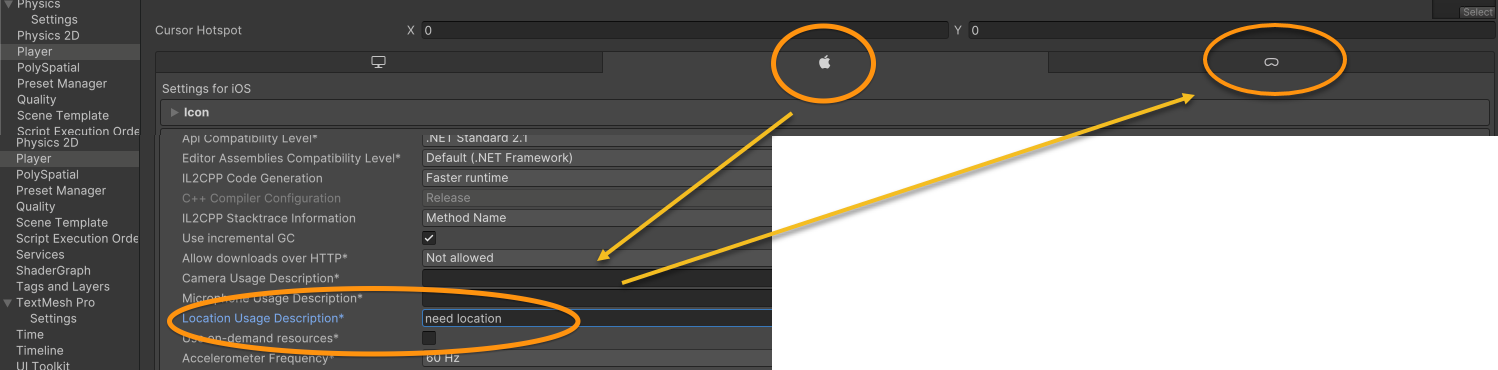
Since the Location Usage Description field isn't currently displayed in Unity's Project Settings > Player > visionOS tab, configure as follows:
- Switch platform tab: Temporarily switch the tab to iOS.
- Enter description: Fill in the necessary permission usage description in the Location Usage Description slot.
- Switch back to visionOS: Switch the tab back to visionOS; the configuration just entered will automatically remain and take effect.
Configuration in Xcode project
The following configurations are required in the Xcode project obtained through Unity build:
Configure camera data entitlement
Copy the obtained
Enterprise.licensefile to the Xcode project file directory.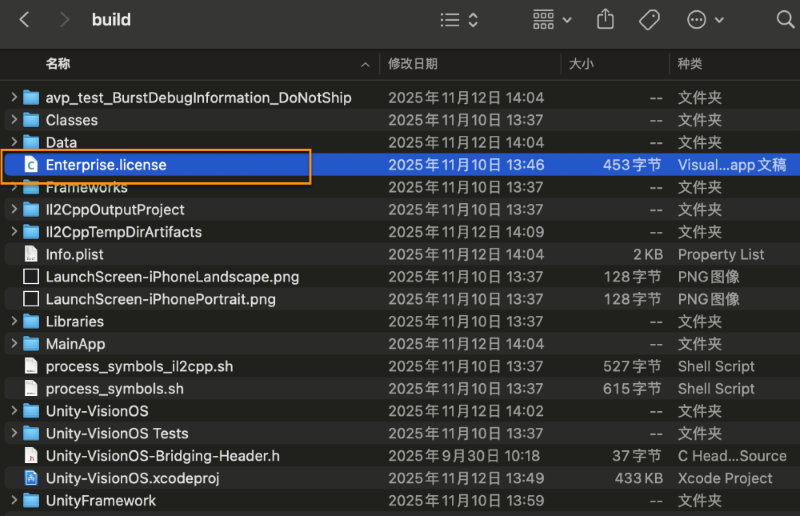
Drag
Enterprise.licensefrom the Xcode project file directory into the Xcode project.
Modify info.plist to enable saving and sharing files
If you need to record EIF in the app and share it to computers or other devices through visionOS's Files app, add the following fields to Info.plist and modify:
Add
LSSupportsOpeningDocumentsInPlaceand set its value totrue.Add
UIFileSharingEnabledand set its value totrue.
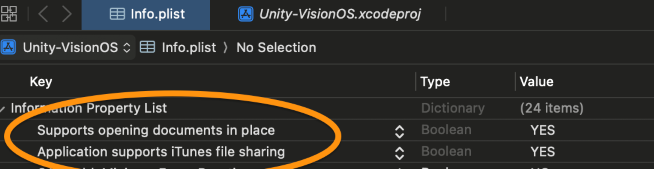
Tip
After adding fields, the Key displayed in Xcode interface may differ from the manually added string (e.g., entering LSSupportsOpeningDocumentsInPlace but displaying Supports opening documents in place - this is normal).