Get and use API Key
Creating API Keys in the EasyAR development center has no quantity limit. It is recommended to assign independent API Keys to different applications for finer permission control.
Create API Key
Log in to the EasyAR development center. If this is your first time using an API Key, please create one first by following these steps:
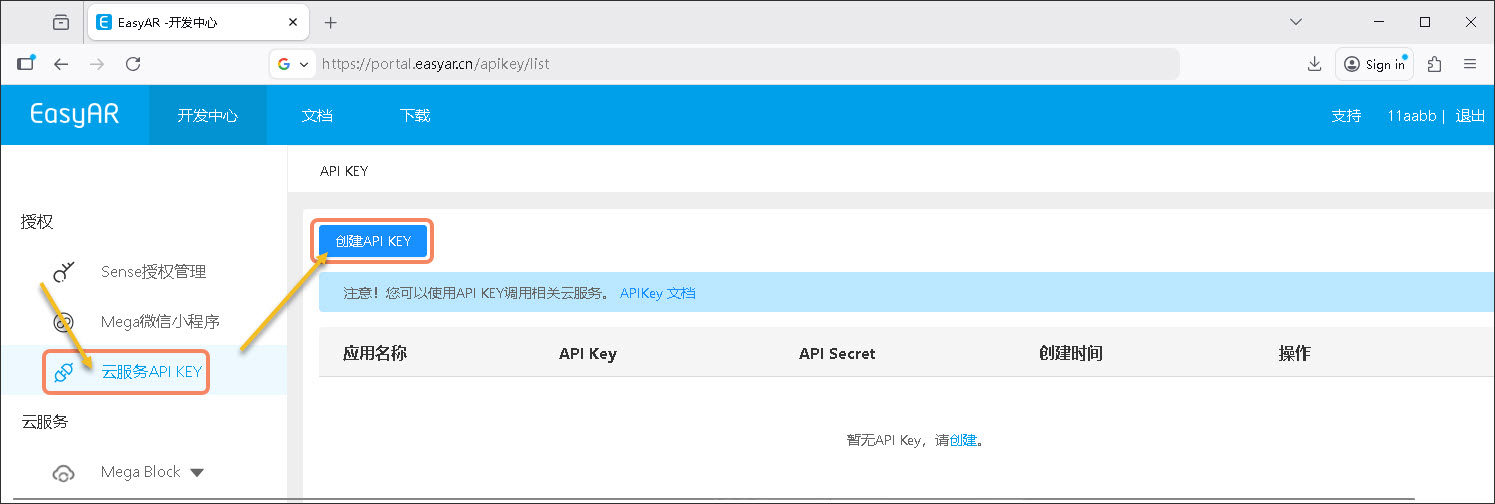
- Under "Authorization", click "Cloud Services API KEY"
- On the "API KEY" page, click the "Create API KEY" button
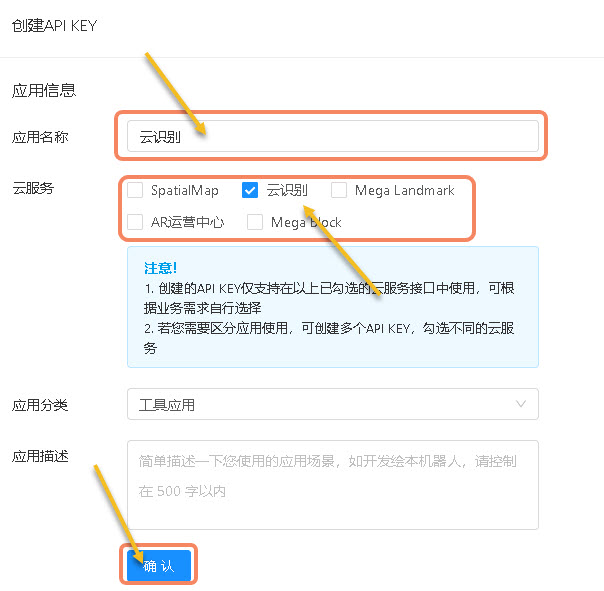
- Fill in the "Application Name"
- Check the required cloud services according to your application needs. It is not recommended to authorize all services.
- Click "Confirm"
Tip
To use SpatialMap, check SpatialMap.
To use Cloud Recognition, check Cloud Recognition.
To use Mega Landmark, check Mega Landmark. Apply to business before using this feature.
To use AR Operation Center, check AR Operation Center. Apply to business before using this feature.
To use Mega Block cloud-based positioning, check Mega Block.
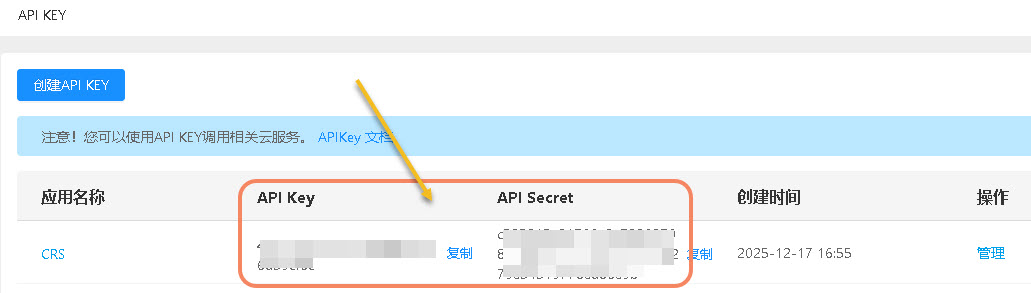
- The API Key and API Secret will be generated on the page as shown below. Be careful not to leak them.
Warning
Do not use API Key and API Secret directly in client applications (such as Web, WeChat Mini Programs, etc.).
Get token
There are two ways to obtain a token: 1. Directly from the development center; 2. By writing code. If you need control over resource access permissions, it is recommended to use the second method. The following will introduce these two acquisition methods separately. Choose according to your needs.
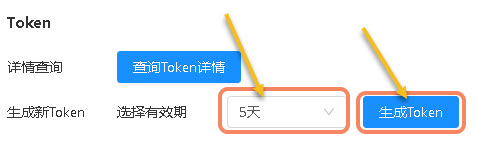
Get token from development center
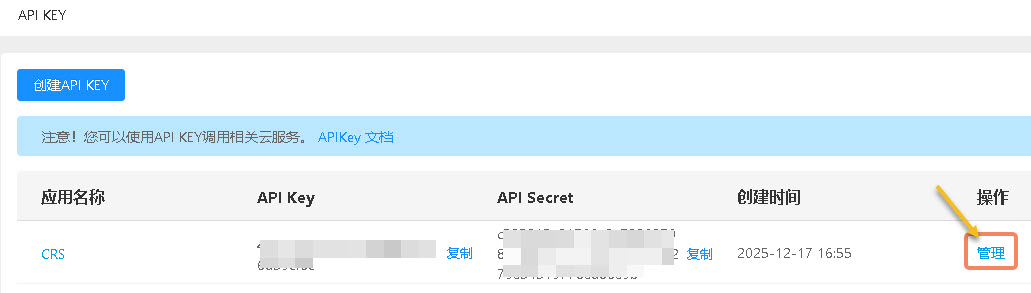
- Select the API Key you want to use, click "Manage" on the right
- Select a token validity period
- Click "Generate Token"
- Click "Copy" to copy
Note
Security is the primary reason for setting the token validity period. If the token validity period is too long, once leaked or stolen, attackers can use it for a long time, leading to data leakage or unauthorized operations; the validity period limits the effective window of the token, so even if leaked, the harm is limited to a short time.
Generate token using API Key and API Secret
The token generation process requires signing core parameters to ensure transmission security. Subsequently, this signed data is sent to the STS (Security Token Service) for authentication. After successful verification by the STS service, a temporary access token is issued, which is only valid within the specified time window. Re-authentication is required after expiration.
Warning
Do not generate tokens in client-side code. Generate tokens on the server side and then pass them to the client for use.
Request parameters
| Field Name | Type | Required | Description |
|---|---|---|---|
| apiKey | string | Yes | API Key |
| expires | int | Yes | Validity period of the generated token, in seconds |
| acl | string | Yes | Access Control List, controls the resource access permissions of the token |
| timestamp | long | Yes | Timestamp, in milliseconds |
| signature | string | Yes | Signature |
acl: Composed of one or more ACs (Access Controls). Each AC contains four parts: service, effect, resource, and permission.
- service: Service type. Currently supports
ecs:crs(cloud recognition),ecs:spatialmap(sparse spatial map),ecs:cls(Mega Block cloud localization),ecs:vps1(landmark). - resource: App ID of the specific service, e.g., the CRS AppId of a cloud recognition library.
- effect: Specifies whether access matching this resource configuration item can be executed. Values:
Allow,Deny. - permission: Permission values:
READ,WRITE.
Structure example:
[
  {
    "service": "ecs:crs",
    "resource": ["f7ff497727ab2d55ea01d9984ef8068c"],
    "effect": "Allow",
    "permission": ["READ"]
  }
]
Signature method
- Sort all parameters of the request by key name
- For each parameter, concatenate its key name and value into a string
- Concatenate all such strings, and append the API Secret at the end
- The hexadecimal of the sha256 hash of the string is the signature
Signature examples
<?php
// Your API Key and API Secret
$apiKey = '6a47f7f8ff6......68744b4bcf';
$apiSecret = '87745d866345256b......fbae27c502a';
// Your service App ID
$appId = 'f7ff497727ab2d55ea01d9984ef8068c';
// Valid time in seconds
$expires = 3600;

// Build parameters to be signed
$data = [
    'apiKey' => $apiKey,
    'expires' => $expires,
    'acl' => '[{"service":"ecs:crs","resource":["'. $appId .'"],"effect":"Allow","permission":["READ"]}]',
    'timestamp' => time() * 1000,
];

// Sort
ksort($data);

// Concatenate strings
$builder = [];
foreach ($data as $key => $value) {
    array_push($builder, $key . $value);
}

// Concatenate API Secret
array_push($builder, $apiSecret);

// Generate signature
$signature = hash('sha256', implode('', $builder));
echo $signature;
Tip
When adding to the signature, convert ACL to a JSON string.
Get token
Add the generated signature to the parameter list and send a request to the /token/v2 endpoint to obtain the token.
- Request address:
https://uac.easyar.com/token/v2orhttps://uac-na1.easyar.com/token/v2(North America 1 region) - Request method: POST
- Request header: Content-Type: application/json
- Request parameters:
{"apiKey":"6a47f7f8ff6......68744b4bcf","expires":3600,"acl":"[{\"service\":\"ecs:crs\",\"resource\":[\"f7ff497727ab2d55ea01d9984ef8068c\"],\"effect\":\"Allow\",\"permission\":[\"READ\"]}]","timestamp":1765954279002,"signature":"32f18a37fc3c18......55c4943af9"}
Example:
curl -X POST https://uac.easyar.com/token/v2 \
-H 'Content-Type: application/json' \
-d '{"apiKey":"6a47f7f8ff6......68744b4bcf","expires":3600,"acl":"[{\"service\":\"ecs:crs\",\"resource\":[\"f7ff497727ab2d55ea01d9984ef8068c\"],\"effect\":\"Allow\",\"permission\":[\"READ\"]}]","timestamp":1765954279002,"signature":"32f18a37fc3c18......55c4943af9"}'
If the statuscode in the returned result is 0, it indicates success
Normal return format:
{
  "statusCode": 0,
  "timestamp": 1765954874399,
  "msg": "Success",
  "result": {
    "apiKey": "6a47f7f8ff6......68744b4bcf",
    "expires": 3600,
    "token": "nuPDCj......xstQX",
    "expiration": "2025-12-17T08:01:14.399+0000"
  }
}
- token: token for authenticating business requests.
- expiration: expiration time of the token, which requires re-application after expiration.
Error return format:
{
  "statusCode": 4001017,
  "timestamp": 1765954666624,
  "msg": "AppId is not authorized by this API Key",
  "result": null
}
Use token
In business https requests, add the token to the request header in the format: {"Authorization": "nuPDCj......xstQX"}.
When sending business API requests, add the parameter appId (check the relevant service in the development center for the source).
Error code description
During token generation and token usage, various errors or exceptions may occur. To help developers quickly locate problems and take effective solutions, the following details common error codes and their meanings:
| Error code | Error message | Description | Solution |
|---|---|---|---|
| 4001011 | API Key invalid | API Key is invalid | Check if this API Key exists under "Cloud Services API KEY" |
| 4001012 | Timestamp invalid | Timestamp is invalid | Timestamp unit is milliseconds, and the error should not exceed 5 minutes compared to standard time |
| 4001015 | Signature invalid | Signature is invalid | Check if the signature algorithm is correct, and verify if the API Secret matches the API KEY |
| 4001017 | AppId is not authorized by this API Key | AppId is not authorized by this API Key | Check if the service where the AppId resides is associated with this API Key |
| 4001018 | Base64 decode error | Authorization set in the request header is not a valid base64 format | Do not process the obtained token; use it directly |
| 4001019 | Decryption error | Authorization set in the request header was not generated by EasyAR | Do not process the obtained token; use it directly |
| 4001022 | API Key's resource is empty | API Key has no associated cloud services | Check if the API Key is associated with cloud services and if the associated cloud services have expired |
| 4001024 | Token is expired | Token has expired | Regenerate |
| 4001025 | Token generate fail | Token generation failed | Contact technical support: support@easyar.com |