Create a Single-Image Mapping Task
This document details the complete operation process of a single-image mapping task, including task creation, data upload, and an explanation of the mapping process. It helps users standardize the full-process operation of a single-image mapping task.
Create a Single-Image Task
After completing Create a Project, follow these steps to create a single-image mapping task:
- Click
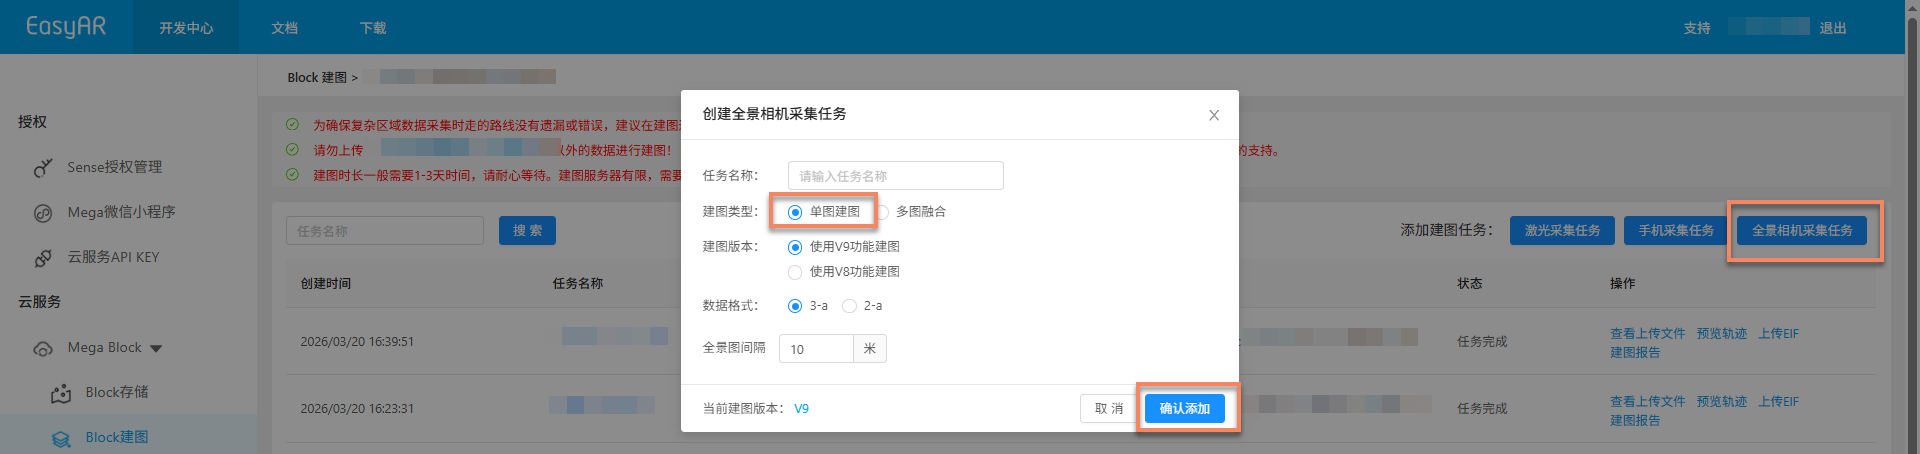
Managementto enter the mapping task management interface. - Click the
Panoramic Camera Acquisition Taskbutton in the upper right corner. - Fill in the task information in the pop-up dialog box:
- Task Name: Enter a custom task name.
- Mapping Type: Select
Single-Image Mapping. - Mapping Version and Data Format: It is recommended to use the latest version.
- Click
Confirm and Addto complete the creation.
Note
- One mapping task corresponds to a complete data acquisition within the project.
- If data acquisition and upload are carried out by external personnel, relevant personnel can be notified to upload data according to the standard process after creating the task.
Task Naming Rules
The task name should be concise and clear, and follow the following naming rules:
- If the names of each acquisition area are clearly different, directly use the abbreviated name of the area (for example: "Changtai Square").
- If there are areas with the same name, a number should be added after the abbreviated name of the area for differentiation (for example: "Zhouzhuang - Area 1").
Data Preparation
Before starting the mapping task, it is necessary to ensure that the collected spatial data meets the requirements and is organized and stored according to the specifications. The following content will detail the data acquisition equipment and the naming, storage, and structure specifications of data files.
Data Acquisition and Export
Use a panoramic camera to collect spatial data. For relevant device configurations and acquisition key points, please refer to:
- GoPro Max Device Configuration
- GoPro Max2 Device Configuration
- Acquisition Route Planning
- Acquisition Method
- Acquisition Key Points Checklist
- GoPro Max/Max2 Data Export
Data folder naming
Each collection area requires a main folder named with the full pinyin of the province/city + the full pinyin of the scenic/commercial area name + area number. For example: shanghaiwaitan1.
Note: Folder names can only contain Chinese characters, English letters, numbers, and hyphens (-). Special characters are not allowed.
Data storage location
The main folder should be set on the local hard drive of the computer (not recommended on the system drive). Copy the collected data from the TF memory card to the main folder for organization. It is advised to check available capacity in advance before copying to ensure stable final file upload.
Data file structure specification
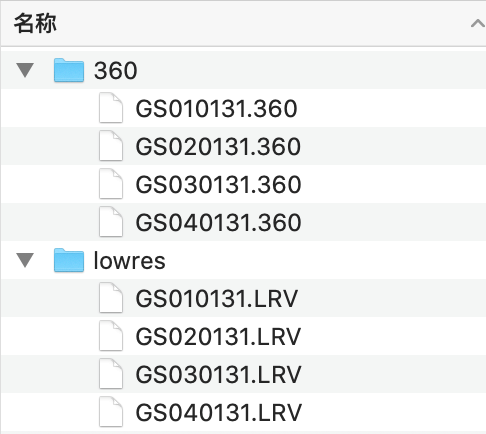
- Each main directory folder must contain two subdirectories:
lowresand360.
lowresfolder: Stores LRV files generated during collection in the area.
360folder: Stores 360 files generated during collection in the area, with names corresponding one-to-one with LRV files. - Note: Unnecessary data (e.g., videos generated during practice operations, abandoned videos from incorrect operations during collection) should not be uploaded.
- After organizing data files for a single area, the file structure should appear as shown below.
Data file naming specification
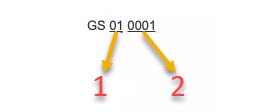
1Named as: Video middle number
Video middle number: The device automatically segments videos every 8GB during recording, so multiple video segments may be generated after collecting one area. Arrange video segments in ascending order based on the middle number (e.g., 01, 02, 03, 04 for four segments).2Named as: Video end number
Video end number: Normally, videos generated within the same area share the same end number.- Filename format:
GS prefix + video middle number starting from 01 consecutively + identical video end number - Special case: If the battery or memory card is replaced during collection, the middle and end numbers of videos captured after resuming will differ from those before the interruption. However, they belong to the same area and should be placed under the same main folder. It is recommended to record the start time for each collection session to facilitate quick data partitioning during organization.
- If filenames do not comply with this specification, unpredictable issues may occur during mapping. Even if mapping succeeds, the data may be unusable.
Upload Data
Click Upload Data and select the corresponding options in the pop-up window. For specific option descriptions, please see below:
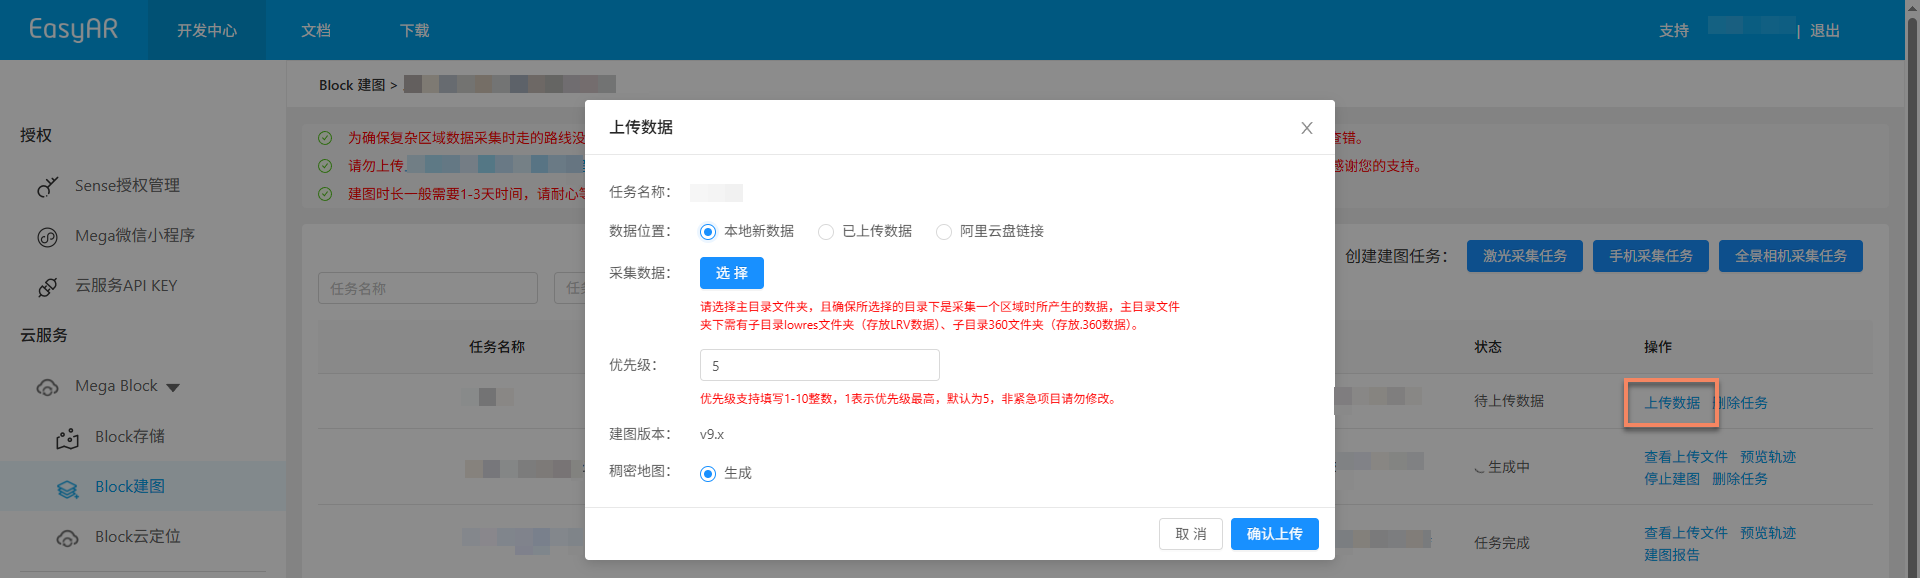
Data Location
Due to the different regions where the mapping projects are located, the available data upload methods are as follows:
China Region 1
Depending on the data source and storage method, you can choose any of the following methods:
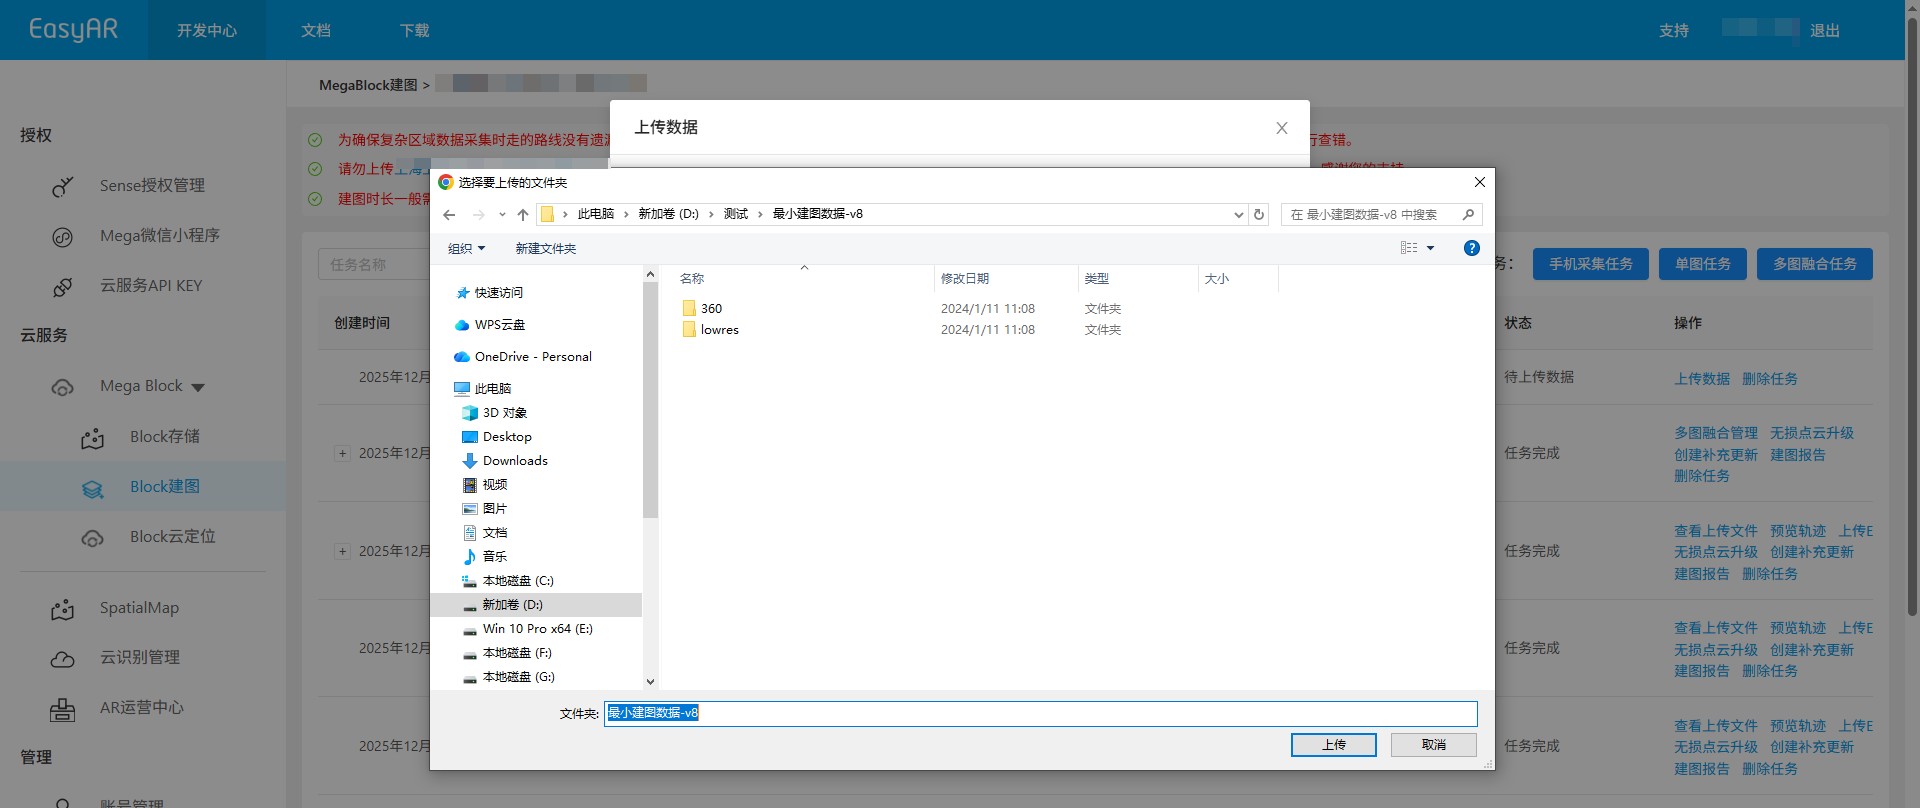
- New local data
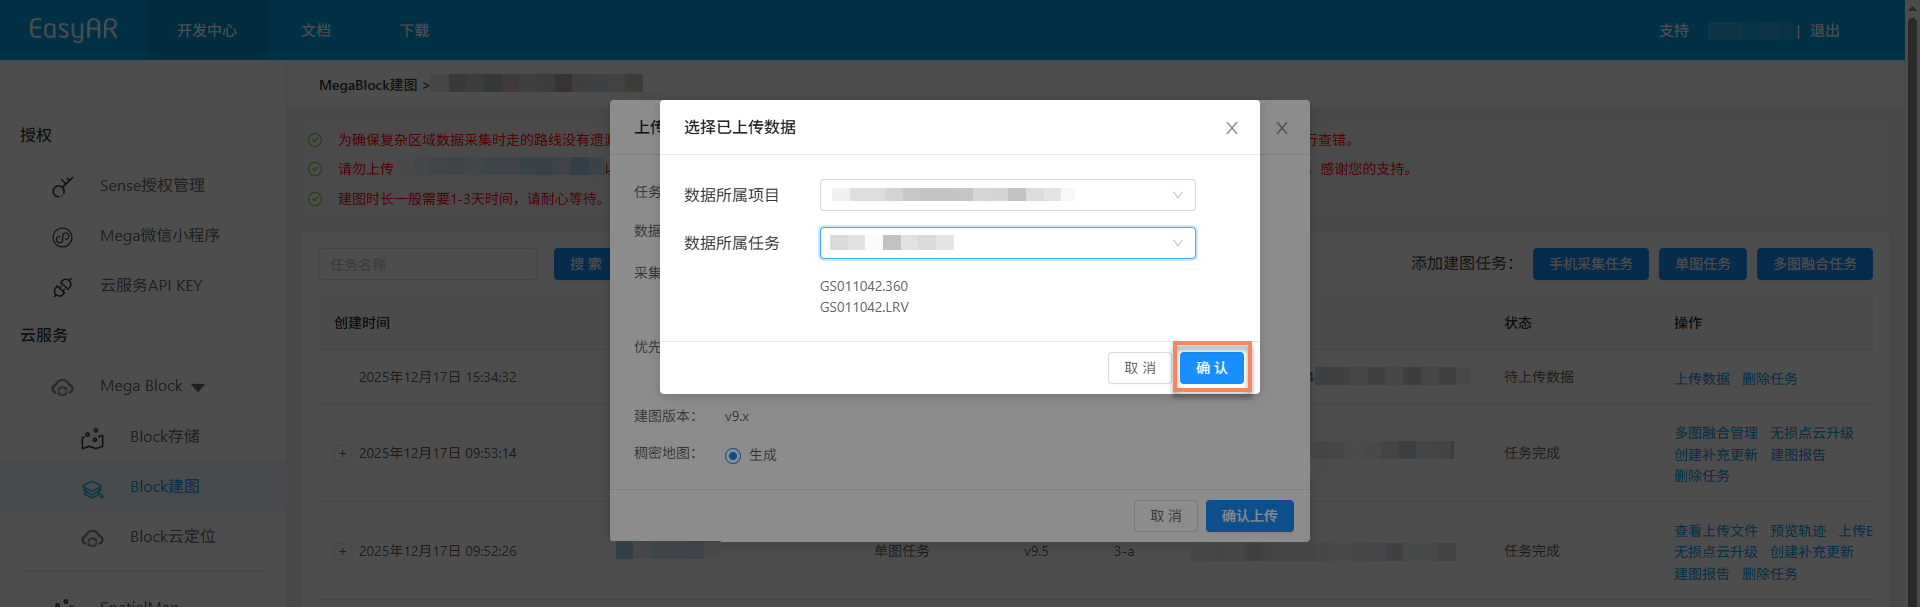
- Mapping with previously uploaded data
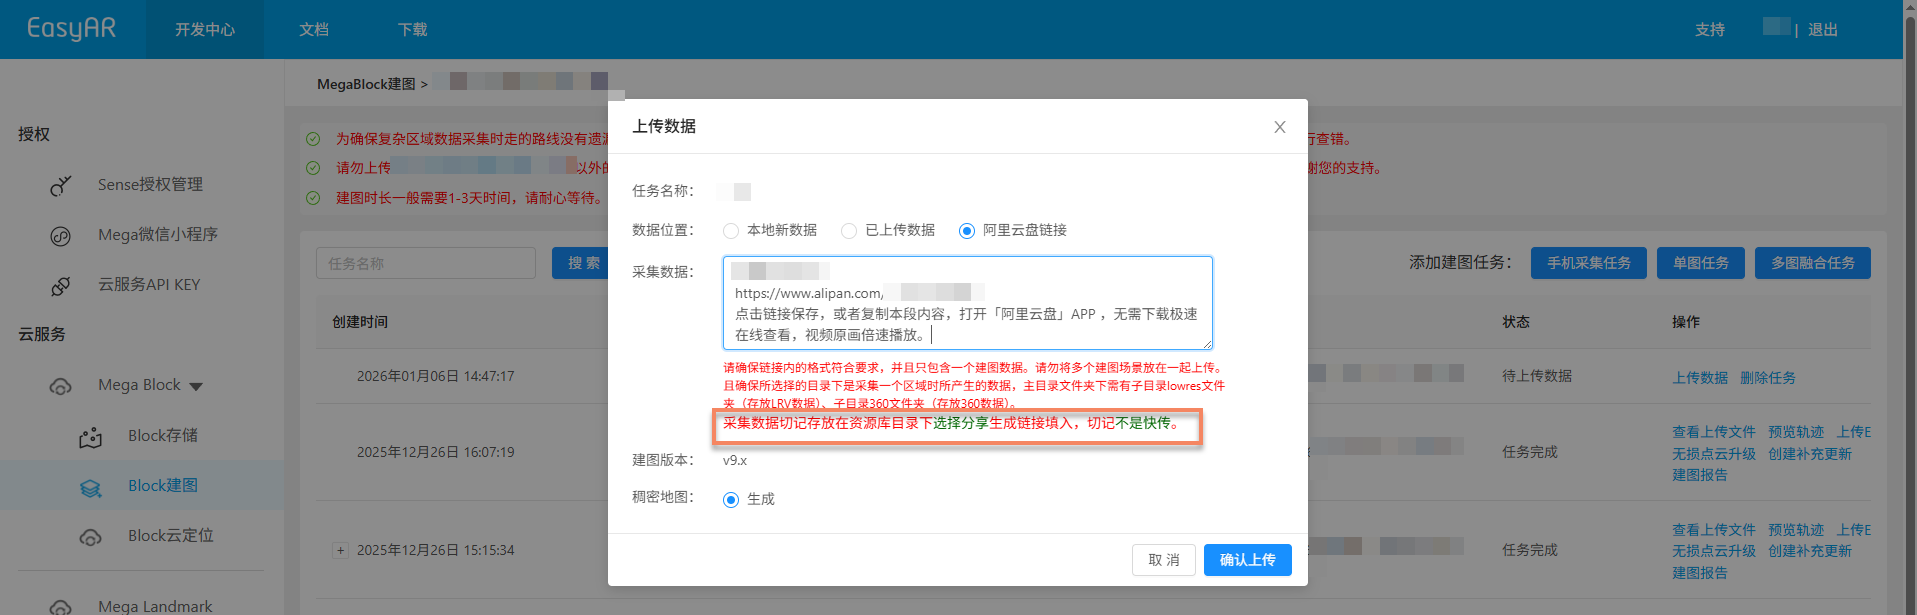
- Alibaba Cloud Drive link
Global
Only the "New local data" upload method is supported.
Collect Data
Click Select, choose the main directory folder of the data (see the specific mapping data file structure below), and then click Upload.
Confirm Upload
- After clicking the
Confirm Uploadbutton, the upload progress and status will be displayed in the list. - During the data upload process, please keep your computer powered on and the network connected. Do not close the browser, refresh the page, or click other menus, otherwise the upload will be interrupted and you will need to start over.
Start Mapping
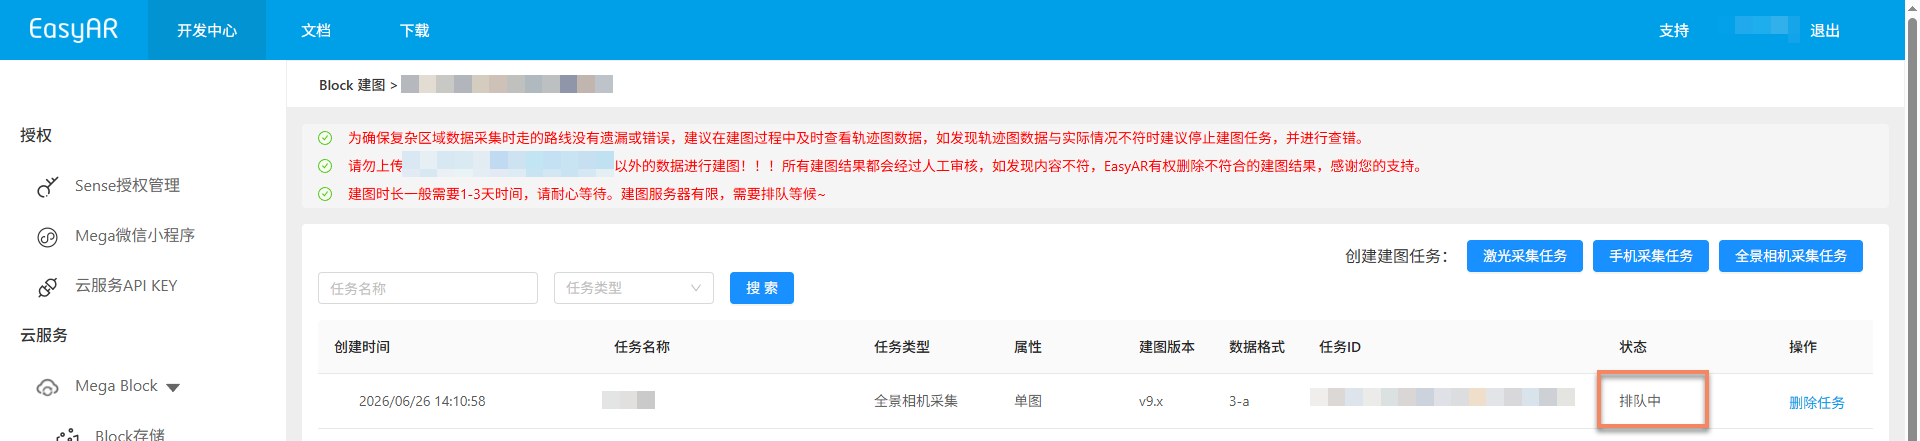
After the data upload is completed, the mapping process will start automatically, and the status will be displayed as In queue or Generating, as shown in the following figure. Please wait patiently for the mapping to complete.
Auxiliary Functions
The following functions can help you better manage and operate mapping tasks and improve work efficiency:
View Uploaded Files
This is used to check whether the uploaded mapping files are complete and avoid mapping failures caused by missing files.
Click the
View Uploaded Filesbutton, and view the list of all uploaded files in the pop-up window to confirm whether the files have been uploaded completely.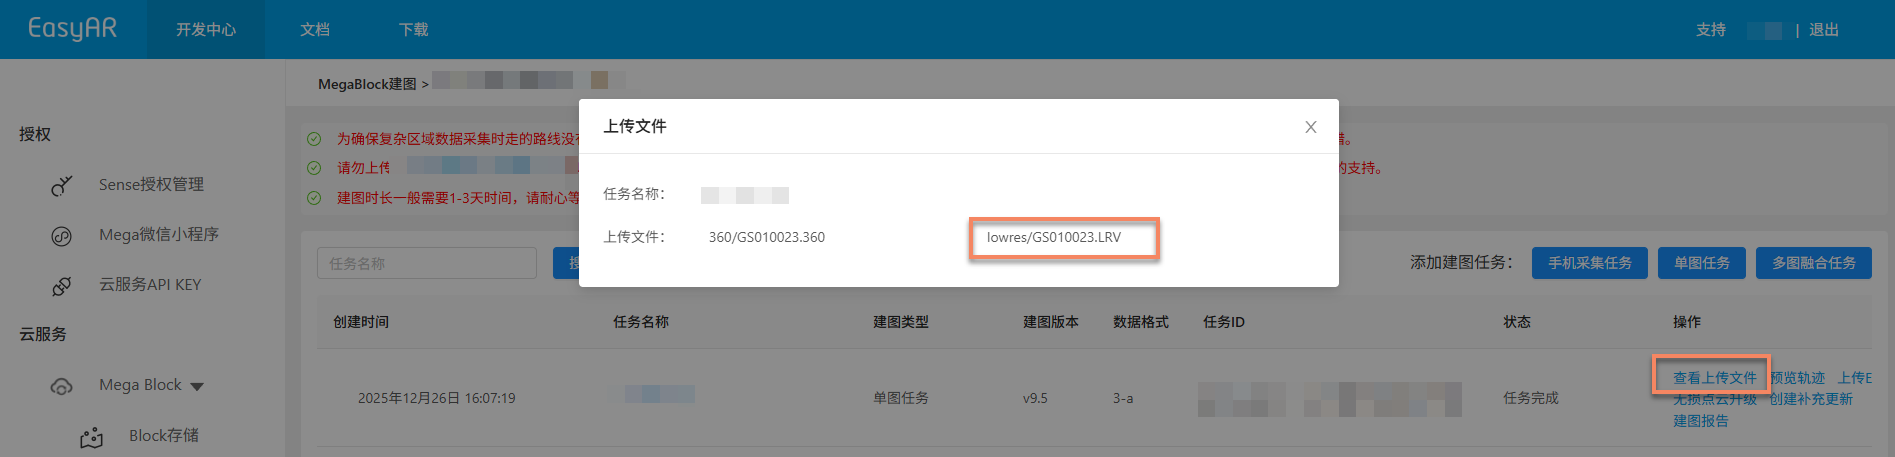
China Region 1: You can click on a specific
LRV fileto preview the video online and check whether the quality of the collected data meets the requirements.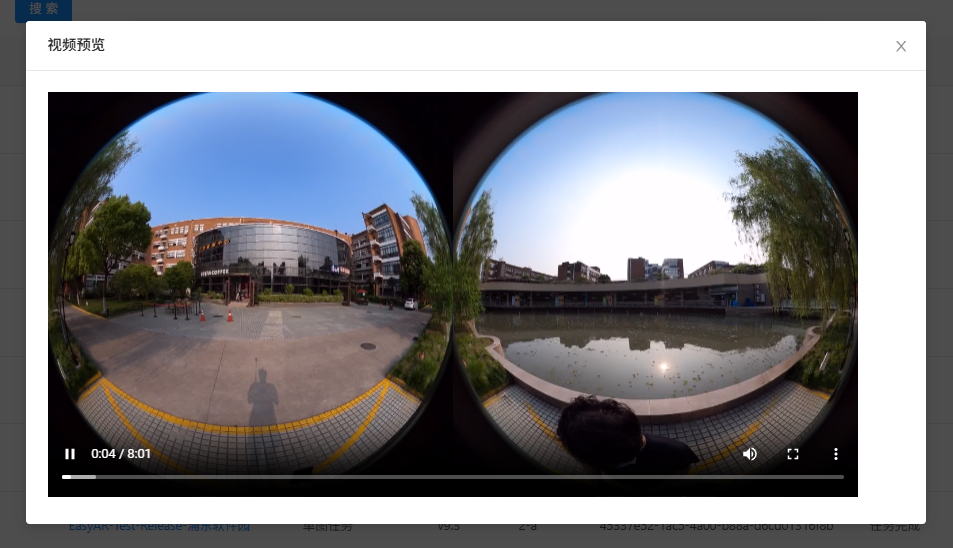
Generate Pre-Trajectory
Before the mapping result is generated, you can click the Generate Pre-Trajectory button to generate a pre-trajectory. By previewing the pre-trajectory map, you can determine whether the actual collected trajectory is consistent with the preset route plan. It is recommended to compare the shapes of the route plan map and the trajectory map to ensure that the collection path is complete and there are no missing areas. If you find that the trajectory does not match the plan, you can immediately stop the mapping, recollect or supplement the data, and then upload it again for mapping.

Preview Pre-Trajectory
After the pre-trajectory is generated, you can click the Preview Pre-Trajectory button to view the trajectory map. If the mapping is completed, you can directly click the Preview Trajectory button to view the final trajectory.

Stop Mapping
Before the mapping task is completed, if you find that the wrong data has been uploaded or the trajectory map data does not match the actual situation, you can click the Stop Mapping button, and click Confirm in the secondary confirmation pop-up window to stop the mapping.
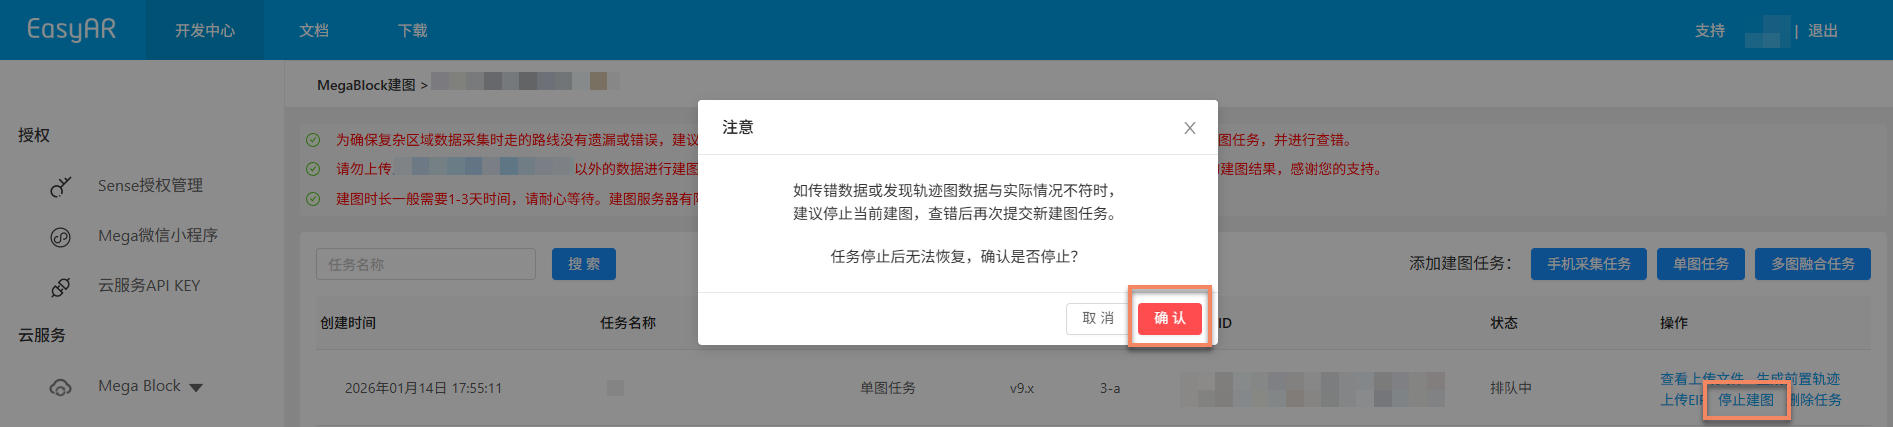
Delete Task
If the current mapping task fails to generate or is no longer needed, you can click the Delete Task button to delete the task. Click Delete in the secondary confirmation pop-up window to complete the deletion operation.
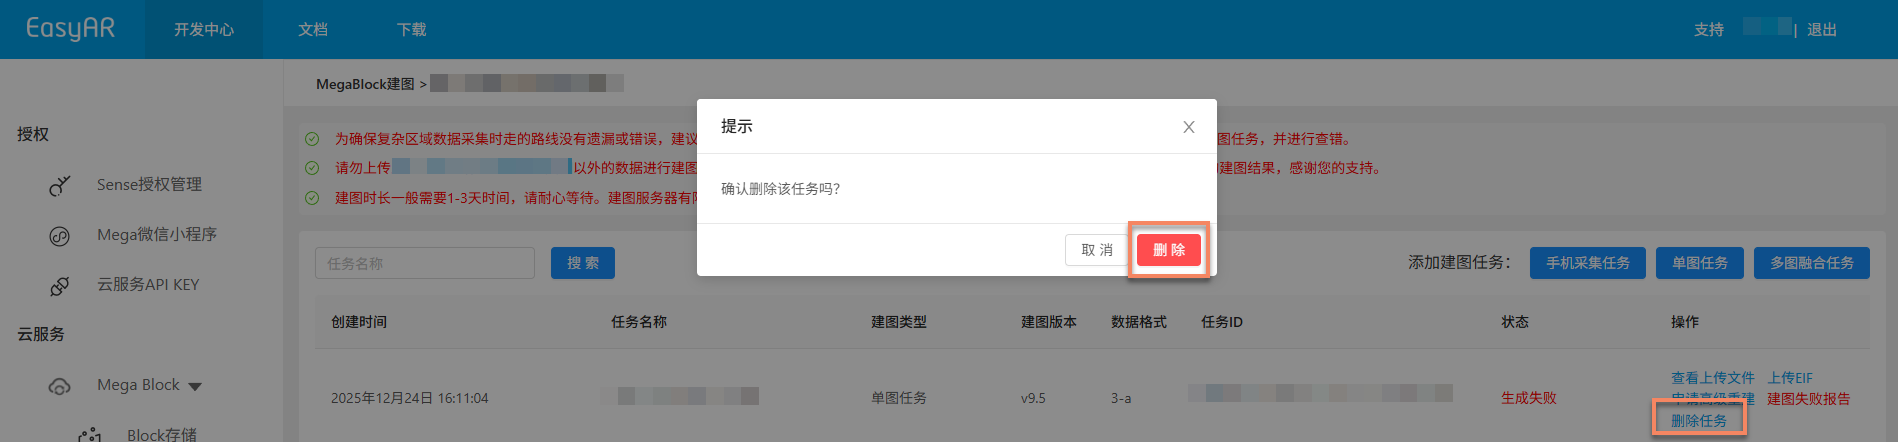
Confirm Mapping Result
After the task enters the mapping process, you can determine whether the mapping task is completed through the Task Status. When the status is displayed as Task completed or Generation failed, it means that the mapping task has ended.
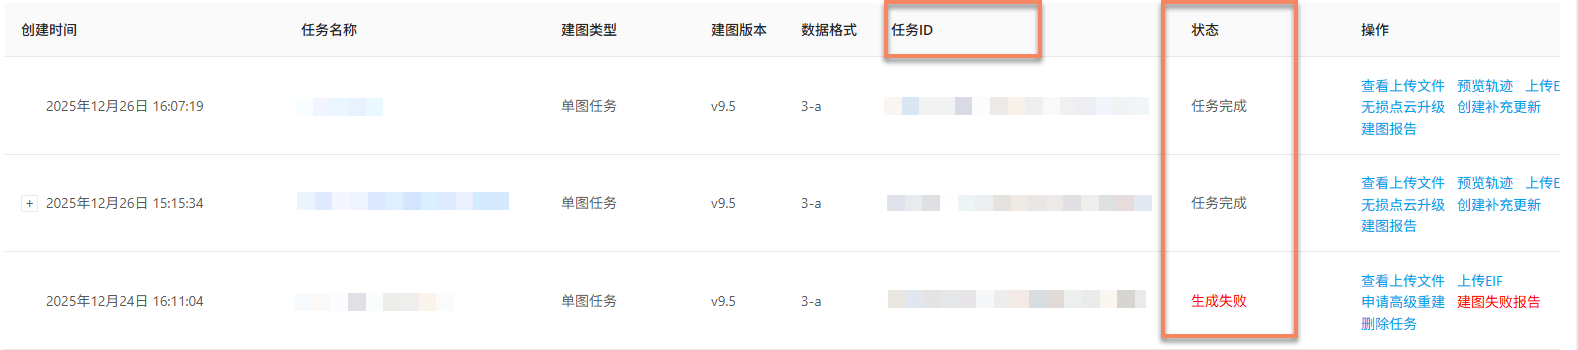
Mapping Success
When the task status is displayed as Task completed, it means that the mapping is successful and the mapping result has been generated. At this time, you can further view the mapping result to confirm whether it meets the expected requirements.
View the mapping result:
- Review the collection route
- View the mapping report
- Preview the spatial model
- View Block information
Mapping Failure
When the task status is displayed as Generation failed, it means that the mapping has failed. It is recommended to troubleshoot the problem in the following ways:
- View the mapping report: View the mapping report and find the solution based on the report information.
- Refer to the troubleshooting guide: Consult the Mapping failure troubleshooting guide to get solutions to common problems.
- Contact technical support: If the above methods do not solve the problem, please contact EasyAR staff and provide the
JobIDin the mapping report to quickly locate the problem.