Recording EIF files in Unity
This article explains how to record EIF files in Unity for simulation runs.
Before starting
- Understand the basic concepts of recording EIF files and using them for simulation runs
- Understand the basic concepts, composition, and workflow of AR Session
- Learn how to access recording components through accessing AR functional components in session
Starting recording
Use FrameRecorder.enabled = true to start recording, for example:
if (Session.State >= ARSession.SessionState.Ready && Session.Assembly.FrameRecorder.OnSome)
{
    var frameRecorder = Session.Assembly.FrameRecorder.Value;
    frameRecorder.enabled = true;
}
Note that it is necessary to first check whether ARAssembly.FrameRecorder exists.
Note
ARAssembly.FrameRecorder cannot be used in a few cases, such as when using FramePlayer.
The default value of FrameRecorder.enabled is false, meaning recording is turned off, and manual configuration in the editor is also invalid.
Recording will start only when FrameRecorder.Status >= FrameRecorder.RecorderStatus.Ready during session runtime.
If FrameRecorder.Status < FrameRecorder.RecorderStatus.Ready, you can use the OnReady event to wait for recording to be ready.
Session.GetComponent<FrameRecorder>().OnReady.AddListener(() => {
    // Can start recording
});
You can use the OnRecording event to confirm successful startup:
frameRecorder.OnRecording.AddListener((file) =>
{
    Debug.Log($"Recording started: {file}");
});
There is no event triggered for startup failure, but you can confirm by checking whether FrameRecorder.Status is Error.
Important
The runtime effect when playing EIF in the scene is related to the device used for recording and the frame source selected on that device at the time. Therefore, when recording EIF files, it is recommended to use the same or similar device as the target device to ensure consistent playback effect. Also, pay special attention to whether motion tracking is enabled in the recording scene. If motion tracking is not enabled during recording, it cannot be enabled during playback, and AR features that rely on motion tracking (such as dense spatial mapping, Mega, etc.) cannot work consistently with the device.
Stopping recording
Use FrameRecorder.enabled = false to stop recording, for example:
frameRecorder.enabled = false;
This operation will immediately stop recording and block until the file write is complete.
Important
Must call stop recording, otherwise the recording file write is incomplete, which may cause some features or the entire file to be unusable:
File storage and export
You can use the OnRecording event to get the full real path of the recording file:
frameRecorder.OnRecording.AddListener((file) =>
{
    Debug.Log($"Recording started: {file}");
});
By default, the recording file is stored in the application's persistent data path, which can be accessed via Application.persistentDataPath.
You can modify the storage path of the recording file via FrameRecorder.Configuration.FilePath. This path must be set before recording starts and can only take effect after AutoFilePath is turned off. The directory must be created in advance.
Important
Must ensure that the storage directory for the recording file exists and the application has write permission, otherwise recording will fail to start.
For example, the following code shows how to store the recording file in a custom directory and generate a filename based on the FrameSource type used by the session and the current time:
if (!Directory.Exists(SavePath))
{
    Directory.CreateDirectory(SavePath);
}
var frameRecorder = Session.Assembly.FrameRecorder.Value;
frameRecorder.Configuration.AutoFilePath = false;
frameRecorder.Configuration.FilePath.Type = WritablePathType.Absolute;
frameRecorder.Configuration.FilePath.FolderPath = SavePath;
frameRecorder.Configuration.FilePath.FileName = ARSessionFactory.DefaultName(Session.Assembly.FrameSource.GetType()).Replace(" ", "") + DateTime.Now.ToString("_yyyy-MM-dd_HH-mm-ss.fff");

frameRecorder.enabled = true;
Alternatively, in the editor, select AR Session (EasyAR), and after unchecking Auto File Path in the Inspector window for Frame Recorder, configure:
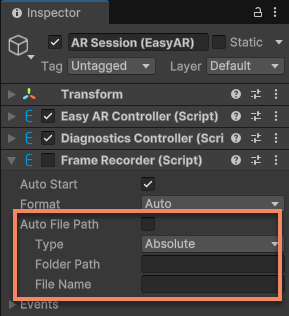
Tip
Through FrameRecorder.RecordingConfiguration.FilePath, you can modify the storage directory and filename (without extension) of the file. The file extension will be added automatically based on the recording format.
If the file is stored in the application's persistent data path or other private paths, you can export the file to a computer in the following ways:
- On Android, you can connect to a computer via USB and use
adb pullor other methods to export the file to the computer. The file is usually under/sdcarad/Android/data/<app package name>/files. - On iOS, you can export the file to a computer via Xcode's Devices window, or access the application's private directory via iTunes or Finder file sharing.
- Use code to store the file in a public directory, such as Android's download directory or iOS's photo album.
Note
For iOS applications, if you want to access the application's private directory via iTunes or Finder file sharing, you need to add the UIFileSharingEnabled key to the XCode project's Info.plist before packaging and set the value to YES:
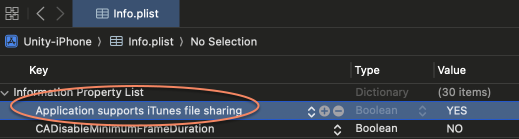
The text displayed after adding may differ from the added string, which is normal.
Changing recording format
Change the recording format via FrameRecorder.Configuration.Format, which must be set before recording starts.
For example, the following code shows how to force the recording format to H264:
frameRecorder.Configuration.Format = FrameRecorder.InternalFormat.H264;
Alternatively, in the editor, select AR Session (EasyAR), and modify Format in the Inspector window:
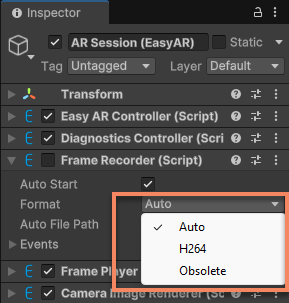
Note
H264 is unavailable on some devices (e.g., Windows). Generally, Auto is recommended, which automatically selects the appropriate format based on the device.
Note
On XREAL, recording data using the Obsolete format cannot be used for simulation runs; it is used solely for reporting issues.
You can use RecordingFormat to view the current recording format.
Auto-recording at session start
Set AutoStart to true before starting the session to start recording when the session starts, for example:
frameRecorder.AutoStart = true;
Alternatively, in the editor, select AR Session (EasyAR), and check Auto Start for Frame Recorder in the Inspector window:
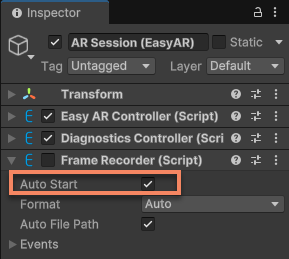
Note
Modifying FrameRecorder.enabled in the editor is invalid.
Data usable by Mega
When using Mega, there are special requirements for EIF and related file content. Older versions of the Unity plugin did not integrate these features, and data recorded with those versions cannot be used for Mega.
The following situations recorded data can be used for Mega:
- Data recorded using Unity plugin 4000 or higher
- Data recorded using Mega Toolbox
- If the data is recorded in Obsolete format, such as file
x.eif, thex.eif.jsonfile must exist in the same directory to be usable
The following situations recorded data cannot be used for Mega:
- Data recorded using Unity plugin 4.6 or lower
- Using native EasyAR Sense and not adding the same content as in the Unity plugin
Additionally, although Mega can work without motion tracking, the runtime effect is different. It is recommended to enable motion tracking when recording EIF files to ensure the playback effect meets most usage scenarios.