WeChat Mini Program Mega Plugin Sample Project Description
This article details the usage methods, implementation approaches, and precautions for each feature demonstrated in the sample project.
Before you begin
- Be able to create and upload annotations using the Unity editor, and record annotation names and their IDs.
- Be able to create 3D content aligned with the real world using the Unity editor.
- Be able to fully run the sample project.
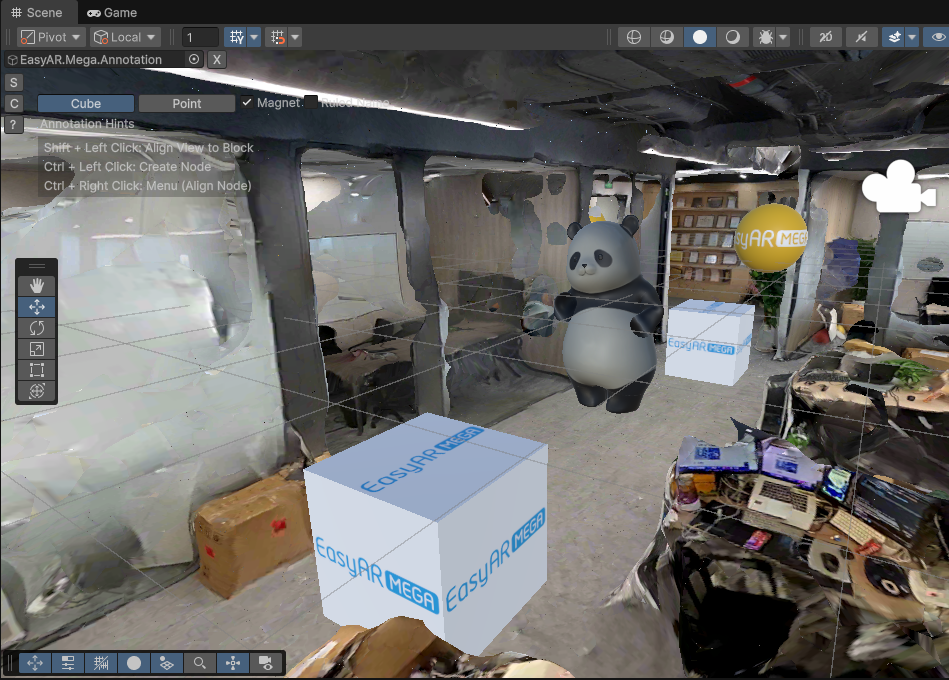
How to display models at annotation positions
Precisely position and upload annotations in the Unity editor, recording annotation names and their IDs
Add gltf model resources
Add model resources in
sampleAssetswithinminiprogram/components/sample-easyar-mega/index.ts.const sampleAssets = { your_model_name: { assetId: "your_model_asset_id", type: "gltf", src: "url/model.glb", options: {} } }Load the added model resources
Load the model in the
loadAsset()function withinminiprogram/components/sample-easyar-mega/index.ts.async loadAsset() { try { await scene.assets.loadAsset(sampleAssets.your_model_name); } catch (err) { console.error(`Failed to load assets: ${err.message}`); } }Configure annotations to be replaced
Configure annotations to be replaced in
miniprogram/components/sample-data/annotation-metadata.ts. Separate multiple annotations with commas.export const AnnotationMetaData: Record<string, any> = { "aaaaaaaa-bbbb-cccc-dddd-123456789012": { assetId: "panda", scale: "0.5 0.5 0.5" }, "aaaaaaaa-bbbb-cccc-dddd-123456789013": { assetId: "your_model_asset_id", scale: "1 1 1" } };Replace annotations and load models
Use the "factory method"
scene.createElement(xrFrameSystem.XRGLTF, options)in the EMA loading callback to create model nodes.Parameters:
xrFrameSystem.XRGLTF: Specifies creating a GLTF model element.options: Initialization configuration items corresponding to component properties.
Key properties in code:
"model": Required. Points to the loaded resource ID (asset-id)."anim-autoplay": Optional. Specifies the animation name to play automatically after loading."scale": Optional.assetInfo.scaleor "1 1 1".name: Required. Annotation name.
Caution
Note the distinction between string and non-string property keys. Fill them exactly as in the example.
Mount the model under the annotation node using
xrNode.addChild(child).To ensure consistent rendering of GLTF models across platforms, rotate the loaded model 180 degrees around the Y-axis after loading.
if (assetInfo && assetInfo.assetId && assetInfo.assetId.trim().length > 0) {
    model = scene.createElement(
        xrFrameSystem.XRGLTF,
        {
            /** Corresponds to the assetId from the previous step */
            "model": assetInfo.assetId,
            /** Model animation to play can be specified here */
            "anim-autoplay": assetInfo.animation ? assetInfo.animation : "",
            "scale": assetInfo.scale ? assetInfo.scale : "1 1 1",
            name: emaName
        }
    );
    xrNode.addChild(model);
    /**
     * Due to differences in GLTF loader behavior, to ensure model orientation in xr-frame
     * matches Unity rendering results exactly, it is necessary to rotate the loaded model
     * 180 degrees around the Y-axis.
     */
    let modelTransform = model.getComponent(xrFrameSystem.Transform);
    let currentRotation = modelTransform.quaternion.clone();
    let targetRotation = currentRotation.multiply(new xrFrameSystem.Quaternion().setValue(0, 1, 0, 0));
    modelTransform.quaternion.set(targetRotation);
}
Run on a real device
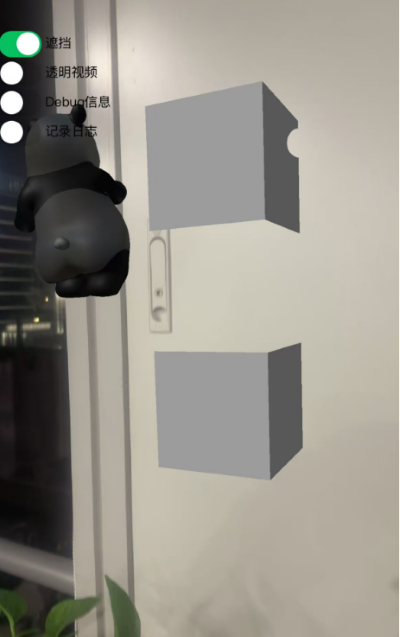
The result of running on a real device is as follows. Compare with the position in the Unity editor from Step 1:
Turn on the left transparent video button. A cube with transparent video material appears at the world coordinate origin (position
(0, 0, 0)).Note
The origin position may be randomly located anywhere in space. Use annotations to place occlusion models where desired. For details, see Creating and uploading annotations using the Unity editor.
Turn on the left occlusion button. A panda model and stacked cubes appear at the world coordinate origin (position
(0, 0, 0)). The middle cube has occlusion material, while a static panda model with occlusion material is on the other side.Note
The origin position may be randomly located anywhere in space. Use annotations to place occlusion models where desired. For details, see Creating and uploading annotations using the Unity editor.
How to play transparent videos at annotation positions
Load video texture assets of type
video-texture.async loadAsset() { const videoTexture = { assetId: "fireball", type: "video-texture", // Video resource URL src: "url/video-resource.mp4", options: { autoPlay: true, loop: true, } }; try { // Load video-texture type resource await scene.assets.loadAsset(videoTexture); } catch (err) { console.error(`Failed to load video texture: ${err.message}`); } }Modify EMA loading callback
Use
scene.createElement(xrFrameSystem.XRMesh,options)in the EMA loading callback to create a simple geometry and assign theeasyar-video-tsbsmaterial, modifying theuniformtou_baseColorMap:video-{$assetId}.Parameters:
xrFrameSystem.XRMesh: Specifies the element type as a basic geometry.options: Initialization configuration items corresponding to component properties.
Key properties in code:
"geometry": "cube": Uses xr-frame's built-in cube geometry data."material": "easyar-video-tsbs": Specifies a predefined material (inferred from the name to be a special material supporting video textures)."uniforms": "u_baseColorMap:video-{$assetId}":
Caution
Note the distinction between string and non-string property keys. Fill in exactly as in the example.
This is dynamic binding of material parameters.
It maps the video resource (texture) named
video-{$assetId}to the material's base color map.Effect: This creates a cube with a surface playing video.
model = scene.createElement(xrFrameSystem.XRMesh, {
    geometry: "cube",
    material: "easyar-video-tsbs",
    uniforms: "u_baseColorMap:video-fireball",
});
xrNode.addChild(model);
Note
When using
video-texture, if the console showswx.createVideoDecoder with type: 'wemedia' is deprecatedwarning, please ignore it.Confirmed with the WeChat official team that this warning does not affect usage.
Real device running
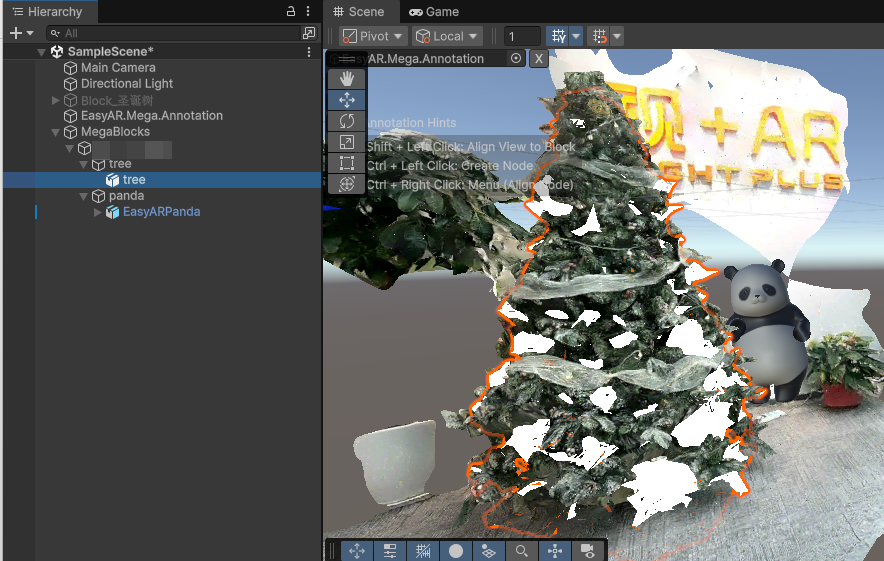
How to place occlusion models aligned with the space
Place accurately the model for occlusion and upload the annotation.
Load the GLTF for occlusion in the xr-frame mini program.
Load model resources via
scene.assets.loadAsset()(requires manual unloading).const sampleAssets = { occlusion1: { assetId: "occlusion1", type: "gltf", src: "url/occlusion1.glb", options: {} } } async loadAsset() { if (!scene) {console.error("Empty scene"); return;} try { await scene.assets.loadAsset(sampleAssets.occlusion1); } catch (err) { console.error(`Failed to load assets: ${err.message}`); } }Load the model at runtime in the EMA loading callback and assign the occlusion material
Use
scene.createElement(xrFrameSystem.XRGLTF,options)in the EMA loading callback to create the model node.Parameters:
xrFrameSystem.XRGLTF: Specifies the element type as GLTF model.options: Initial configuration items corresponding to component properties.
Key properties in code:
"model": Required, points to the loaded resource ID (asset-id)."scale": OptionalassetInfo.scaleor "1 1 1".name: Required, annotation name.
Caution
Note the distinction between string and non-string property keys. Fill in exactly as in the example.
Mount the model under the annotation node via
xrNode.addChild(child).To ensure consistent GLTF model loading across platforms, rotate the loaded model 180 degrees around the Y-axis in place.
Finally, modify the GLTF model material using
model.getComponent(xrFrameSystem.GLTF).meshes.forEach((m: any) => {m.setData({ neverCull: true, material: occlusionMaterial });}.Note
Loading, registration, deregistration, and unloading of
easyar-occulusionmaterial are controlled by the AR Session.Use the model at annotation position for occlusion:
if (...) {
    model = scene.createElement(
        xrFrameSystem.XRGLTF,
        {
            "model": assetInfo.assetId,
            "scale": assetInfo.scale ? assetInfo.scale : "1 1 1",
            name: emaName
        }
    );
    /**
    * Due to different GLTF loader behaviors, to ensure model orientation on xr-frame
    * exactly matches Unity rendering results, sometimes a 180-degree rotation around Y-axis is needed
    */
    let modelTransform = model.getComponent(xrFrameSystem.Transform);
    let currentRotation = modelTransform.quaternion.clone();
    let targetRotation = currentRotation.multiply(new xrFrameSystem.Quaternion().setValue(0, 1, 0, 0));
    modelTransform.quaternion.set(targetRotation);
    //Note: must modify material after changing Transform
    if (assetInfo.assetId == 'occlusion1') {
        //Get occlusion material provided by mega plugin
        let occlusionMaterial = scene.assets.getAsset("material", "easyar-occlusion");
        //Modify occlusion material
        model.getComponent(xrFrameSystem.GLTF).meshes.forEach((m: any) => {
            m.setData({ neverCull: true, material: occlusionMaterial });
        });
    }
}
Run on real device
Can be compared with simulation results in Unity Editor.