Block data component
This manual details the control functions and usage provided by the Block data component in the Unity editor.
Note
Starting from version 2.13, you should use the block editor tool for Unity application development.
Version note
Starting from custom map version 9.4, the Block Mesh data format has been upgraded from eme to gltfx.
All features in this document that only support the new format are marked as [>=9.4]. If your data version is lower than 9.4, the related UI controls will not take effect.
All features in this document that only support the old format are marked as [<9.4]. If your data version is 9.4 or above, the related UI controls will not take effect.
Initial state
The initial state of the component refers to the state of the Block data component when the tool is just created, no service is selected and no data is loaded.
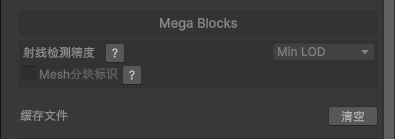
| number | control name | control type | function description |
|---|---|---|---|
| clear | clear cache file | button | clear all locally cached Block data. |
Selected service state
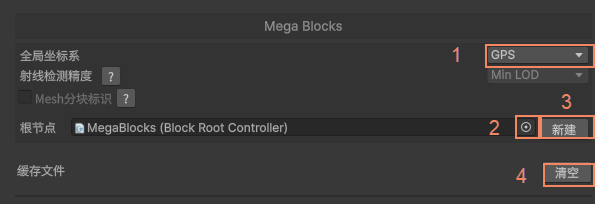
The selected service state of the component refers to the state of the Block data component after a service (Mega Block localization service, Mega Block storage service, etc.) is selected in the tool.
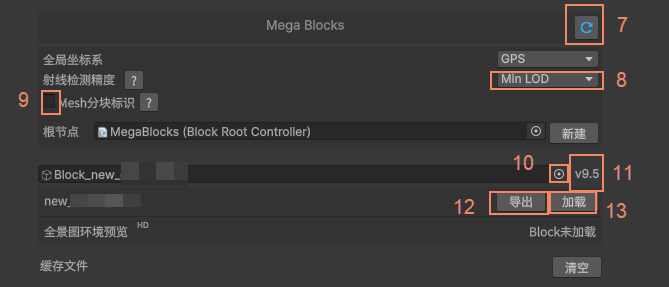
| number | control name | control type | function description |
|---|---|---|---|
| 7 | refresh Block list | button | refresh the information on the current Block tool and synchronize with cloud service data. |
| 8 | select ray detection precision | dropdown menu | [>=9.4]set the model precision of the Block's Mesh when used for ray detection. lowering the precision will speed up LOD loading in the editor, but sacrifice editing precision: Min LOD (default): use the simplest model for ray detection. None: do not load collision model, do not perform ray detection. Match LOD: load collision model according to LOD. |
| 9 | Mesh tile indicator | toggle | [>=9.4]When checked, Mesh tile indicators appear in the scene. |
| 10 | select Block node | button | Select a node with the component in the scene as the Block node. |
| 11 | version | text | The version of this Block. |
| 12 | export Block | button | [>=9.4]Open the export menu. [<9.4]Select the export directory and export model files in obj format. |
| 13 | load Block | button | Load the Mesh in the scene. |
Export menu[>=9.4]
The new export menu lets you change export settings, including export levels, whether to export textures, export file format, and other options.
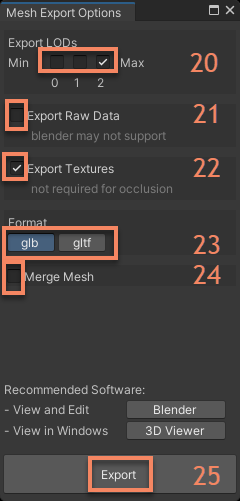
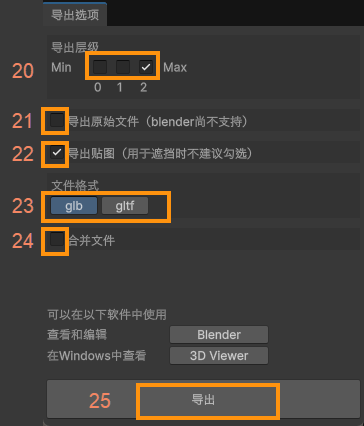
| number | control name | control type | function description |
|---|---|---|---|
| 20 | level selection | checkbox | Select the LOD precision of the model to export. Multiple selections are allowed when merge file is not checked; only one can be selected when merge file is checked. |
| 21 | export raw file | toggle | Export in the original gltfx format. |
| 22 | export textures | toggle | Whether to export model textures. |
| 23 | file format | radio button | Switch whether the exported single-file format is glb or gltf. |
| 24 | merge file | toggle | Merge all tiles at this level during export. |
| 25 | export | button | Select the export path and start exporting. |
Export progress
The export progress bar appears after clicking 12 export Block[<9.4] or 25 export and is used to view the current export status.
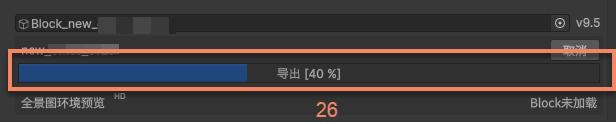
| number | control name | control type | function description |
|---|---|---|---|
| 26 | export progress | progress bar | The export progress bar displayed during export after selecting a path. Export completes when it reaches 100%. |
Loading progress[<9.4]
The progress bar appears after clicking 13 load Blcok and is used to view the current download and/or loading status.
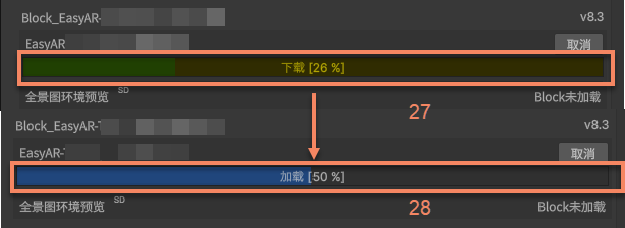
| number | control name | control type | function description |
|---|---|---|---|
| 27 | download progress | progress bar | The progress bar for downloading Block data. Loading is triggered after it reaches 100%. |
| 28 | loading progress | progress bar | The progress bar for loading Block data. Loading completes when it reaches 100%. |
Loaded model state
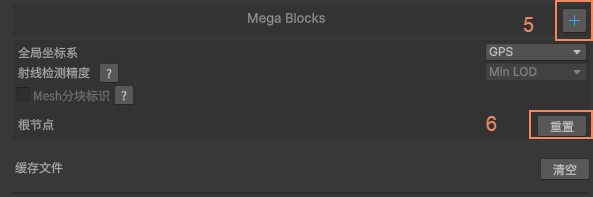
The loaded model state of the component refers to the state of the Block data component after at least one Block Mesh has been loaded by clicking 13 load Block.
| number | control name | control type | function description |
|---|---|---|---|
| 5 | load local Block | button | Load a local Block with the .eme or .gltfx suffix. |
| 6 | reset | button | Restore the current Block component to the initial state. |
Panorama marker not loaded state
This state means the component has loaded at least one Block Mesh but has not loaded panorama markers.
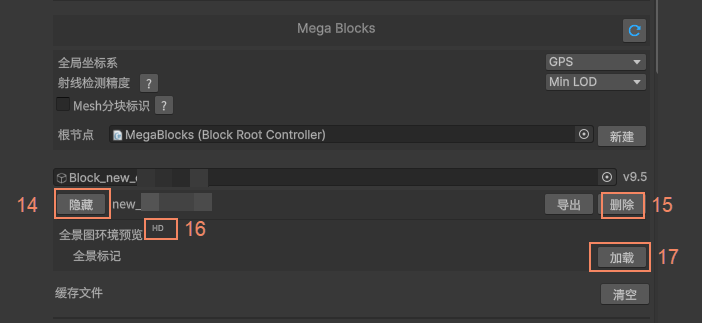
| number | control name | control type | function description |
|---|---|---|---|
| 14 | hide/show | button | Hide/show the Block Mesh in the scene. |
| 15 | delete Block | button | Delete the currently loaded Block. |
| 16 | load panorama marker | button | Load yellow spherical indicators representing panorama markers in the current scene. |
Panorama marker loaded state
This state means the component has loaded at least one Block Mesh and has loaded panorama markers by clicking 17 load panorama marker.
In this state, you can show, hide, and delete the panorama indicators associated with this Block and load the panorama window.
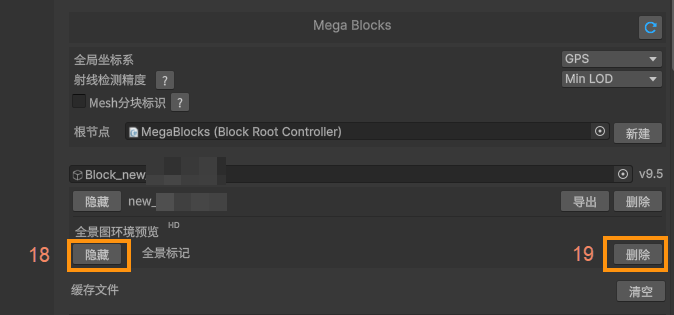
| number | control name | control type | function description |
|---|---|---|---|
| 18 | hide/show | button | Hide/show the panorama marker spheres in the scene. |
| 19 | delete panorama marker | button | Delete the currently loaded panorama marker. |
Controls in the scene
There are controls created by the Block data component in the Unity editor SceneView.
LOD tile indicator[>=9.4]
This indicator is displayed after 9 Mesh tile indicator is enabled in tools of version 9.4 and above. It identifies LOD tiles, levels, and states.
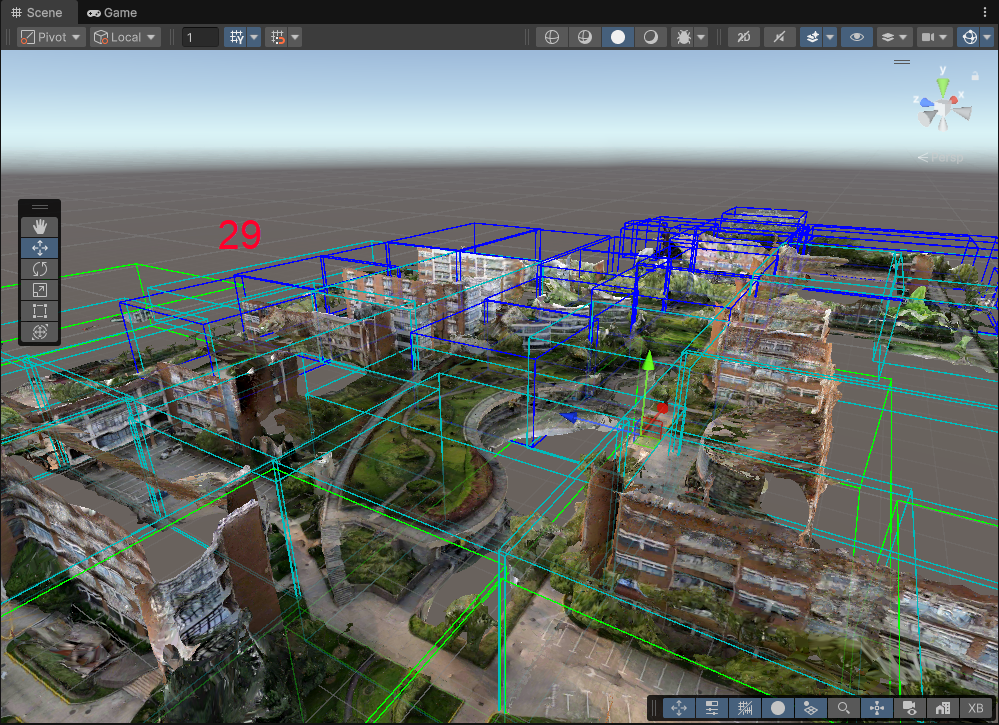
| number | control name | control type | function description |
|---|---|---|---|
| 29 | tile LOD indicator | Gizmo | Identifies tiles. After LOD is loaded, different colors are displayed according to level and state: blue: Min level, lowest precision. light blue: Medium level, medium precision. green: Max level, highest precision. red: An exception occurred during loading (retrying). yellow: Loading. |
LOD loading indicator[>=9.4]
The LOD loading indicator is a rotating UI control on the interface and appears only during LOD switching.
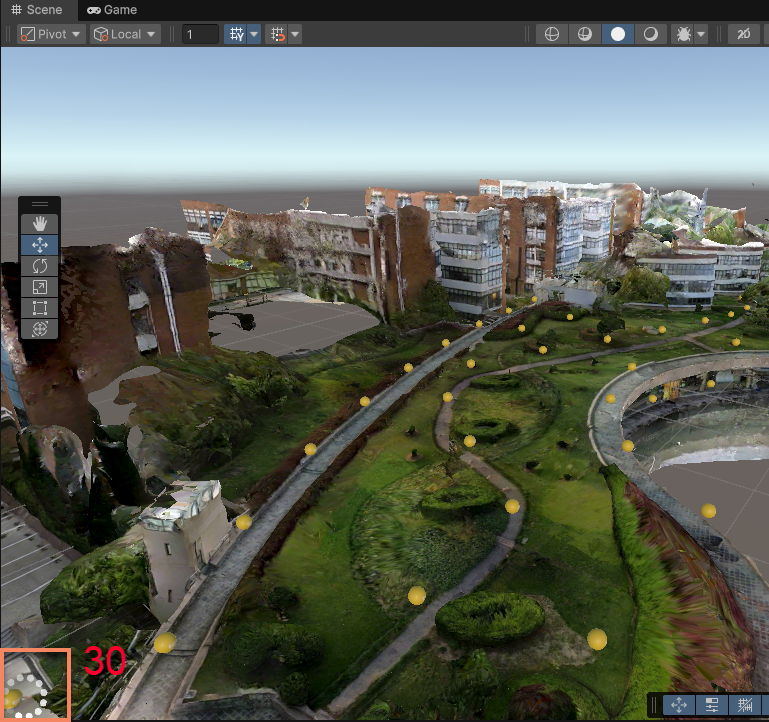
| number | control name | control type | function description |
|---|---|---|---|
| 30 | LOD loading indicator | UI | Indicates that LOD loading is in progress when it appears. |
Panorama marker
A panorama marker is a marker that appears in the scene after clicking 17 load panorama marker after Block Mesh is loaded. It identifies positions where panorama preview is available.
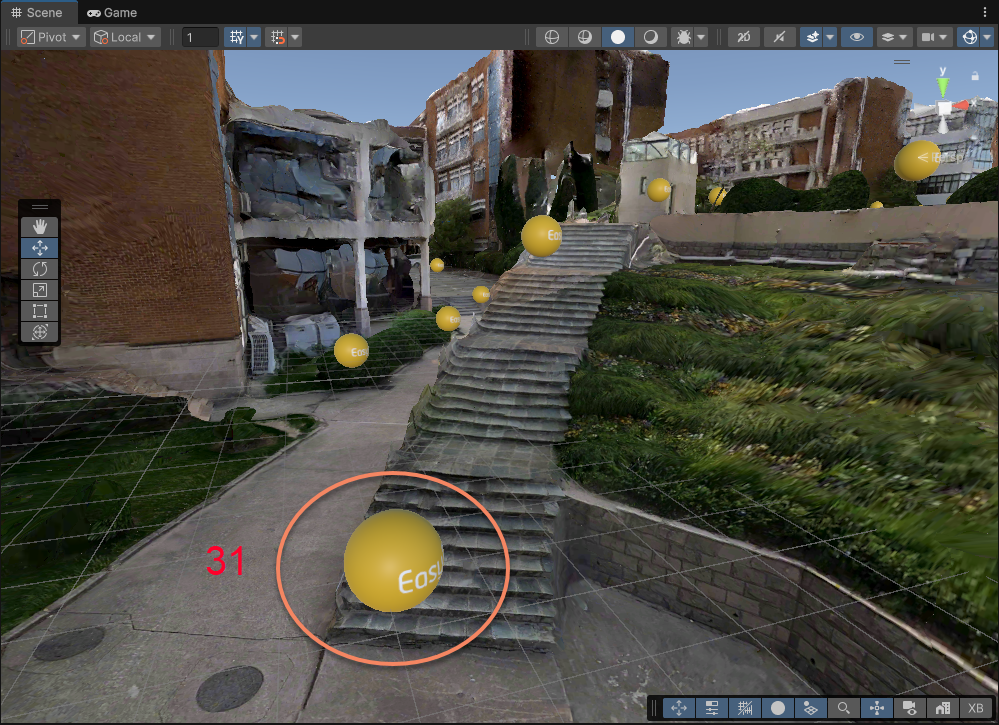
| number | control name | control type | function description |
|---|---|---|---|
| 31 | panorama marker | interactive object | A yellow spherical indicator showing that panorama preview is available at this position. |
Panorama window
The panorama window appears after clicking 31 panorama marker after Block Mesh and panorama indicators are loaded. You can preview panoramas and edit content in it.
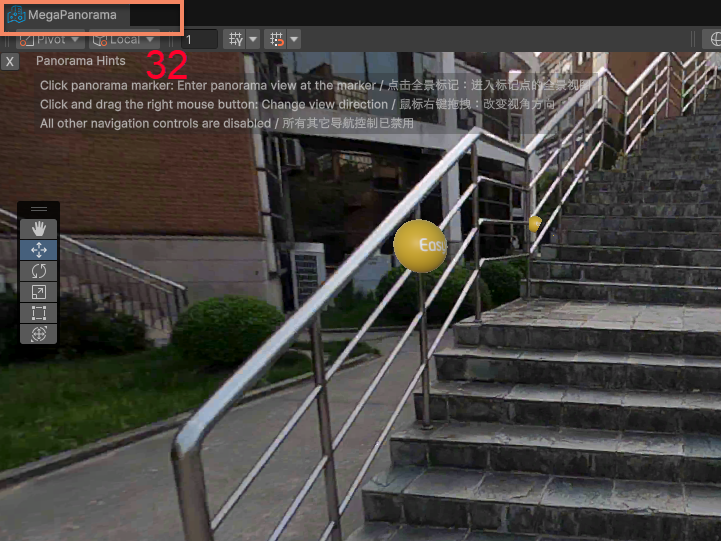
| number | control name | control type | function description |
|---|---|---|---|
| 32 | panorama window | SceneView | A window where panorama preview can be performed. |