Quick Start with EasyAR Mega Unity Development Using Examples
This tutorial introduces how to configure and run the EasyAR Mega Unity examples to quickly start EasyAR Mega development.
Before You Start
Before reading this article, make sure you have completed the following:
- Have a valid cloud localization library.
- Install Unity (2021.3.30 LTS or a later version). It is recommended to use the latest version of Unity 2022.3 or Unity 6.3.
- Import the
com.easyar.sense-**.tgzandcom.easyar.mega-**.tgzpackages according to the method in Enable Mega.
Note
This tutorial is only applicable to Unity plugins with a version >= 4003. If you happen to have downloaded an older version but are still reading the getting-started documentation, you need to download the latest version of the plugin first.
Example usage in six steps
The following will introduce how to configure and run the core example of EasyAR Mega, MegaBlock_Basic, in six steps.
Step one: Import sample
Note
If all samples were imported via **All Samples**, this step can be skipped.
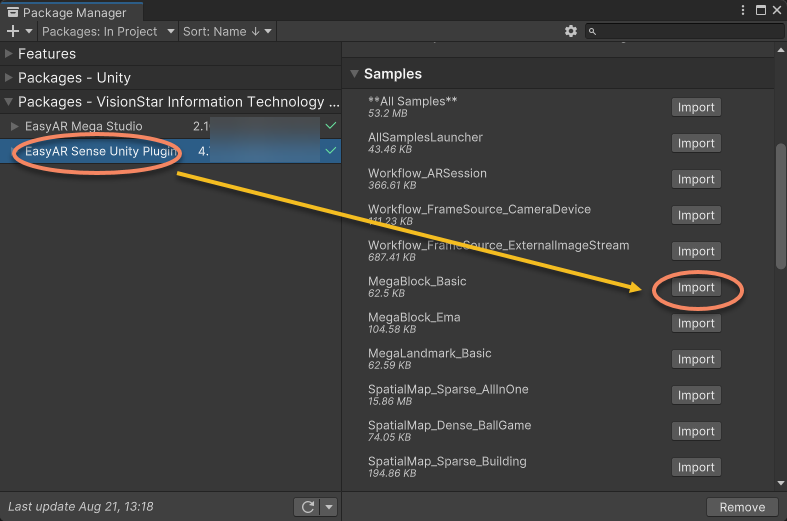
- Open Package Manager using menu
Window>Package Manager, selectEasyAR Sense Unity Plugin. Expand all samples in the Samples section on the right. - Select a sample (e.g.
MegaBlock_Basic), click Import.
Note
- This tutorial cannot be directly applied to headset devices, but understanding the workflow through mobile development is required before developing for headsets.
- If you previously imported samples from older SDK versions, delete old samples before re-importing after upgrading the SDK.
Step 2: Configure the SDK and Mega Cloud Localization Service
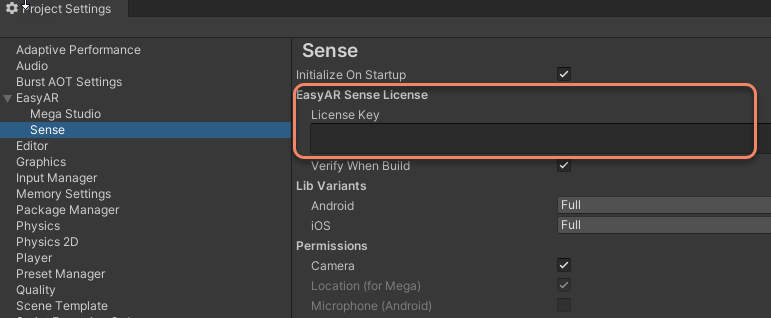
Select
EasyAR>Sense>Configurationfrom the menu bar;

Paste your License Key in the opened Project Settings panel;
Tip
The EasyAR Sense License can be created from the EasyAR Development Center. For first-time use, you can create it as follows:
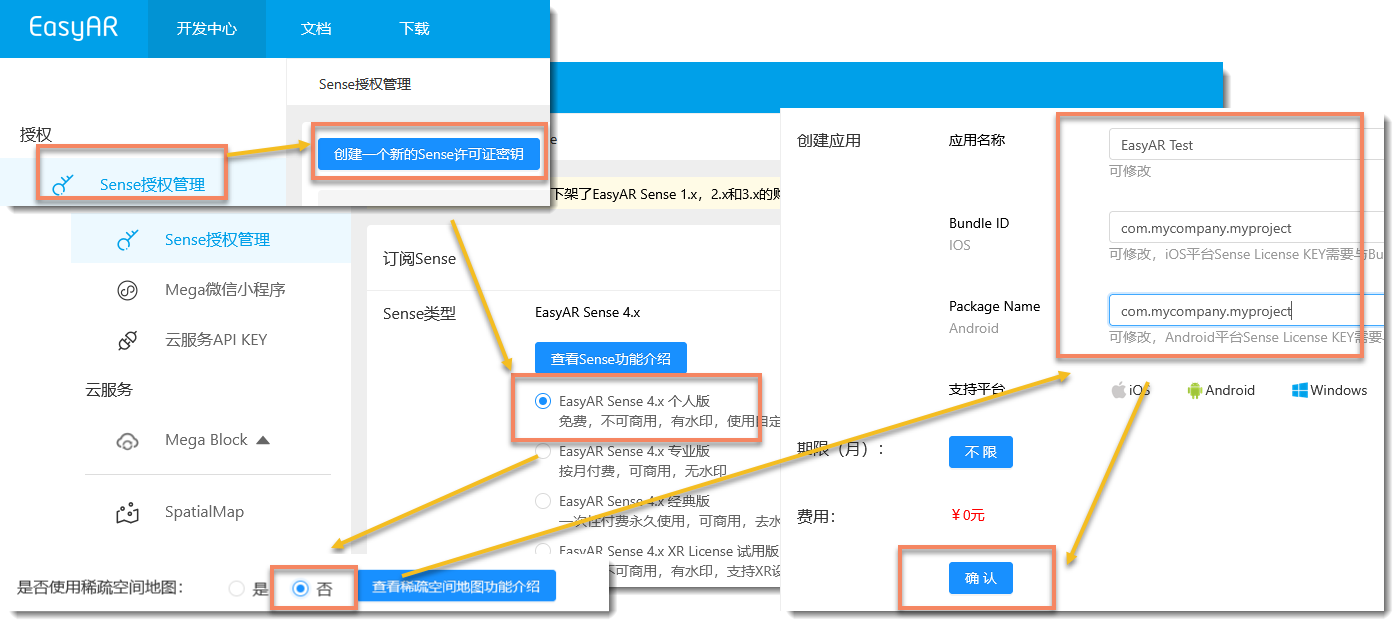
- Create an
EasyAR Sense 4.x Personal Edition - Select
Nofor Sparse Spatial Map - Fill in the application name at will, and fill in
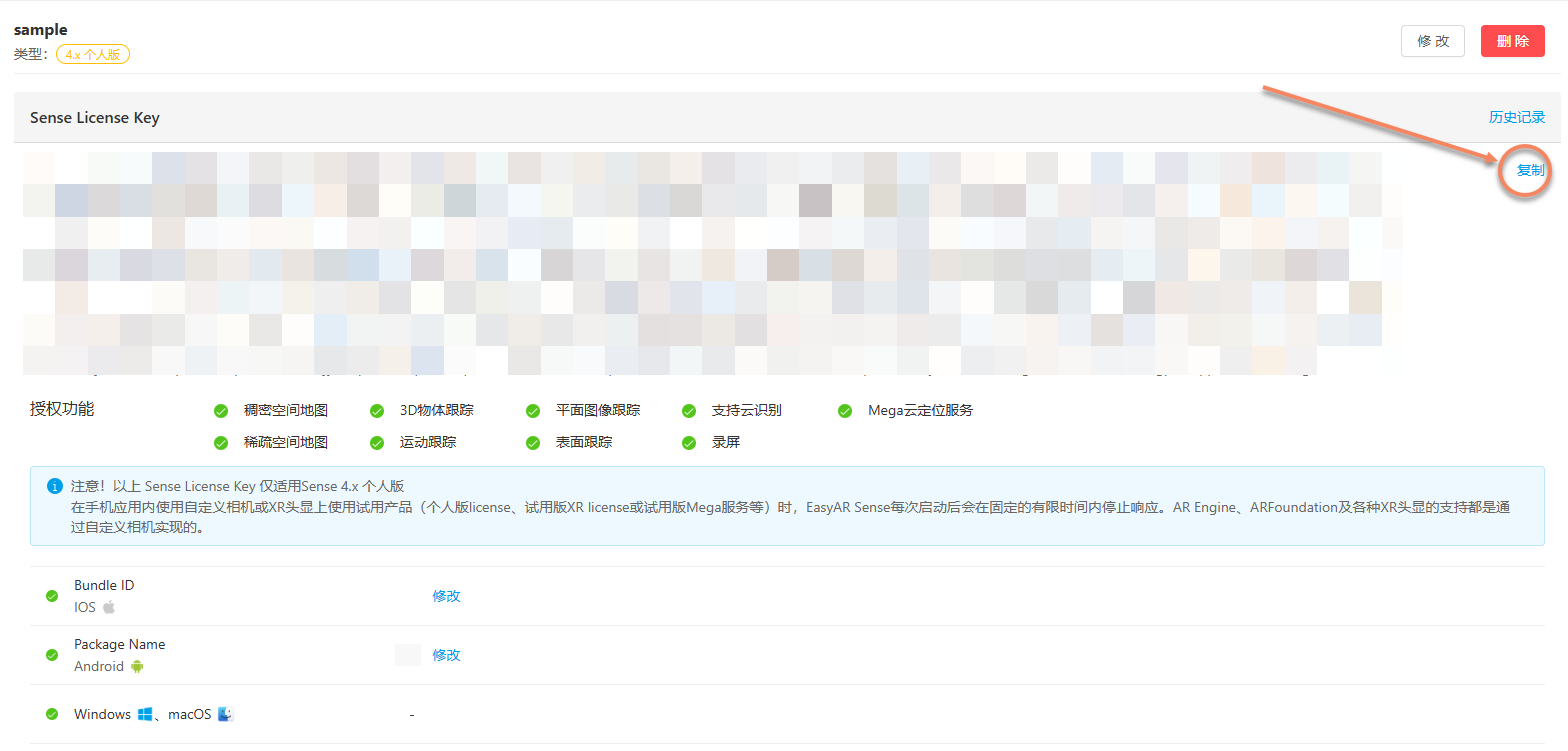
com.mycompany.myprojectfor the Bundle ID and Package Name - Select the newly created License, and click the copy button on the right after entering
Note
The Bundle ID and Package Name can be changed later, but the number of changes is limited. If you have a specific application package name, you can also fill in your own package name.
There is no limit on the number of personal editions created, and other types can be created as needed when they can be used officially.
- Create an
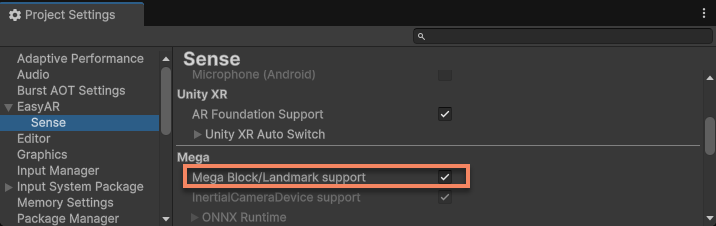
Check and turn on the
Mega > Mega Block/Landmark supportoption in the Project Settings panel;
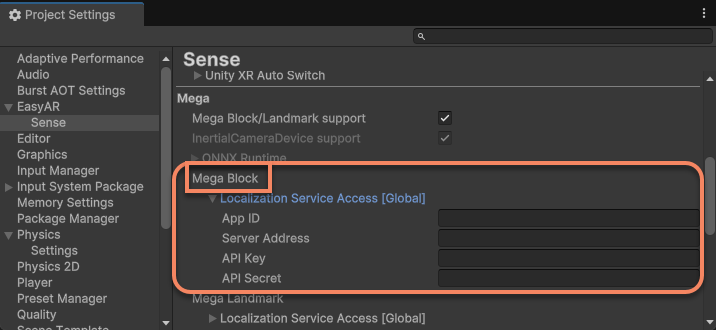
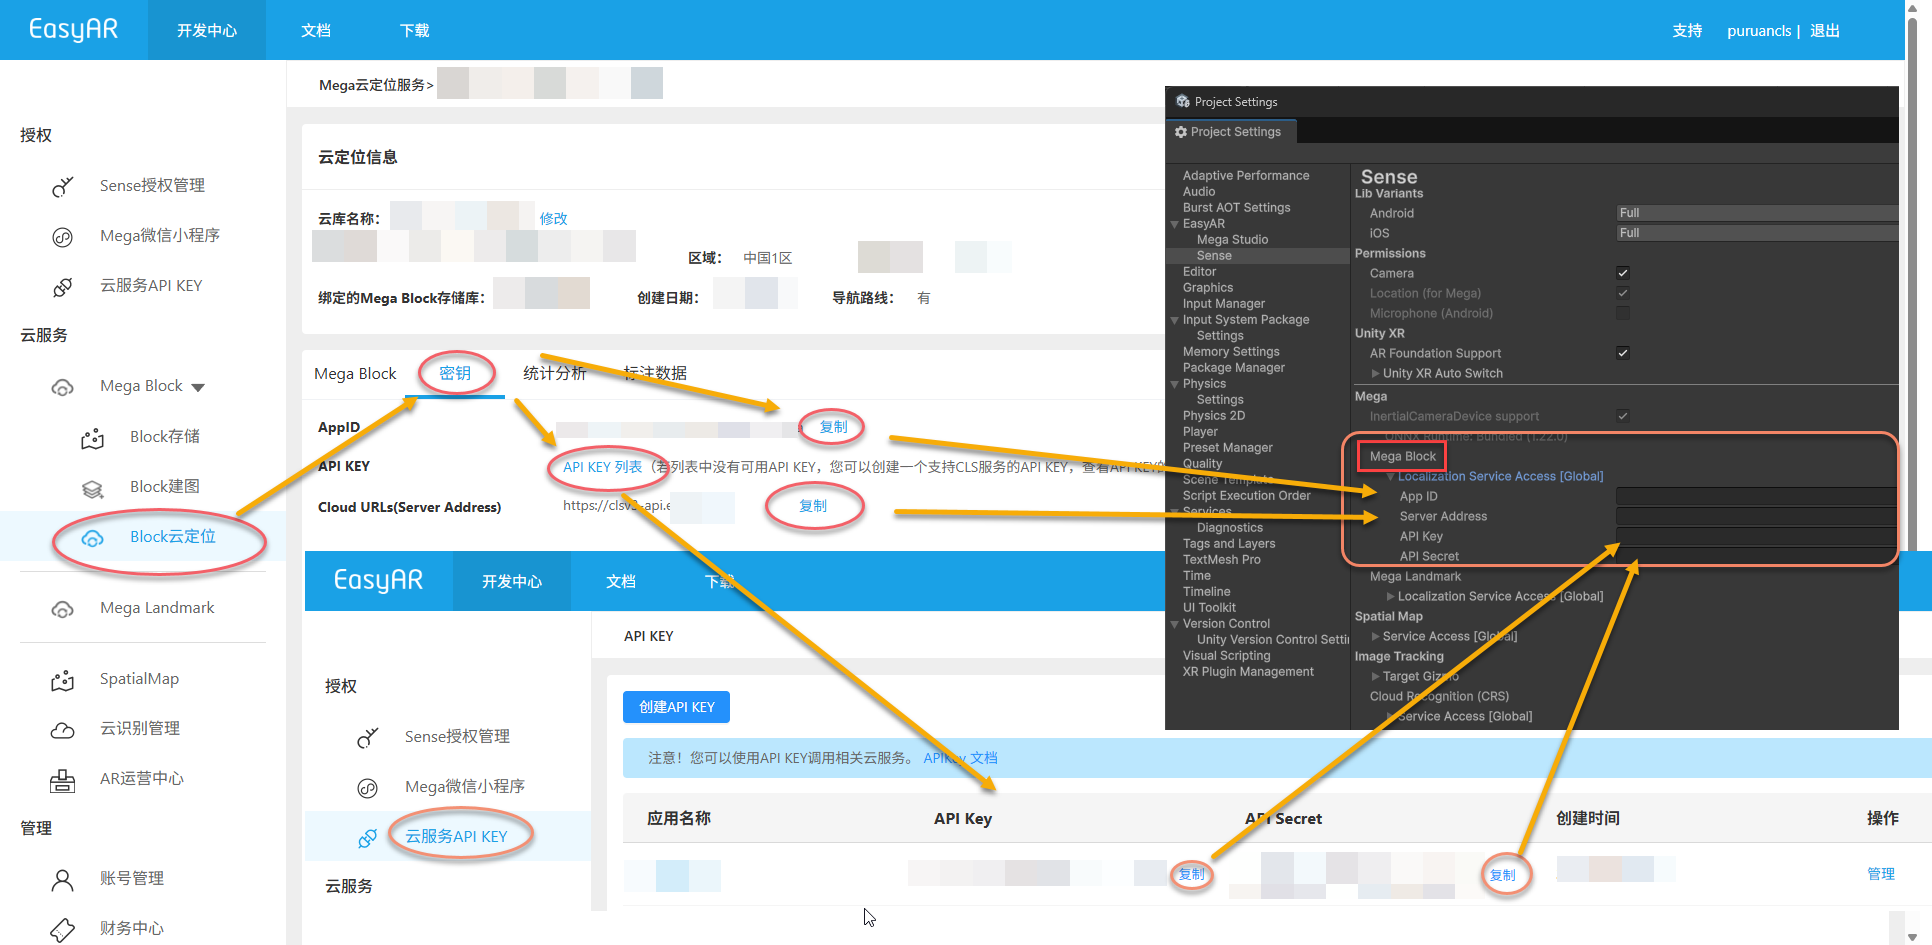
Configure the information of your Mega cloud localization library to the
Mega Blockitem in the Project Settings panel;
Tip
The Mega cloud localization library configuration can be obtained from the EasyAR Development Center.
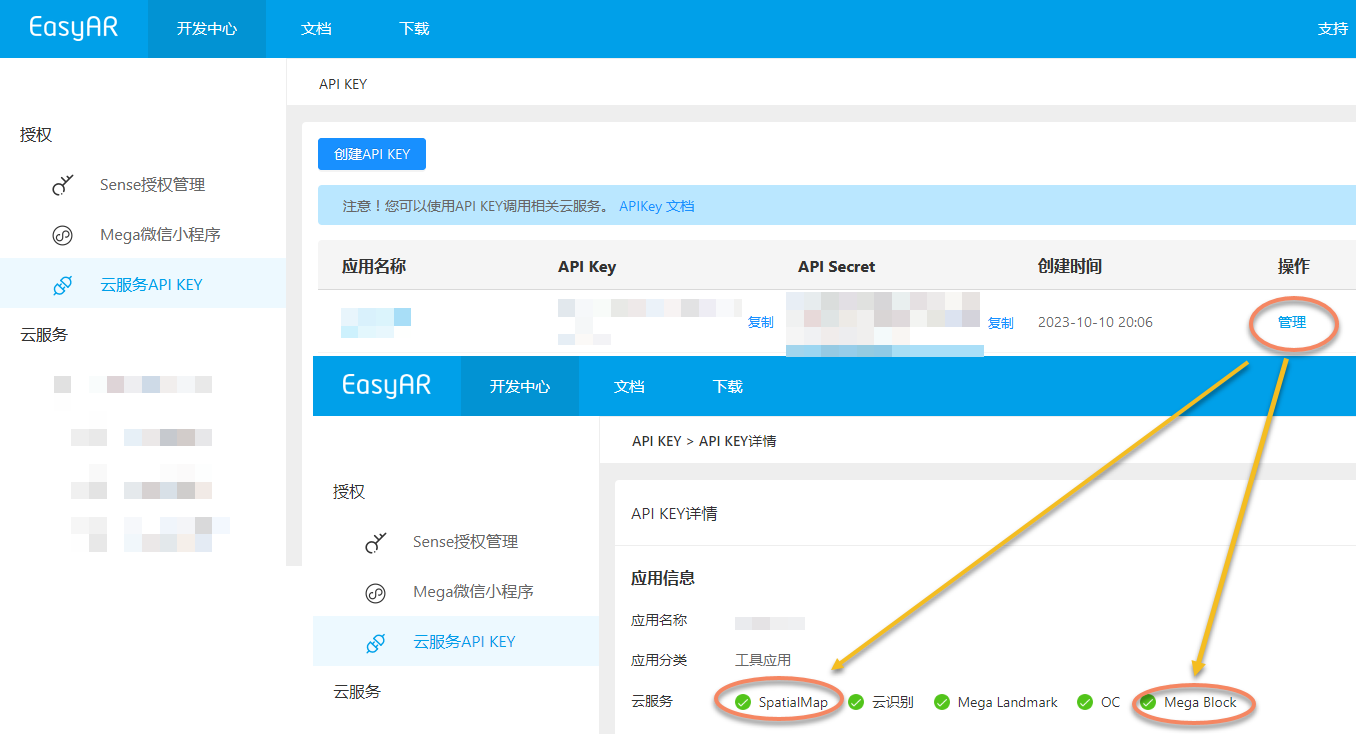
Ensure that yourAPI Keyhas the permissions forMega BlockandSpatialMap. If not, you need to make changes or recreate it.
If you can't find the localization library, you need to configure the localization library correctly first, and check again that the cloud localization library is valid.
Step 3: Configure Mega Block
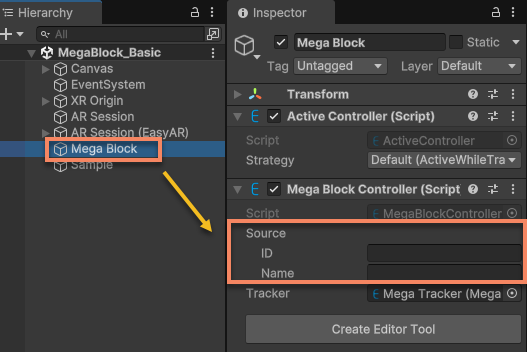
Configure Mega Block;
Select
Mega Blockand fill in the Block's ID and Name.
Tip
The Block ID and Name can be obtained from the corresponding positioning library in the EasyAR Development Center.
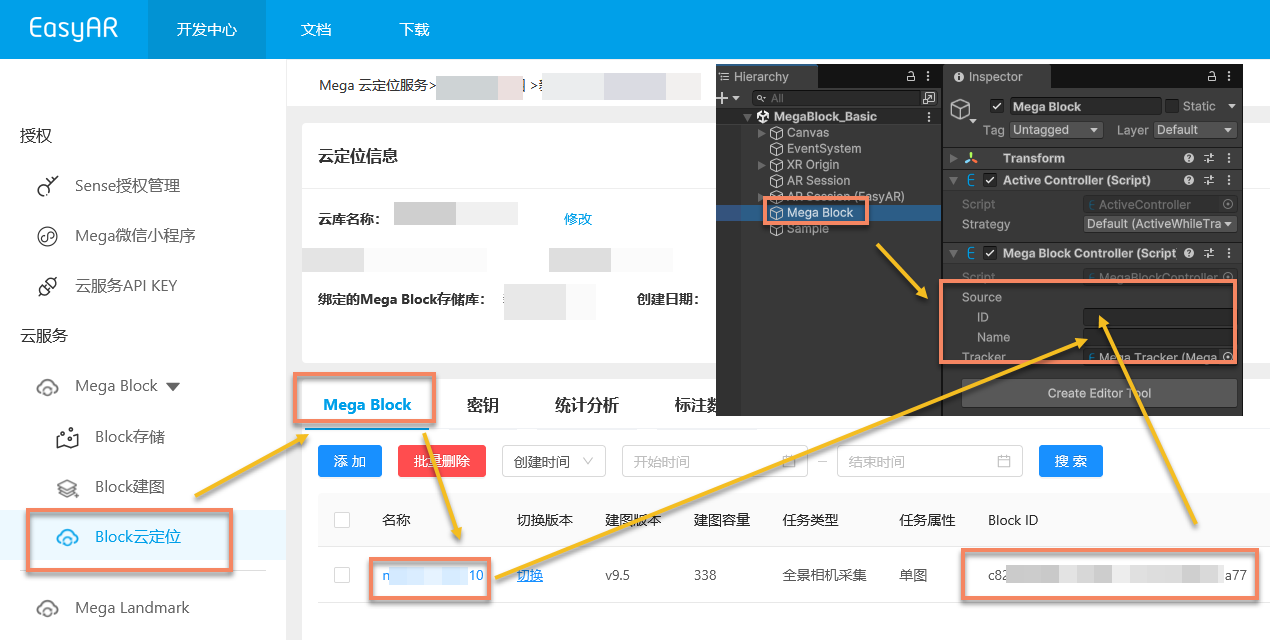
If there is no Block data in the positioning library, you need to add the required Block to the positioning library and check again that the cloud positioning library is valid.
Step 4: Place 3D Content
Select
Mega Blockand create an editor tool;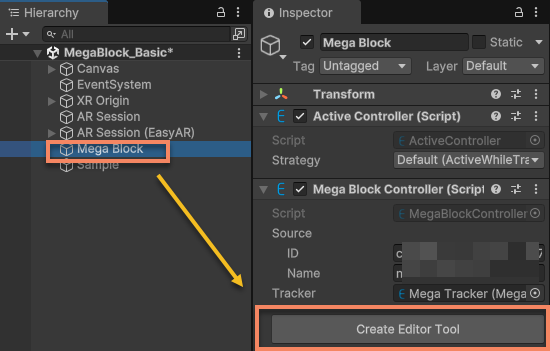
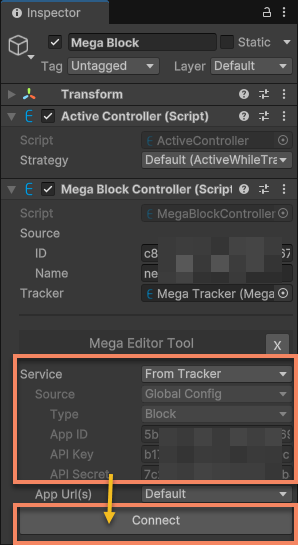
Check the service information and connect to the service;
Tip
If there are no other changes, the service information should be the same as that filled in Project Settings.
After successfully connecting to the service, you should see the update time and the control interface for Block editor data.
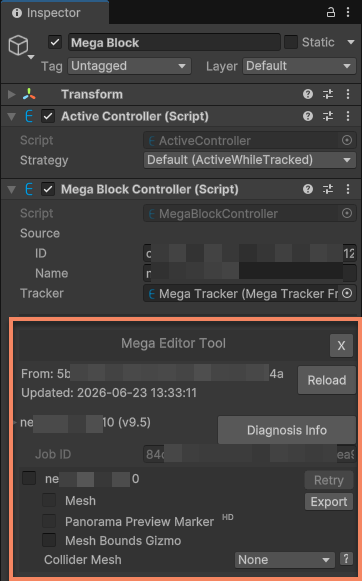
Load Block editor data;
Click the first selection box under Block data. This will start the loading process of Block editor data. After loading, you can see the mesh of the current Block in the Scene window:
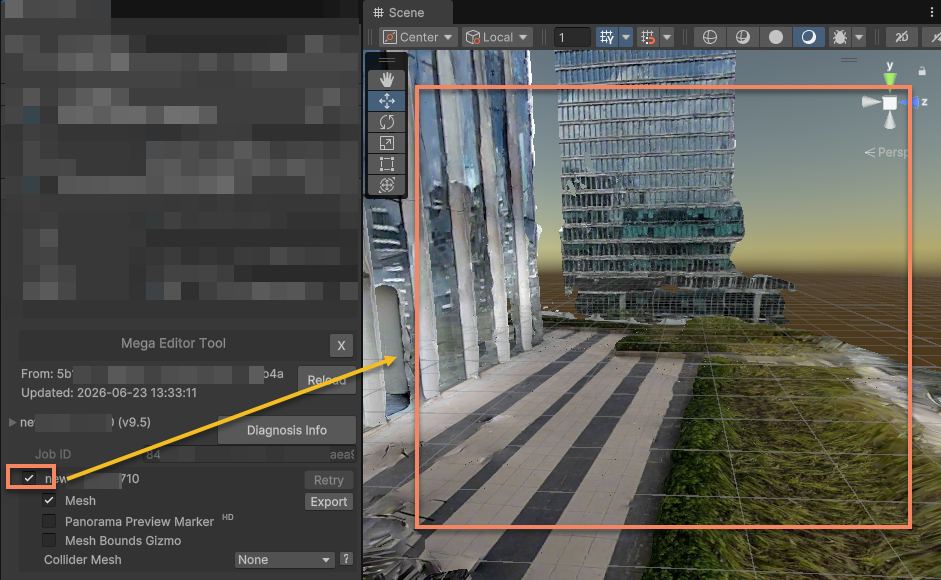
Tip
The Block mesh will switch LOD according to the camera position. You need to stay connected to the Internet.
Place 3D content
At this time, you can refer to the Block mesh to place 3D objects.
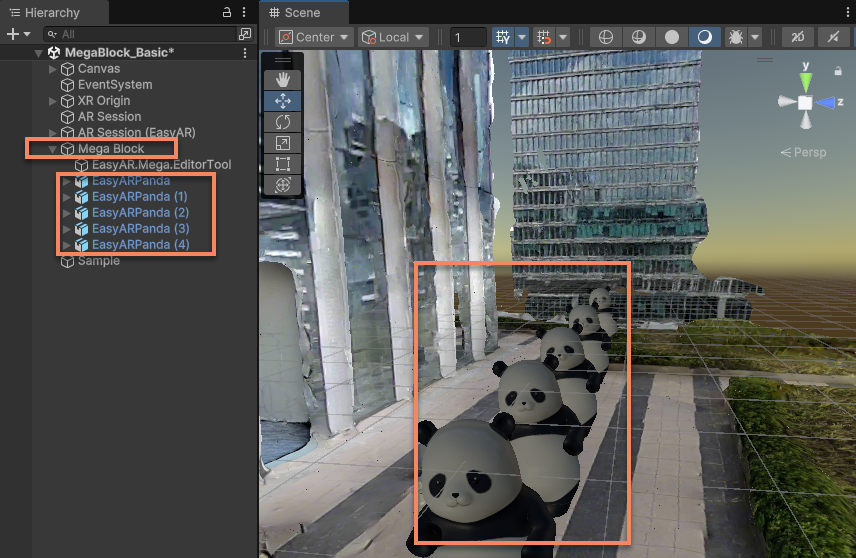
Note
- 3D objects must be placed under the Block node to ensure that the rendering position of the virtual content is correct at runtime.
- 3D objects cannot be placed under the
EasyAR.Mega.EditorToolnode. This node is only used for the editor tool and will be automatically deleted or re - created in some cases.
Step 5: Modify Player Configuration
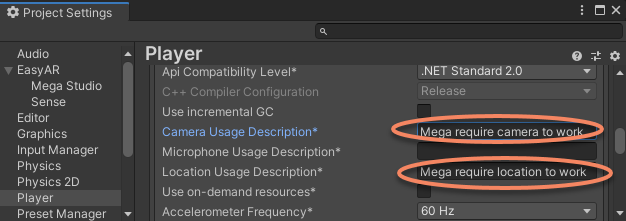
Navigate through the Unity menu File > Build Settings > Player Settings, click on the Android icon to bring up the corresponding settings for the Android platform.

Change the Package Name to the Package Name shown on the License Key page.
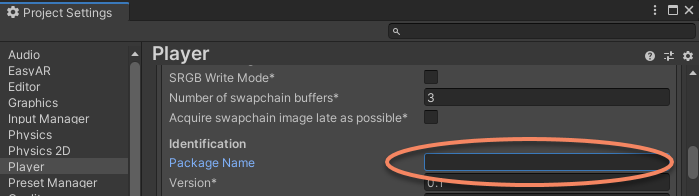
Tip
For example, if the Package Name you filled in when creating the License Key is
com.mycompany.myproject, you must fill in the Package Name here ascom.mycompany.myproject, otherwise the app will fail to run.Change the Minimum API Level to
API Level 24or a higher version.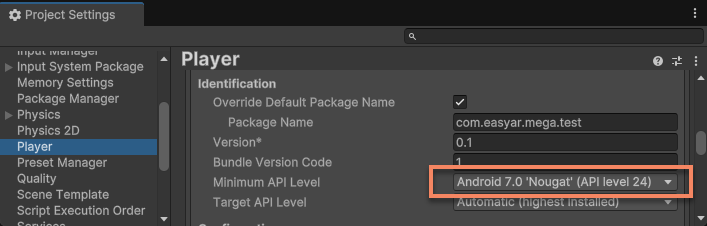
Change the Scripting Backend to
IL2CPPand checkARM64inTarget Architecture.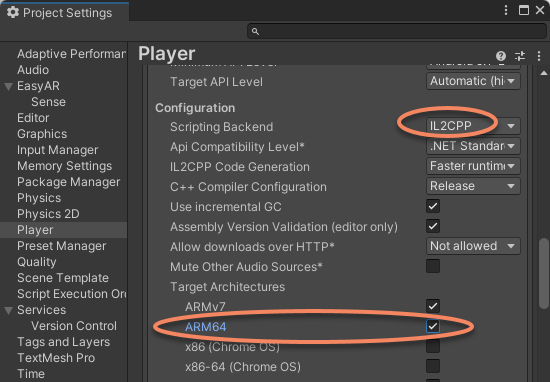

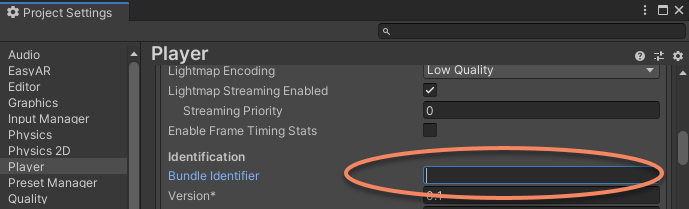
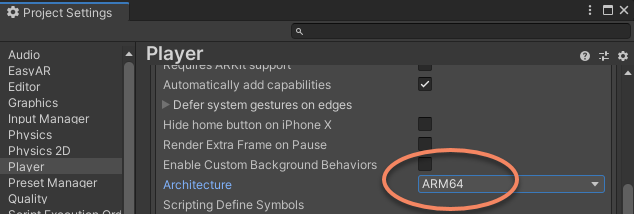
Step 6: Build and Run
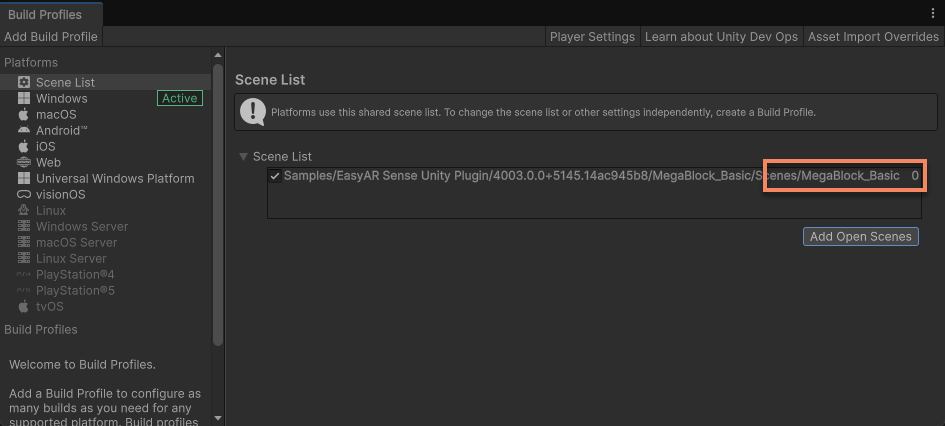
- Add the current scene to
File>Build SettingsorBuild Profiles>Scene List;
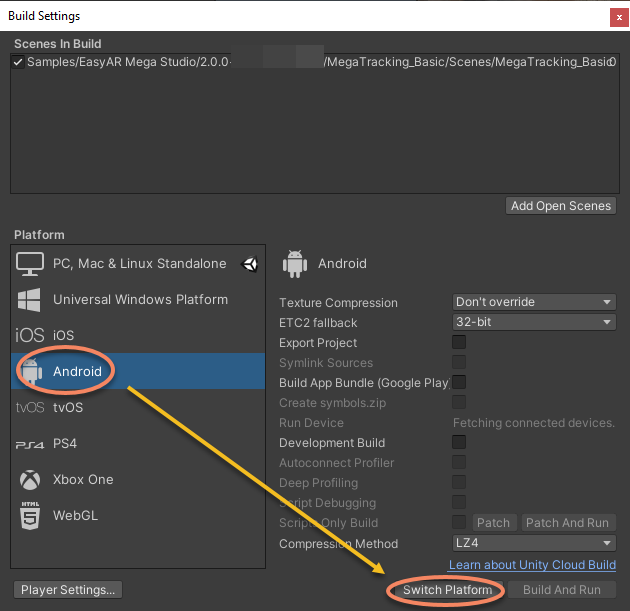
- Switch to the target platform (e.g., Android / iOS), and check if the bundle ID is consistent with the License Key;
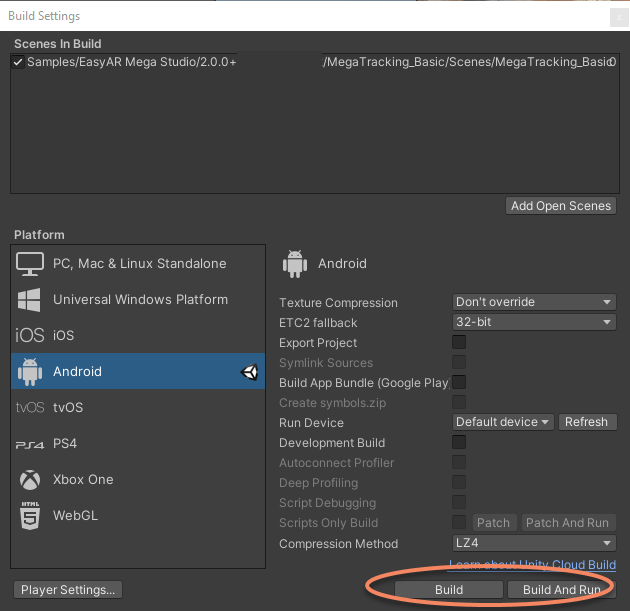
- Click Build And Run.
The running effect of the on - site shooting is as follows:
About the yellow text on screen
During runtime, you may notice two areas of yellow text displayed on the screen.
Simulation run warning message
It appears at the bottom of the screen:
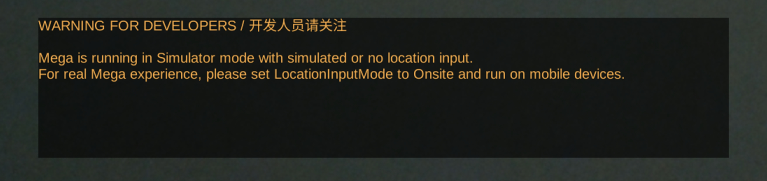
This warning appears because, under the default configuration, the app can run without being on-site. It has a slight impact on the app's performance. If you are using it on-site, you can modify the MegaTracker configuration before building.
Diagnostic information
It appears at the top of the screen and is used to understand the session status and issues. It is recommended to keep it displayed during development and testing phases:
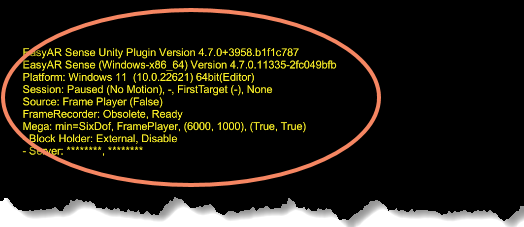
You can refer to Diagnostic information in the scene to quickly understand how to configure and use this diagnostic information.
Next steps: from beginner to proficient
Congratulations! By following the steps above, you have successfully run the core sample of EasyAR Mega within 10-minutes, personally experiencing the charm of spatial localization and AR content overlay.
Now that you have mastered the basics. If you wish to:
- Build more stable and efficient AR applications
- Achieve complex effects like virtual-real occlusion and content alignment
- Debug when devices are unavailable or on-site visits are impossible
Please refer to the following in-depth guides. They will help you solve practical problems encountered during development.
Advanced development
If you wish to understand the complete project configuration, you can refer to the following:
If you wish to further understand how to use EasyAR, start here:
Additionally, it is recommended to read the following to assist your development and debugging:
Fine-grained control of mega functions
The following will help you better use Mega in your application:
- Onsite and simulation
- ARSession best practices
- Add tracking targets
- Create 3D content aligned with the real world
- Environment occlusion (Occlusion)
- Control tracking process
The following will help you verify Mega functions without being onsite:
Advanced topics
The following content is more suitable for reading after gaining some experience with EasyAR.
If you wish to run EasyAR Mega on headsets, you can refer to the following:
If you wish to use AR Foundation, you can start here: