Make head-mounted display support EasyAR
This article introduces how to use the head-mounted display extension package template of EasyAR Sense Unity Plugin to develop an EasyAR extension package that supports head-mounted display devices.
Before starting
Before proceeding with development, you need to understand how to use the EasyAR Sense Unity Plugin.
- Quickstart
- Run the AR Session sample, the ImageTracking_Targets sample, and the SpatialMap_Dense_BallGame sample. Their performance is similar on mobile devices and head-mounted displays.
Head-mounted display plugin development involves some fundamental functionalities. You need to understand these topics first:
- Understand AR Session
- Understand frame data sources and external frame data sources
Additionally, you should be familiar with how to develop a Unity package.
Prepare the device for AR/MR
Prepare the motion-tracking/VIO system
Ensure the device tracking error is controlled. Some EasyAR features like Mega can reduce the device's cumulative error to some extent, but significant local errors can also make EasyAR's algorithms unstable. Generally, we expect VIO drift to be within 1‰.
Prepare the display system
Ensure that when a virtual object of the same size and outline as a real-world object is placed in the virtual world, and its relative transformation to the virtual camera matches that of the real object to the device, the virtual object aligns correctly with the real object. Moving the device or turning the head should not break the display effect. Refer to the Vision Pro effect as a benchmark.
Prepare the device SDK
Ensure APIs are available to provide external input frame data. This data should be generated at exactly two time points in the system. Ensure there are no data misalignment issues.
Use the head-mounted display extension template
Import the EasyAR Sense Unity Plugin (package com.easyar.sense) using Unity's Package Manager window via installing from a local tarball. Extract the head-mounted display extension template (package com.easyar.sense.ext.hmdtemplate) into your Unity project's Packages directory and rename the Samples~ folder to Samples.
You should then see a directory structure like this:
.
├── Assets
└── Packages
    └── com.easyar.sense.ext.hmdtemplate
        ├── CHANGELOG.md
        ├── Documentation~
        ├── Editor
        ├── LICENSE.md
        ├── package.json
        ├── Runtime
        └── Samples
            └── Combination_BasedOn_HMD
Tip
If needed, you can import EasyAR Sense Unity Plugin and place the head-mounted display extension template using any method allowed by Unity.
If you choose not to use the template, you can refer to Unity's guide on creating custom packages to create a new package.
If the device SDK is not organized using Unity packages, extract the head-mounted display extension template into your Unity project's Assets folder, then delete the package.json file and any files with the .asmdef suffix from the extracted files. Note that in this case, users combining the device SDK with EasyAR will not get proper version dependency management.
Complete the runtime input extension
Follow the method in Creating image and device motion data input extensions, modify Runtime/HMDTemplateFrameSource.cs, and complete the input extension suitable for the head-mounted display. This is the primary development task of the extension package.
Complete the editor menu
Modify the "HMD Template" string in the MenuItems class to represent the device name. If other custom editor features are needed, you can add additional scripts.
When a developer selects AR Session (EasyAR) in the Hierarchy view and right-clicks, these menu items will appear:
EasyAR Sense>Extensions>Frame Source : [Device Name]: Adds a frame data source for this device to the current session.EasyAR Sense>Extensions>Frame Source : [Device Name (keep it only)]: Adds and retains only one frame data source for this device in the current session.

Complete the application sample
The sample is located at Samples/Combination_BasedOn_HMD. For simplicity, the sample template contains no code; all AR functionality is achieved through scene content and configuration.
Add content that supports device operation to the scene.
Tip
If needed, you can do the reverse: use a scene that runs on the device and add EasyAR components and other objects from the sample scene to it.
Modify objects intended to be placed under the session origin.
If a session origin is defined in the scene, move
EasyARPandaandUIunder the origin node.
EasyARPandaprovides a reference for device motion tracking behavior, helping to identify causes of tracking instability.Delete the text in parentheses within these object names (they are hints for extension developers):
(Move into Origin if there is any)(Move into Origin if there is any, set constraint source to your rendering camera)
Configure
HUDbutton behavior.Set the constraint source of
UIto the virtual camera to ensure theHUDbuttons work as expected.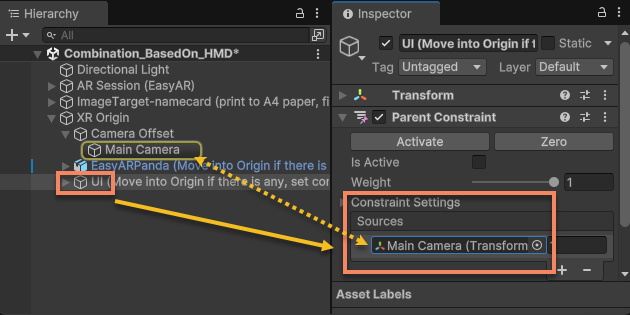
Configure
Canvasraycast functionality.Modify the
Canvasunder theUInode to ensure raycasting works, guaranteeing all UI buttons and switches function as expected.The template has pre-added XR Interaction Toolkit's Tracked Device Graphic Raycaster under the
Canvasnode. It will be visible after importing the corresponding package.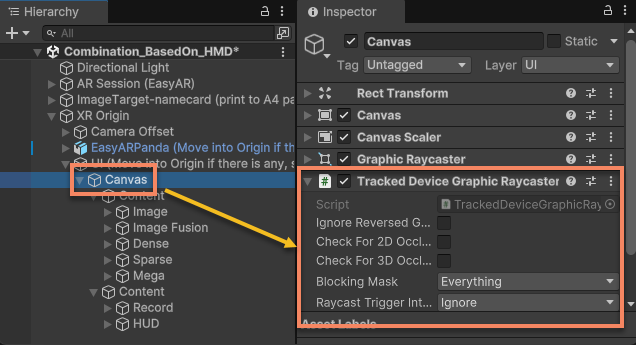
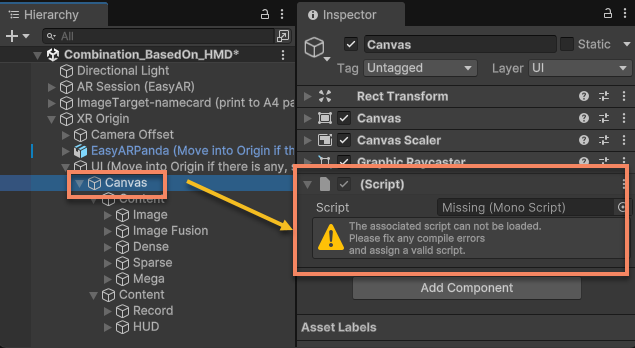
If XR Interaction Toolkit is not used when running on the device, you will see a missing script warning like the one below. You can delete it and add the raycaster component required by the device.
Next steps
- Before further developing the extension package, you need to run the bring-up validation for the input extension.
- Once fully completed, you can prepare to distribute the extension package.