Run the WeChat Mini Program Mega plugin sample project quickly
This article will introduce how to quickly run the sample project for the WeChat Mini Program Mega plugin. You will learn how to:
- Set up and configure the development environment for the sample project.
- Run part of the sample functionality: using Mega cloud-based localization.
Before you begin
- Refer to the documentation Is my localization library ready to use? to confirm that the localization library has been correctly created and the Mega Block has been added.
Confirm the mini program entity is an enterprise entity
Important
The Mega Mini Program plugin only supports enterprise entities. Mini programs with personal entity types cannot use the Mega Mini Program plugin.
Confirm that in the Mini Program backend, Settings > Basic Information > Entity Information displays Enterprise Legal Person or Individual Business.
Since Mega functionality is provided as a mini program plugin, you must have a WeChat Mini Program with an enterprise entity as the host environment.
Even if you only want to run our sample project, you need to configure your own WeChat Mini Program AppID to debug and preview in the developer tools.
Download the sample project
Go to the Development Tools Download Page.
Confirm the EasyAR Privacy Policy and click Download.
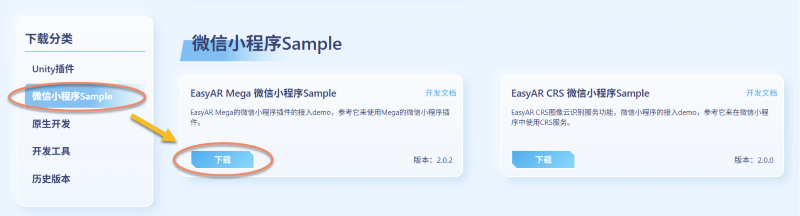
After downloading, unzip the
.zippackage locally.
Configure the sample project
Log in to the WeChat Mini Program Developer Tools.
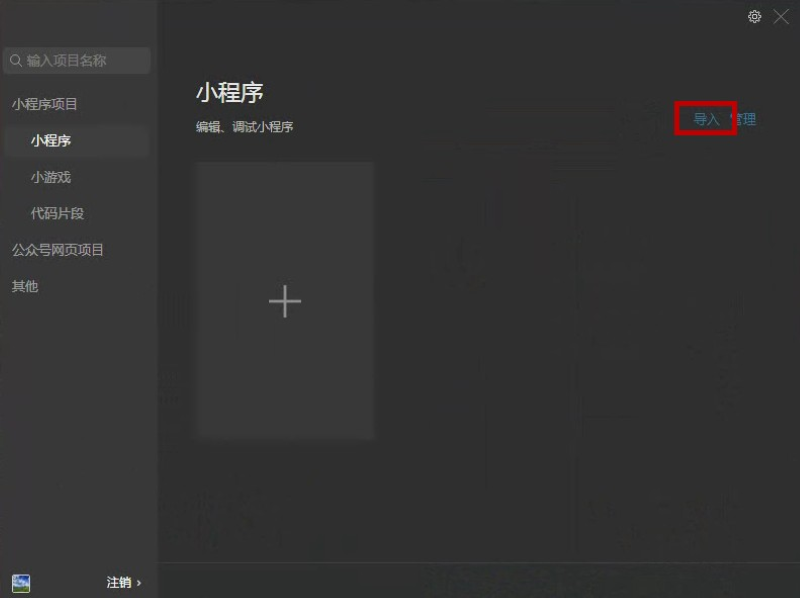
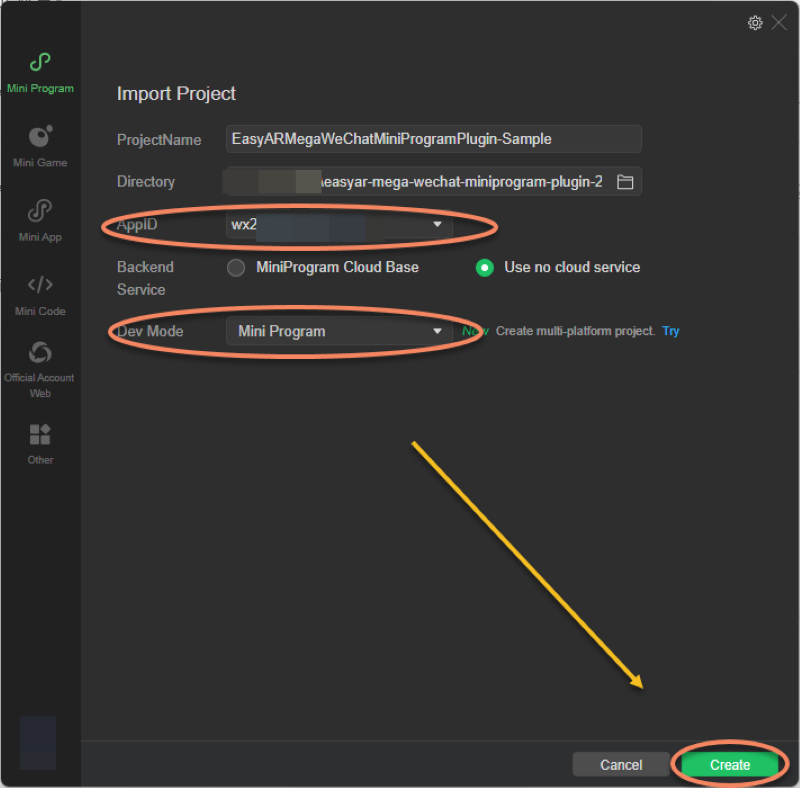
Import the sample project using the WeChat Mini Program Developer Tools.
- After opening the developer tools, click the import button and select the locally extracted directory.
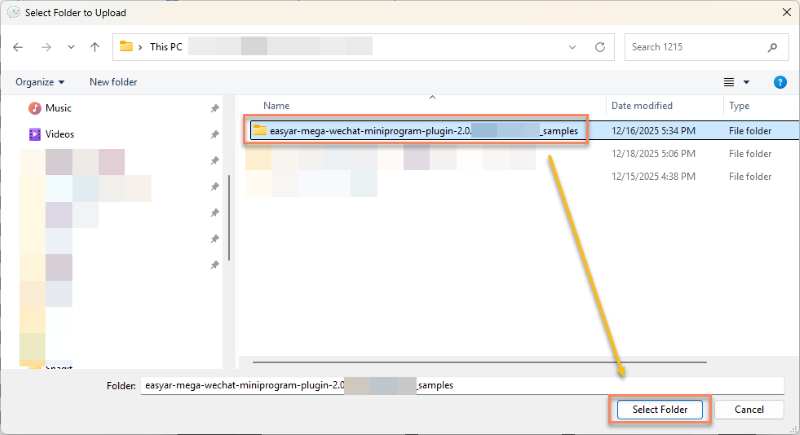
- Ensure the AppID matches the AppID filled in when applying for the Mega license, and the development mode is Mini Program. Click create.
Note
Inconsistent AppID will cause license verification failure.
Configure mega license and cloud services
Open the file
miniprogram/components/sample-data/easyar-settings.tsand fill in the corresponding fields with the license and service information from the preparation work:- Mega License
/** Your mini program's mega license */
export const EasyARLicenseKey: string = "";
How to obtain a mega WeChat mini program license
Select Mega WeChat Mini Program in the EasyAR Development Center.
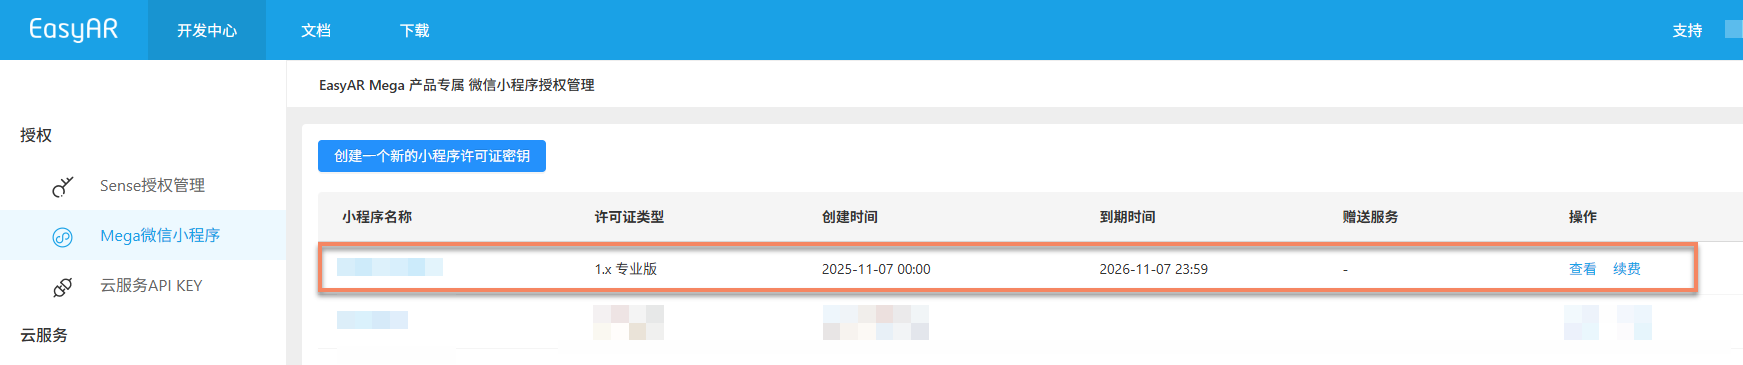
The list should contain the Mega WeChat Mini Program License you want to use. (If no available license exists, verify if your account is the same as the one used to create the Mega positioning library).
Click the mini program name to obtain its Mega license (click the copy button on the right, then paste it into the
easyar-settings.tsfile as the value ofEasyARLicenseKey). Confirm that the associated AppID exactly matches your WeChat mini program AppID.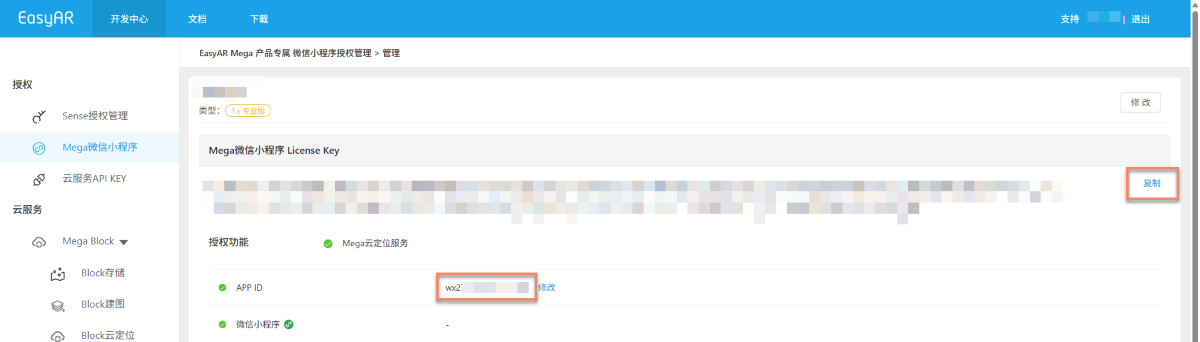
- Cloud service API key and secret
/** Your cloud service API key and secret */
export const EasyARAPIKey: string = "";
export const EasyARAPISecret: string = "";
How to obtain cloud service API key and secret
Select Cloud Service API Key in the EasyAR Development Center.
If you have previously created cloud service API key and secret, copy them from the right side here and paste them into the
easyar-settings.tsfile as values forEasyARAPIKeyandEasyARAPISecret.
If you haven't created them before, create them as follows:
In the EasyAR Development Center, select Cloud Service API Key > Create API key.
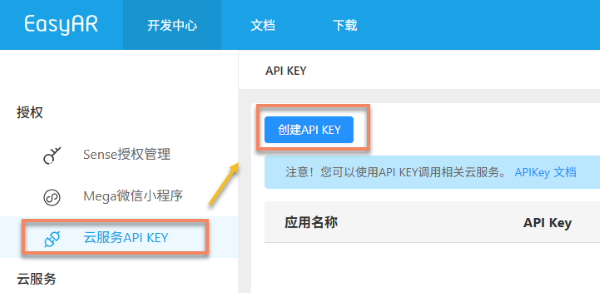
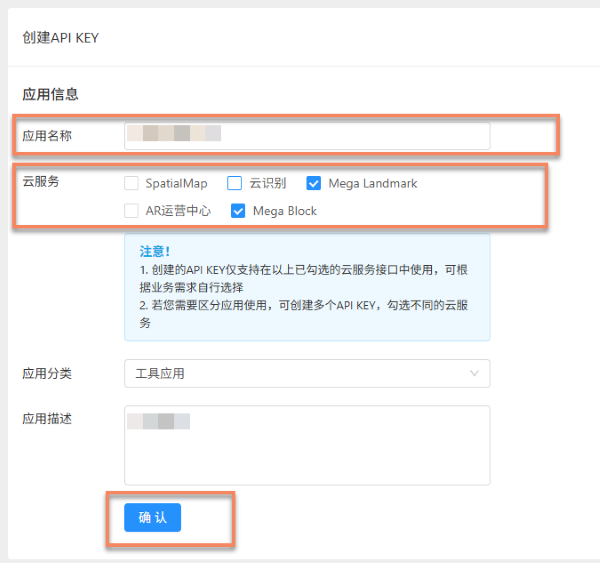
Enter the application name, select the cloud services to use: Mega Block and/or Mega Landmark, then click OK.
- Cloud service server address and AppID:
/** Your mega cloud positioning library's server address and AppID */
export const MegaTrackerServerAddress: string = "";
export const MegaTrackerAppID: string = "";
How to obtain the mega cloud positioning library's server address and AppID
Select Block Cloud Positioning in the EasyAR Development Center, then choose your Mega Cloud Positioning Service Group.
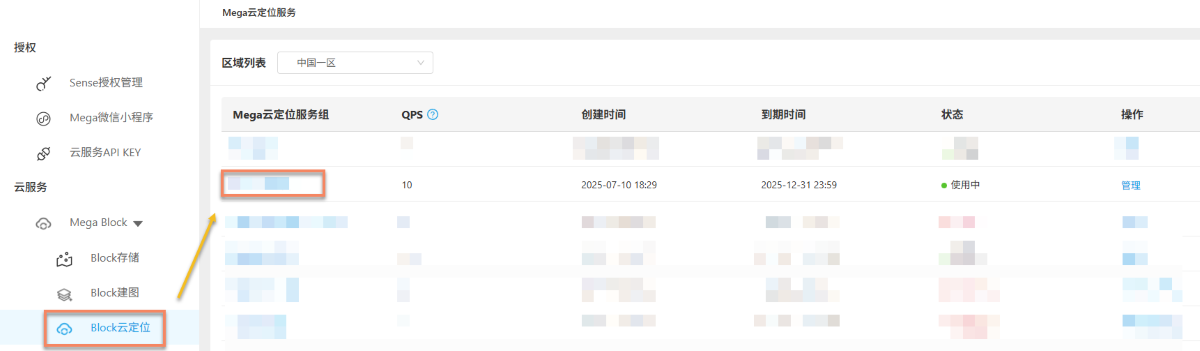
Select your mega cloud positioning library:
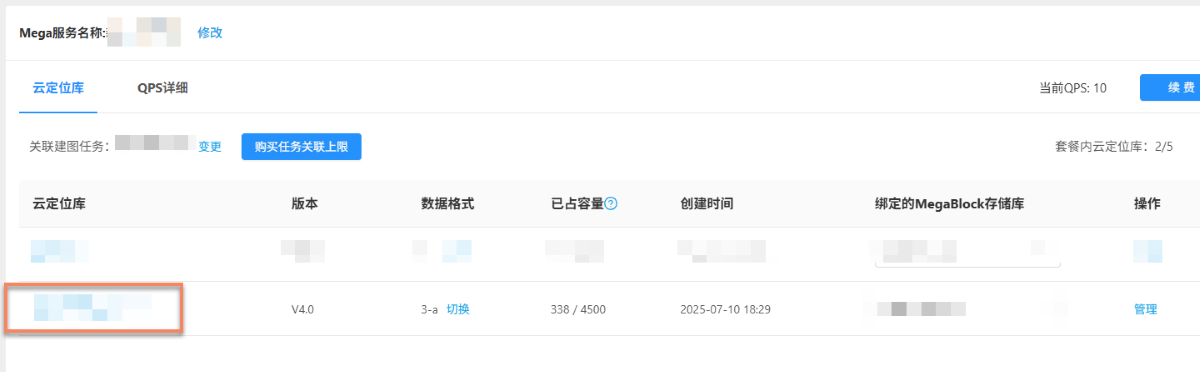
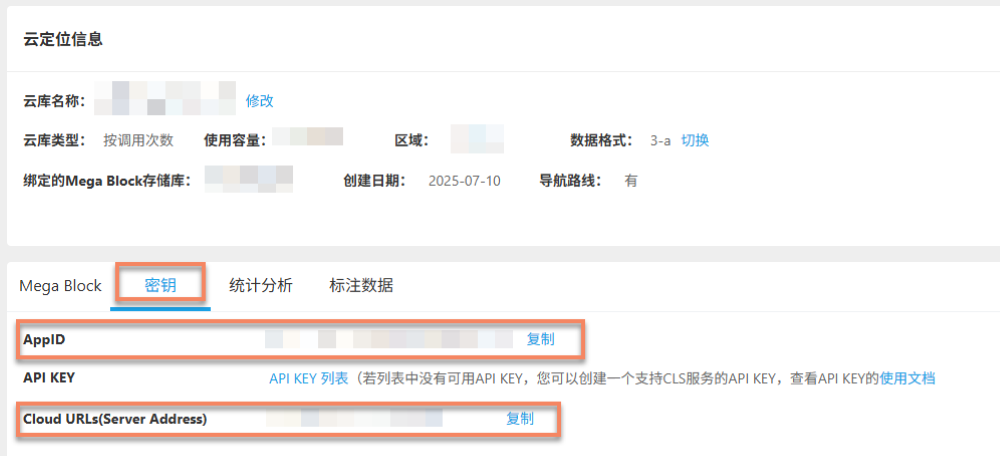
Click Key, then obtain the positioning library's AppID and Server Address below (click the copy button on the right, then paste them into the
easyar-settings.tsfile as values forMegaTrackerAppIDandMegaTrackerServerAddress).
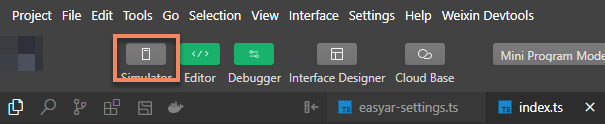
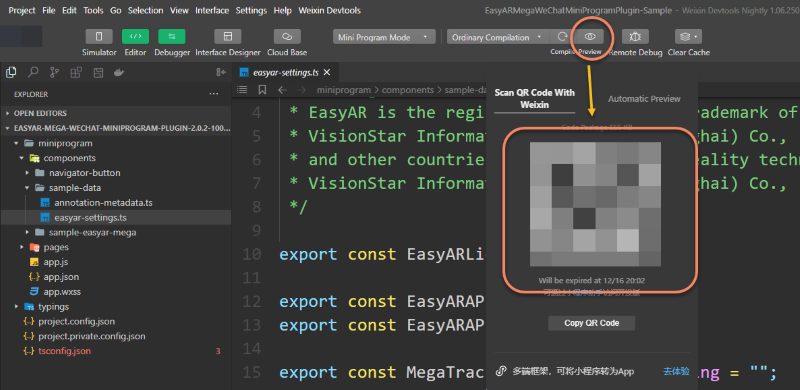
Run the sample on a physical device
Click the real-device preview button on the top bar of the Mini Program development tool, and load it onto your development phone by scanning the QR code.
Caution
You cannot directly simulate and run xr-frame components with AR functionality in the development tool.
Note
When you run the sample project in WeChat Developer Tools for the first time, if plugin permissions haven't been granted, the tool typically prompts that the plugin is unauthorized. You can authorize automatically via WeChat Developer Tools or refer to the Plugin access process.
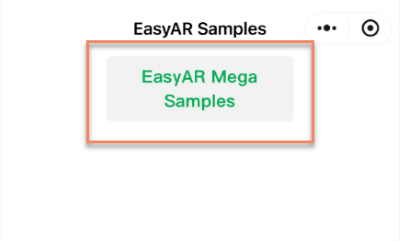
Click EasyAR Mega Samples to enter the AR scene of the sample project.
Note
If you cannot enter the AR scene of the sample project, it may be because the current device does not support WeChat's VisionKit visual algorithm component. For details, refer to Device limitations.
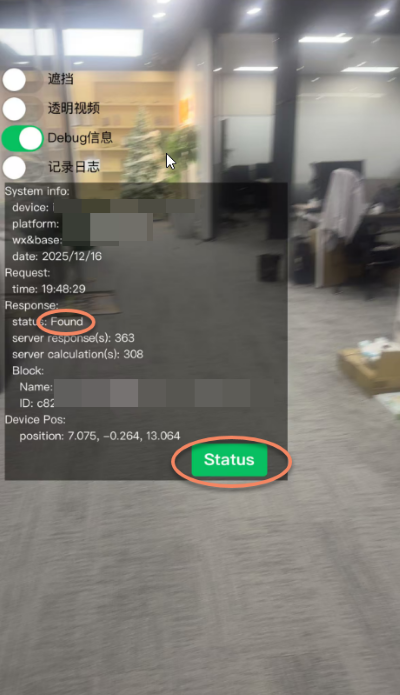
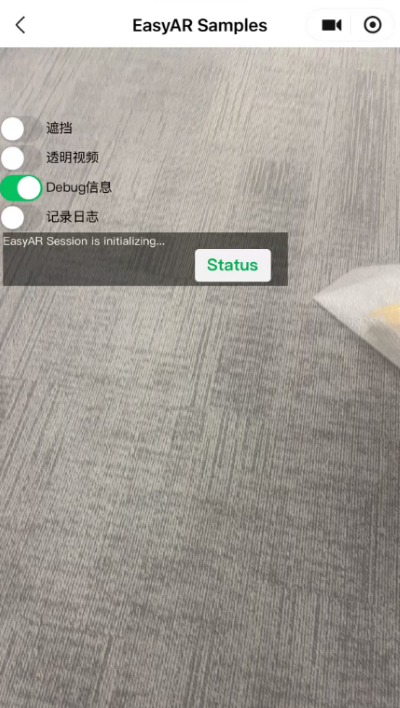
The on-screen prompt
EasyAR Session is initializingindicates WeChat plane detection is initializing.Tip
Ensure testing in well-lit environments, avoiding large areas of solid-color walls or floors.
Swing steadily left and right facing the ground or other planes to speed up this process.
After initialization is complete, hold the phone vertically to capture a normal real-world view with the camera. When positioning succeeds, the word
Foundappears in debug information, and the status indicator in the lower-right corner changes from white to green.