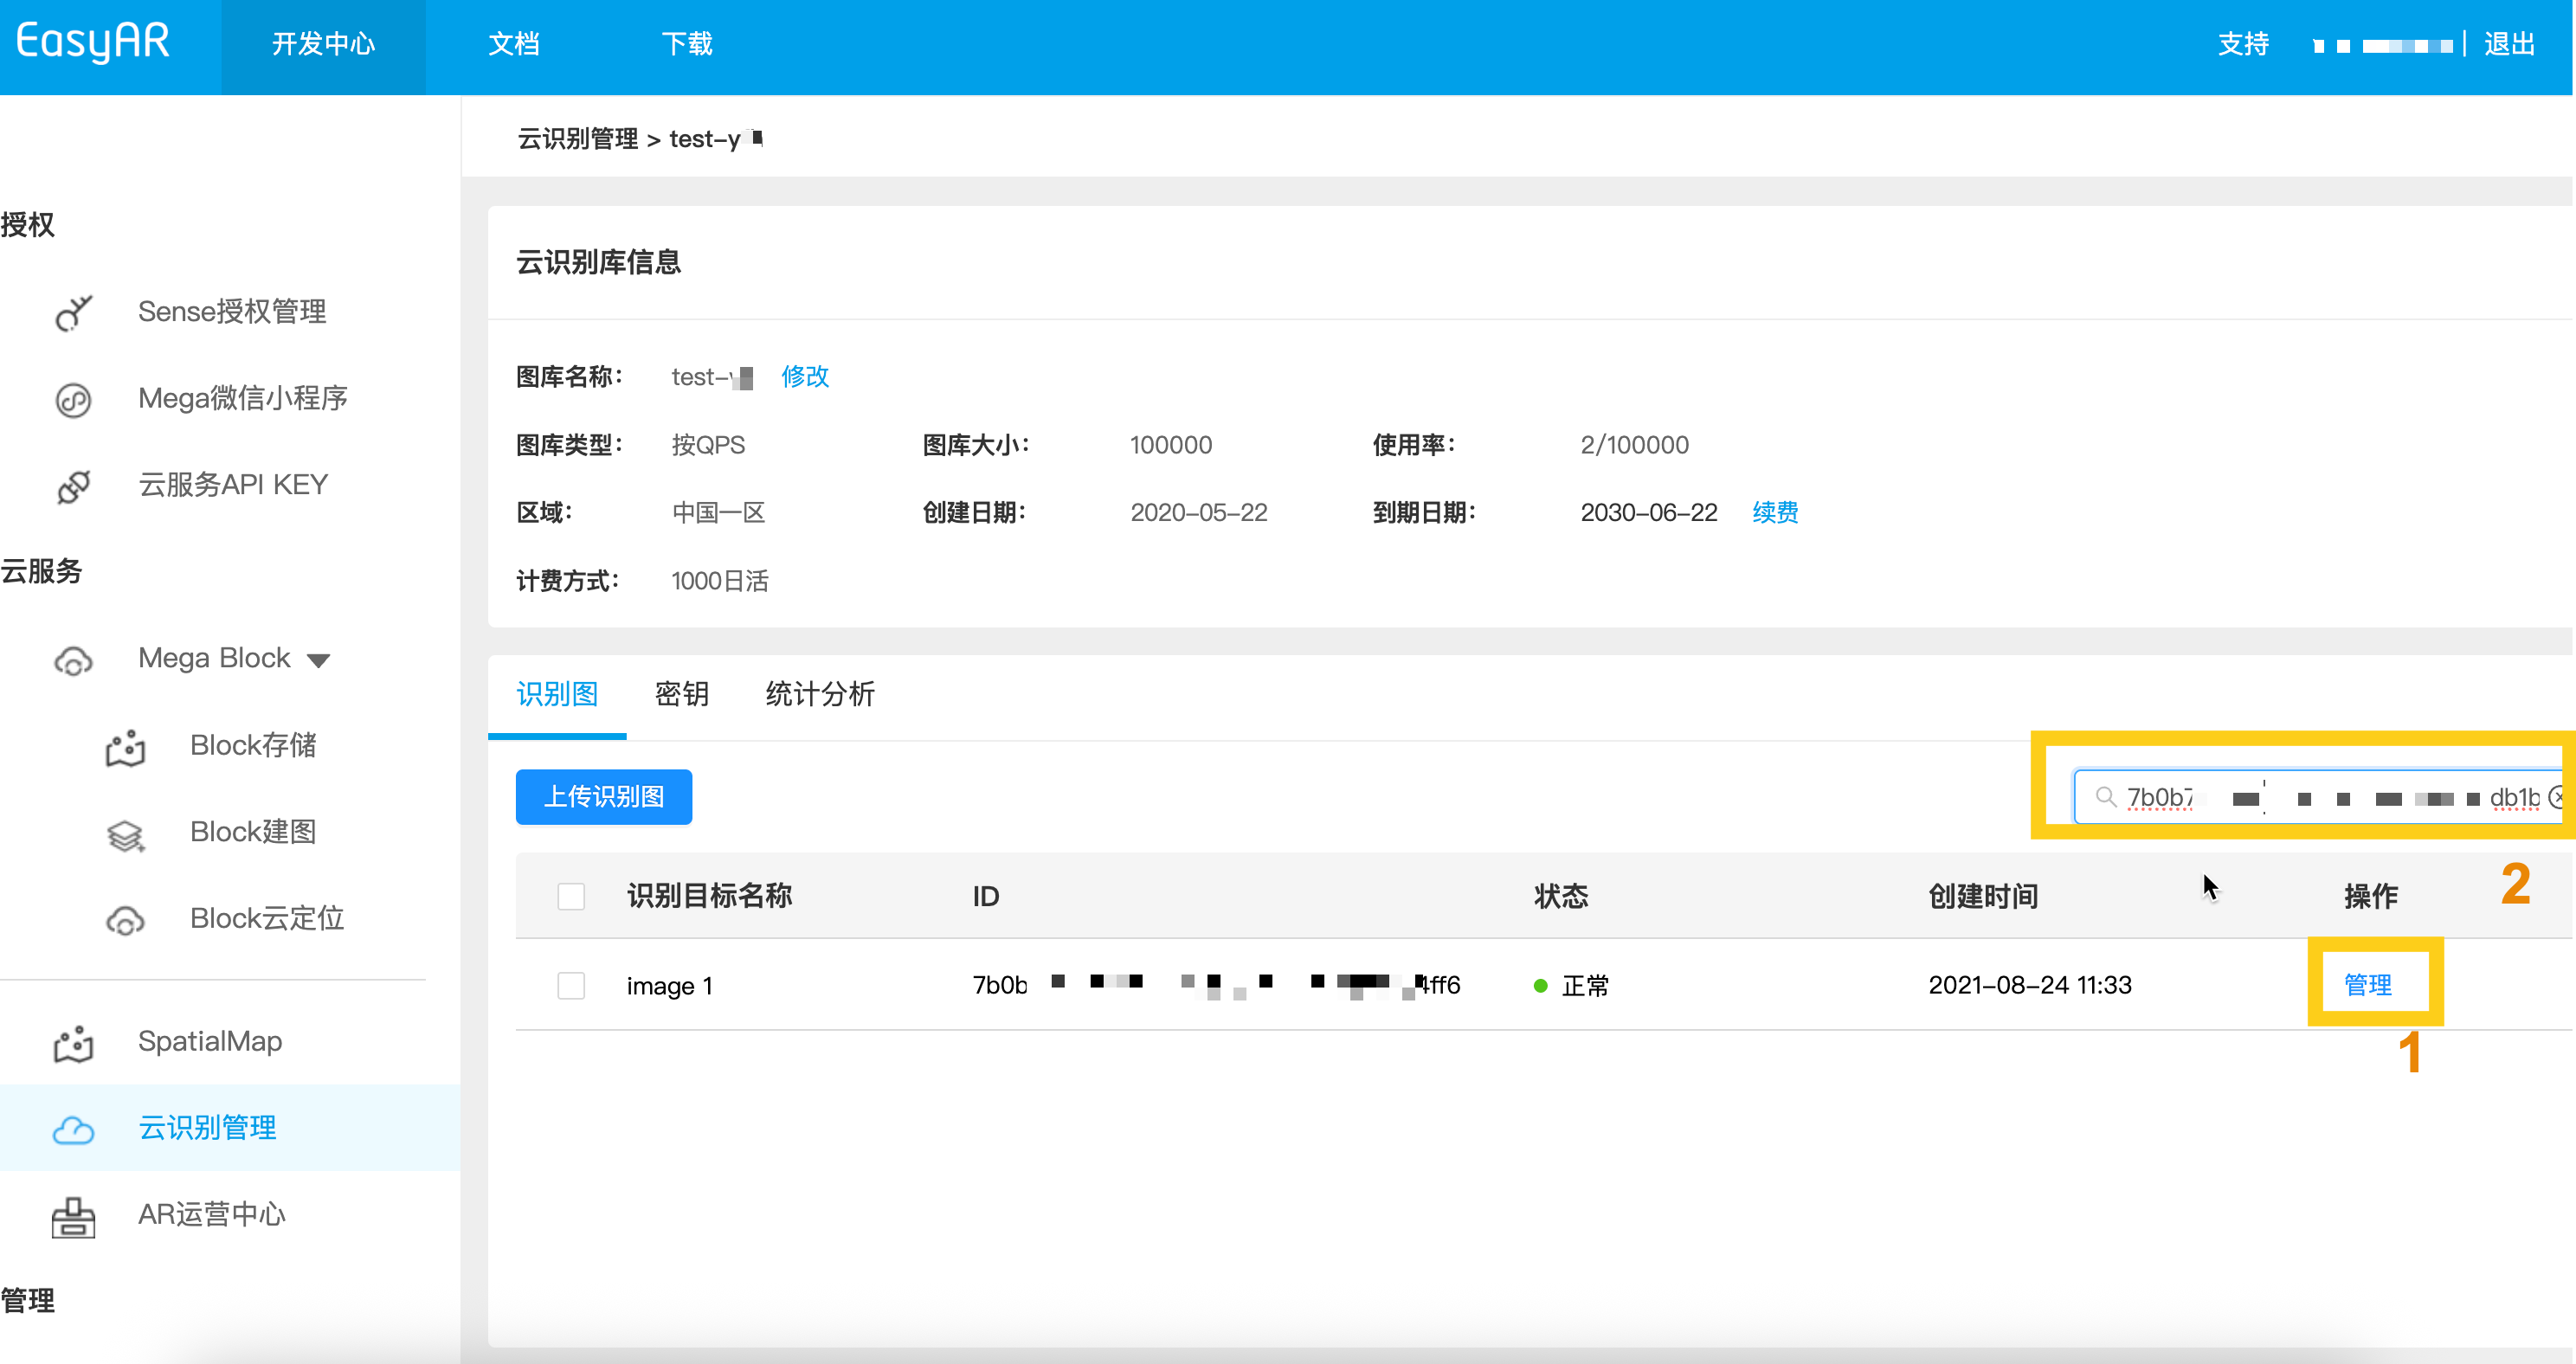
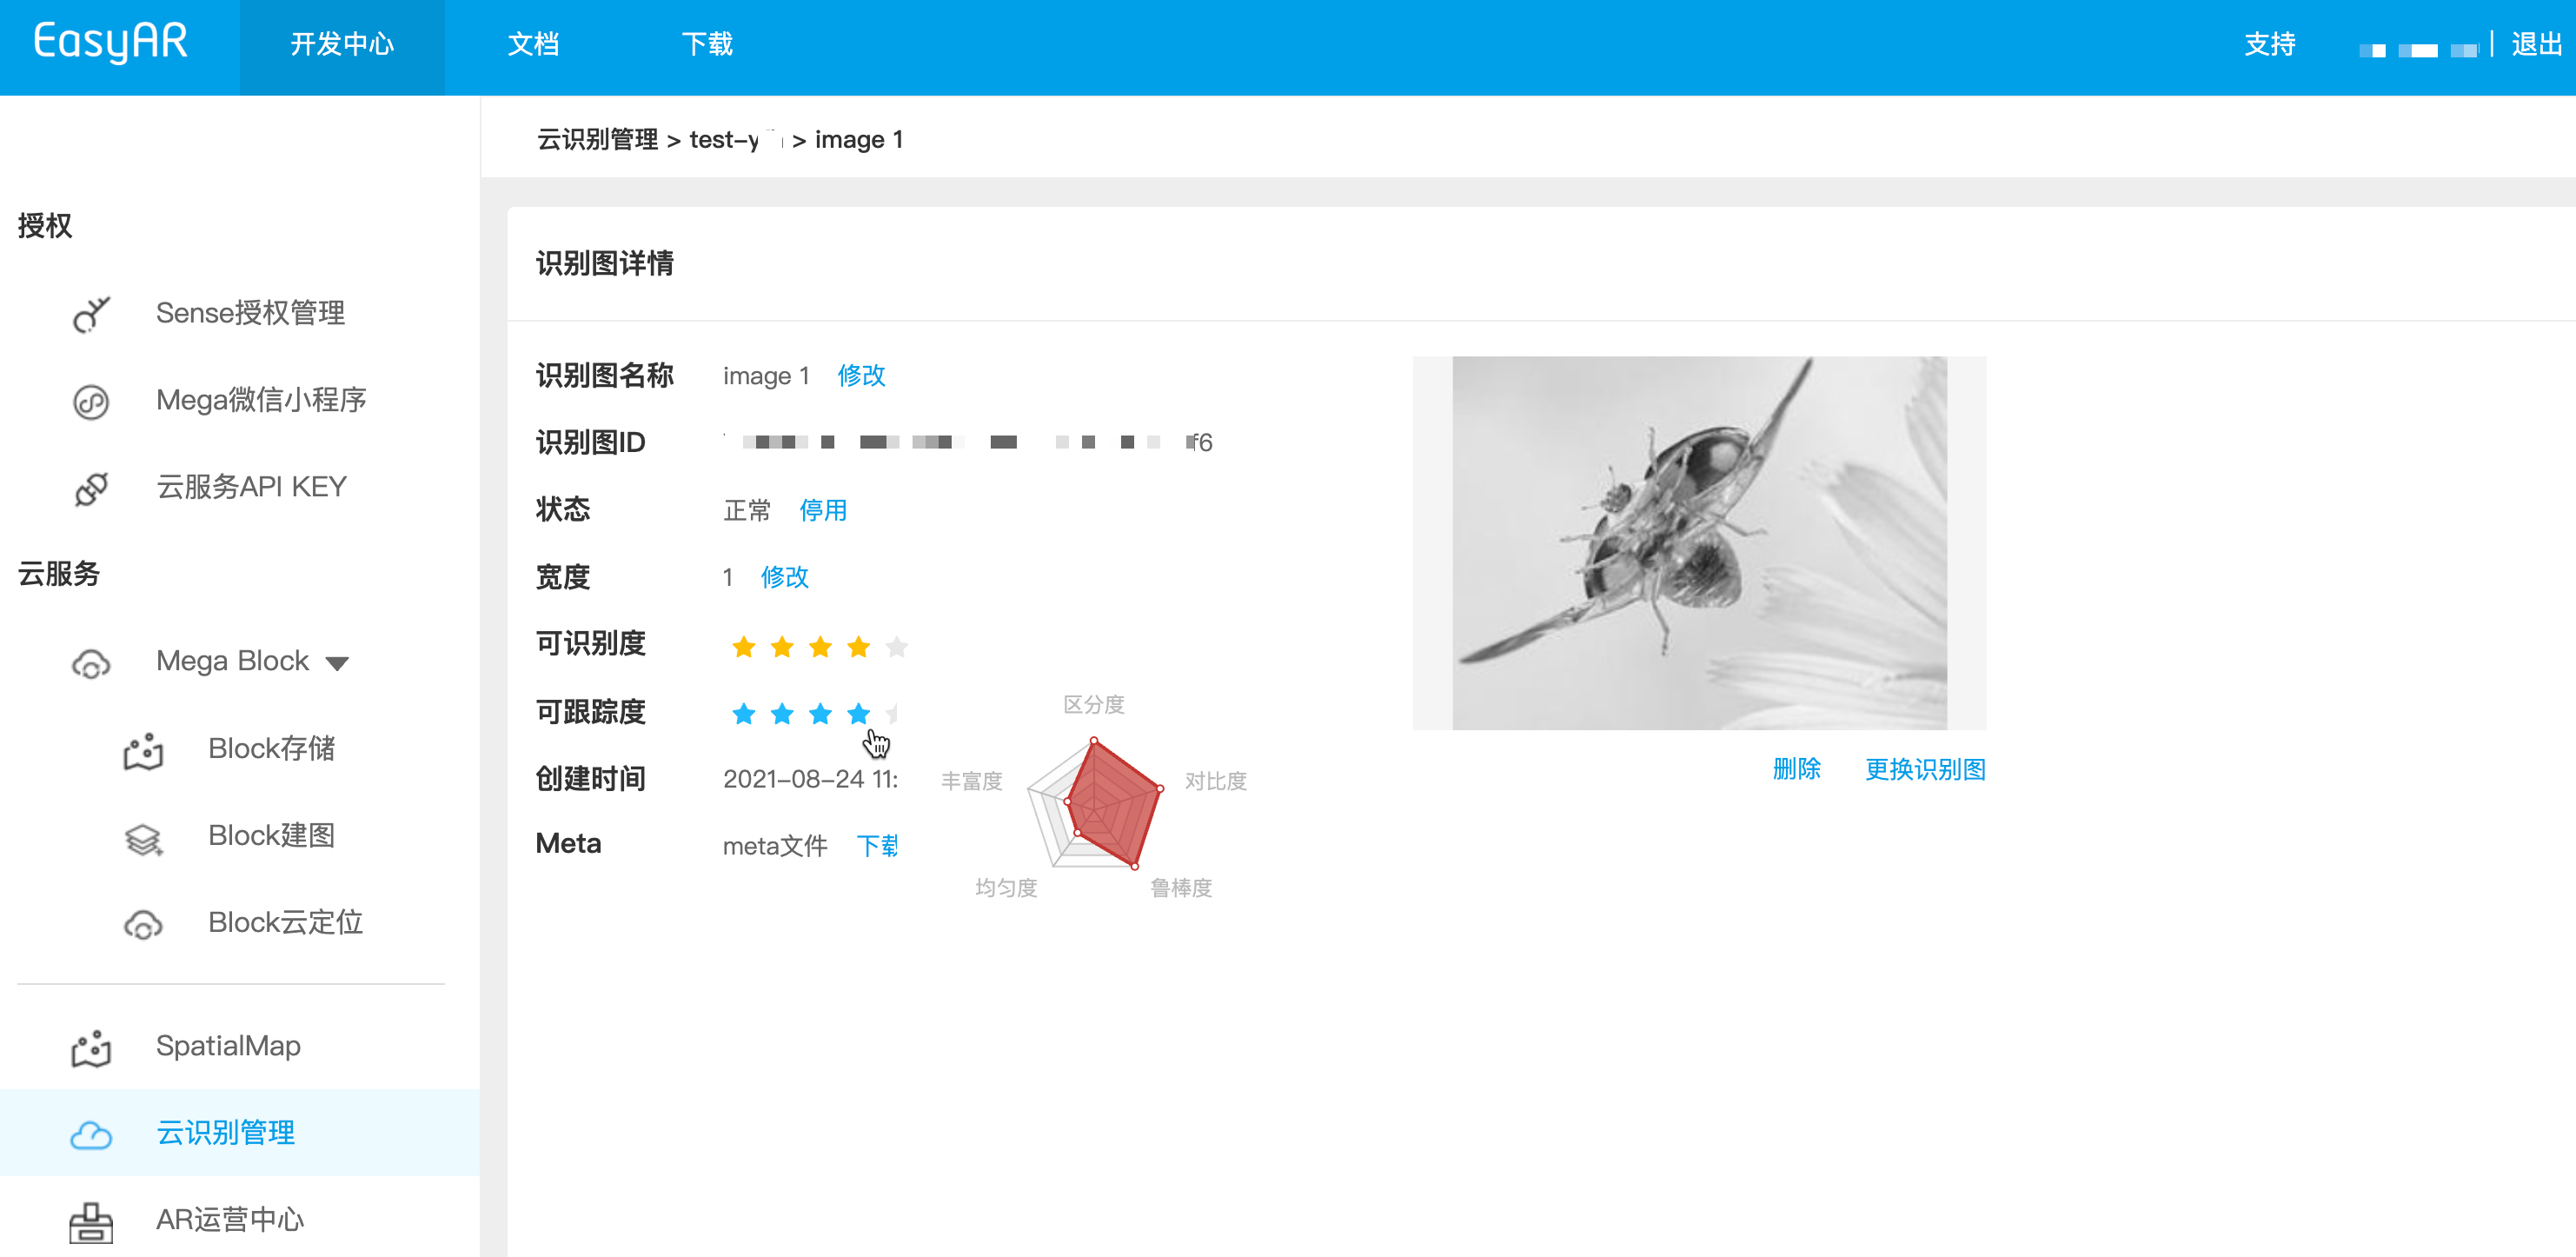
Cloud Recognition (CRS) databases usually store massive numbers of target images. To help developers quickly locate and manage this data, this chapter describes target image viewing, paginated query, and details.
After clicking into the details page, you can view the complete properties of the target image, including:
For developers who need integration with their own backend, REST API management is recommended.
Before sending a request, make sure the following information is ready. For details, refer to API call preparation checklist:
Replace the placeholders with actual parameters and run the curl script.
- Your-Server-side-URL -> actual API host
- Your-Token -> actual API Key Authorization Token
- Your-CRS-AppId -> your appId
curl -X GET "https://<Your Server-side-URL>/targets/infos?appId=<Your-CRS-AppId>" \
  -H "Content-Type: application/json" \
  -H "Authorization: <Your-Token>"
Download the Java sample code
Import the project with Maven
Step 1. Open the related code file ListTargets.java.
Step 2. Modify the global variables and replace them with the authentication parameters in your prepared list.
- CRS AppId
- API Key / API Secret
- TARGET_MGMT_URL → Server-end URL
public class ListTargets {

    private static final String TARGET_MGMT_URL = "http://cn1.crs.easyar.com:8888";
    private static final String CRS_APPID       = "--here is your CRS AppId--";
    private static final String API_KEY         = "--here is your API Key--";
    private static final String API_SECRET      = "--here is your API Secret--";

    public String list(Auth auth) throws IOException {
        OkHttpClient client = new OkHttpClient.Builder().build();
        JSONObject params = new JSONObject();
        Auth.signParam(params, auth.getAppId(), auth.getApiKey(), auth.getApiSecret());
        okhttp3.Request request = new okhttp3.Request.Builder()
                .url(auth.getCloudURL() + "/targets/infos?"+ Common.toParam(params))
                .get()
                .build();
        Response response = client.newCall(request).execute();
        return response.body().string();
    }
    public static void main(String[] args) throws IOException{
        Auth accessInfo  =  new Auth(CRS_APPID, API_KEY, API_SECRET, TARGET_MGMT_URL);
        System.out.println(new ListTargets().list(accessInfo));
    }

}
Step 3. Run Main
Download the NodeJS sample code.
Step 1. Configure the key file keys.json.
- CRS AppId
- API Key / API Secret
{
  "appId": "--here is your appId for CRS App Instance for SDK 4--",
  "apiKey": "--here is your api key which is create from website and which has crs permission--",
  "apiSecret": "--here is your api secret which is create from website--"
}
Step 2. Run it, specifying the key file and Server-end URL.
node bin/getTargets -t <Server-end-URL> -c keys.json
To change the pagination strategy, pass getTargets pagination parameters.
- 'pageSize': page size
- 'pageNum': page number
var argv = require('yargs')
    .usage('Usage: $0 [targetId] -t [host] -c [keys]')
    .demand(0)
    .default('t', 'http://localhost:8888').alias('t', 'host')
    .default('c', 'keys.json').alias('c', 'keys')
    .help('h').alias('h', 'help')
    .epilog('copyright 2015, sightp.com')
    .argv;

var fs = require('fs');
var host = argv.host;
var keys = JSON.parse(fs.readFileSync(argv.keys));
var farmer = require('../farmer')(host, keys.appKey, keys.appSecret);

farmer.getTargets({
  'pageSize': 5,
  'pageNum': 1,
})
.then(function(resp) {
    console.log(resp.result.targets);
})
.fail(function(err) {
    console.log(err);
});
getTargets calls the cloud service API. The sample code is in farmer.js.
function getTargetsByPage(pageNum,pageSize) {
    return Q.promise(function(resolve, reject) {
        request.get(host + '/targets/infos?pageNum=' + pageNum + '&pageSize=' + pageSize)
        .query(auth.signParams(keypair, {
            "pageNum":pageNum,
            "pageSize":pageSize
        }))
        .end(done(resolve, reject));
    });
}
Download the PHP sample code.
Step 1. Open the entry code demo.php.
Step 2. Modify the global variables and replace them with the authentication parameters in your prepared list.
- CRS AppId
- API Key / API Secret
- Server-end URL
<?php
include 'EasyARClientSdkCRS.php';
$apiKey = 'API Key';
$apiSecret = 'API Secret';
$crsAppId = 'CRS AppId'
$crsCloudUrl = 'https://cn1-crs.easyar.com';
$pageNum = 1;
$pageSize = 5;

$sdk = new EasyARClientSdkCRS($apiKey, $apiSecret, $crsAppId, $crsCloudUrl);

$rs = $sdk->targetsV3($pageNum, $pageSize);
if ($rs->statusCode == 0) {
    print_r($rs->result);
} else {
    print_r($rs);
}
Step 3. Run php demo.php.
Create the related code file list_targets.py, modify the global variables, and then run
pip install requests
python list_targets.py
import time
import hashlib
import requests

# --- Global Configuration ---
API_KEY = "YOUR_API_KEY"
API_SECRET = "YOUR_API_SECRET"
APP_ID = "YOUR_APP_ID"
HOST = "https://crs-cn1.easyar.com"

def main():
    timestamp = str(int(time.time() * 1000))

    params = {
        'apiKey': API_KEY,
        'appId': APP_ID,
        'timestamp': timestamp
    }

    # Signature: Sort keys -> Concat -> Append Secret -> SHA256
    sorted_keys = sorted(params.keys())
    sign_str = "".join([f"{k}{params[k]}" for k in sorted_keys]) + API_SECRET
    signature = hashlib.sha256(sign_str.encode('utf-8')).hexdigest()

    url = f"{HOST}/targets/infos"
    params['signature'] = signature

    print(f"Requesting GET {url}...")
    response = requests.get(url, params=params)
    print(f"Response: {response.text}")

if __name__ == "__main__":
    main()
Create the related code file main.go, modify the global variables, and then run
go run main.go
main.go:
package main
import (
"crypto/sha256"
"fmt"
"io"
"net/http"
"sort"
"strconv"
"time"
)
// --- Global Configuration ---
var (
ApiKey = "YOUR_API_KEY"
ApiSecret = "YOUR_API_SECRET"
AppId = "YOUR_APP_ID"
Host = "https://crs-cn1.easyar.com"
)
func main() {
ts := strconv.FormatInt(time.Now().UnixNano()/1e6, 10)
params := map[string]string{
"apiKey": ApiKey,
"appId": AppId,
"timestamp": ts,
}
keys := make([]string, 0, len(params))
for k := range params { keys = append(keys, k) }
sort.Strings(keys)
builder := ""
for _, k := range keys { builder += k + params[k] }
builder += ApiSecret
signature := fmt.Sprintf("%x", sha256.Sum256([]byte(builder)))
url := fmt.Sprintf("%s/targets/infos?apiKey=%s&appId=%s×tamp=%s&signature=%s",
Host, ApiKey, AppId, ts, signature)
resp, _ := http.Get(url)
defer resp.Body.Close()
body, _ := io.ReadAll(resp.Body)
fmt.Printf("Response: %s\n", string(body))
}
Add reqwest, tokio, sha2, and hex dependencies in Cargo.toml.
Run cargo run.
use sha2::{Sha256, Digest};
use std::collections::BTreeMap;
use std::time::{SystemTime, UNIX_EPOCH};
// --- Global Configuration ---
const API_KEY: &str = "YOUR_API_KEY";
const API_SECRET: &str = "YOUR_API_SECRET";
const APP_ID: &str = "YOUR_APP_ID";
const HOST: &str = "https://crs-cn1.easyar.com";
#[tokio::main]
async fn main() -> Result<(), Box<dyn std::error::Error>> {
let ts = SystemTime::now().duration_since(UNIX_EPOCH)?.as_millis().to_string();
let mut params = BTreeMap::new();
params.insert("apiKey", API_KEY);
params.insert("appId", APP_ID);
params.insert("timestamp", &ts);
let mut sign_str = String::new();
for (k, v) in ¶ms {
sign_str.push_str(k);
sign_str.push_str(v);
}
sign_str.push_str(API_SECRET);
let mut hasher = Sha256::new();
hasher.update(sign_str.as_bytes());
let signature = hex::encode(hasher.finalize());
let url = format!("{}/targets/infos?apiKey={}&appId={}×tamp={}&signature={}",
HOST, API_KEY, APP_ID, ts, signature);
let res = reqwest::get(url).await?;
println!("Response: {}", res.text().await?);
Ok(())
}
Create a .NET console project.
dotnet new console
dotnet run
using System;
using System.Collections.Generic;
using System.Linq;
using System.Security.Cryptography;
using System.Text;
using System.Net.Http;

class Program {
    // --- Global Configuration ---
    static string API_KEY = "YOUR_API_KEY";
    static string API_SECRET = "YOUR_API_SECRET";
    static string APP_ID = "YOUR_APP_ID";
    static string HOST = "https://crs-cn1.easyar.com";

    static async System.Threading.Tasks.Task Main() {
        string timestamp = DateTimeOffset.Now.ToUnixTimeMilliseconds().ToString();

        var dict = new SortedDictionary<string, string> {
            { "apiKey", API_KEY },
            { "appId", APP_ID },
            { "timestamp", timestamp }
        };

        StringBuilder sb = new StringBuilder();
        foreach (var kv in dict) sb.Append(kv.Key).Append(kv.Value);
        sb.Append(API_SECRET);

        string signature = Sha256(sb.ToString());

        using var client = new HttpClient();
        string query = string.Join("&", dict.Select(x => $"{x.Key}={x.Value}")) + $"&signature={signature}";
        string url = $"{HOST}/targets/infos?{query}";

        var response = await client.GetAsync(url);
        Console.WriteLine($"Result: {await response.Content.ReadAsStringAsync()}");
    }

    static string Sha256(string str) {
        byte[] bytes = SHA256.HashData(Encoding.UTF8.GetBytes(str));
        return BitConverter.ToString(bytes).Replace("-", "").ToLower();
    }
}
- Runtime environment
- Unity 2020 LTS or later
- Scripting Backend: Mono or IL2CPP are both supported
- API Compatibility Level: .NET Standard 2.1 (recommended)
Step 1: Prepare the image file
- Create a directory in the Unity project:
Assets/
└── Scripts/
     └── ListImageTarget.cs
using System.Collections;
using UnityEngine;
using UnityEngine.Networking;

public class ListImageTarget : MonoBehaviour
{
    [Header("Config")]
    public string apiBaseUrl = "https://Your-Server-end-URL";
    public string authorizationToken = "YOUR API KEY AUTH TOKEN";
    public string crsAppId = "CRS-AppId";
    public int pageSize = 5;
    public int pageNum  = 1;

    private void Start()
    {
        StartCoroutine(ListTarget());
    }

    private IEnumerator ListTarget()
    {

        string url =
            $"{apiBaseUrl}/targets/infos?appId={crsAppId}&pageSize={pageSize}&pageNum={pageNum}";

        UnityWebRequest request = UnityWebRequest.Get(url);
        request.downloadHandler = new DownloadHandlerBuffer();

        request.SetRequestHeader("Content-Type", "application/json");
        request.SetRequestHeader("Authorization", authorizationToken);

        yield return request.SendWebRequest();

        if (request.result == UnityWebRequest.Result.Success)
        {
            Debug.Log("List target success:");
            Debug.Log(request.downloadHandler.text);
        }
        else
        {
            Debug.LogError("List target failed:");
            Debug.LogError(request.error);
            Debug.LogError(request.downloadHandler.text);
        }
    }
}
Step 3: Configure parameters (Inspector)
Modify the following in the Inspector panel:
- Api Url
- Authorization Token
- Crs App Id
- page size
- page num
Only modify these items to run, and fill in the parameters prepared in the preparation checklist
Step 4: Run
- Click Play
- View the result in Console:
- Success: returns JSON (including targetId)
- Failure: HTTP / error information