To ensure the stability and accuracy of AR recognition, it is recommended that you upload images with rich textures, distinct feature points, and no blurry areas.
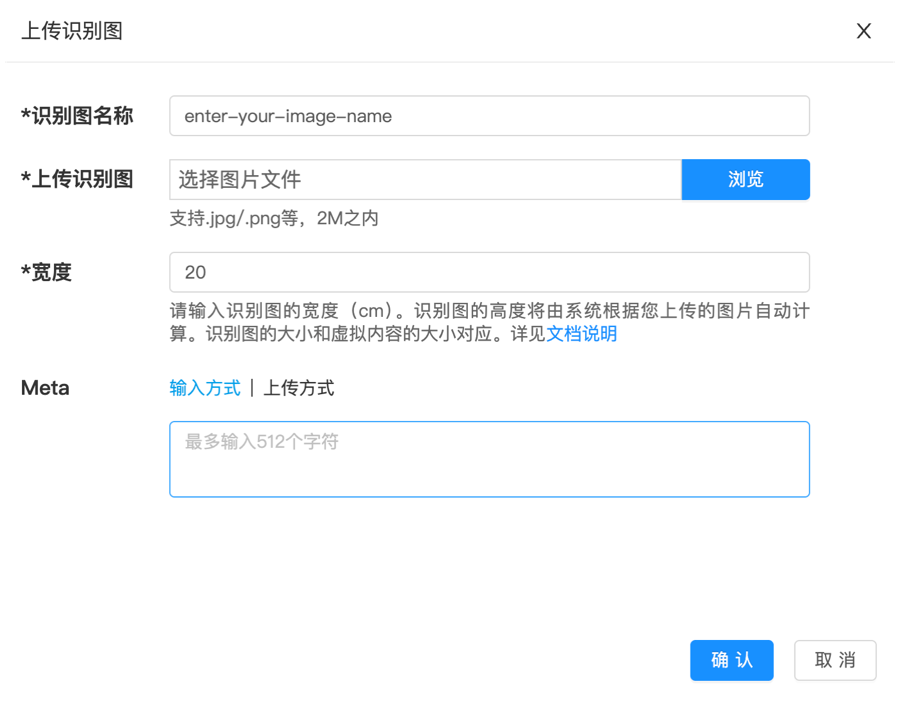
The verification phase can be started by creating target images directly through the EasyAR Web adding method.
In a production environment, we strongly recommend that developers follow the following three-step method to manage target images automatically through APIs, rather than directly forcing uploads.
Before formally adding, check whether the same or extremely similar targets already exist in the current image library.
Use algorithms to predict whether the image is suitable as a recognition target image.
After passing the above two checks, you can safely perform the upload operation.
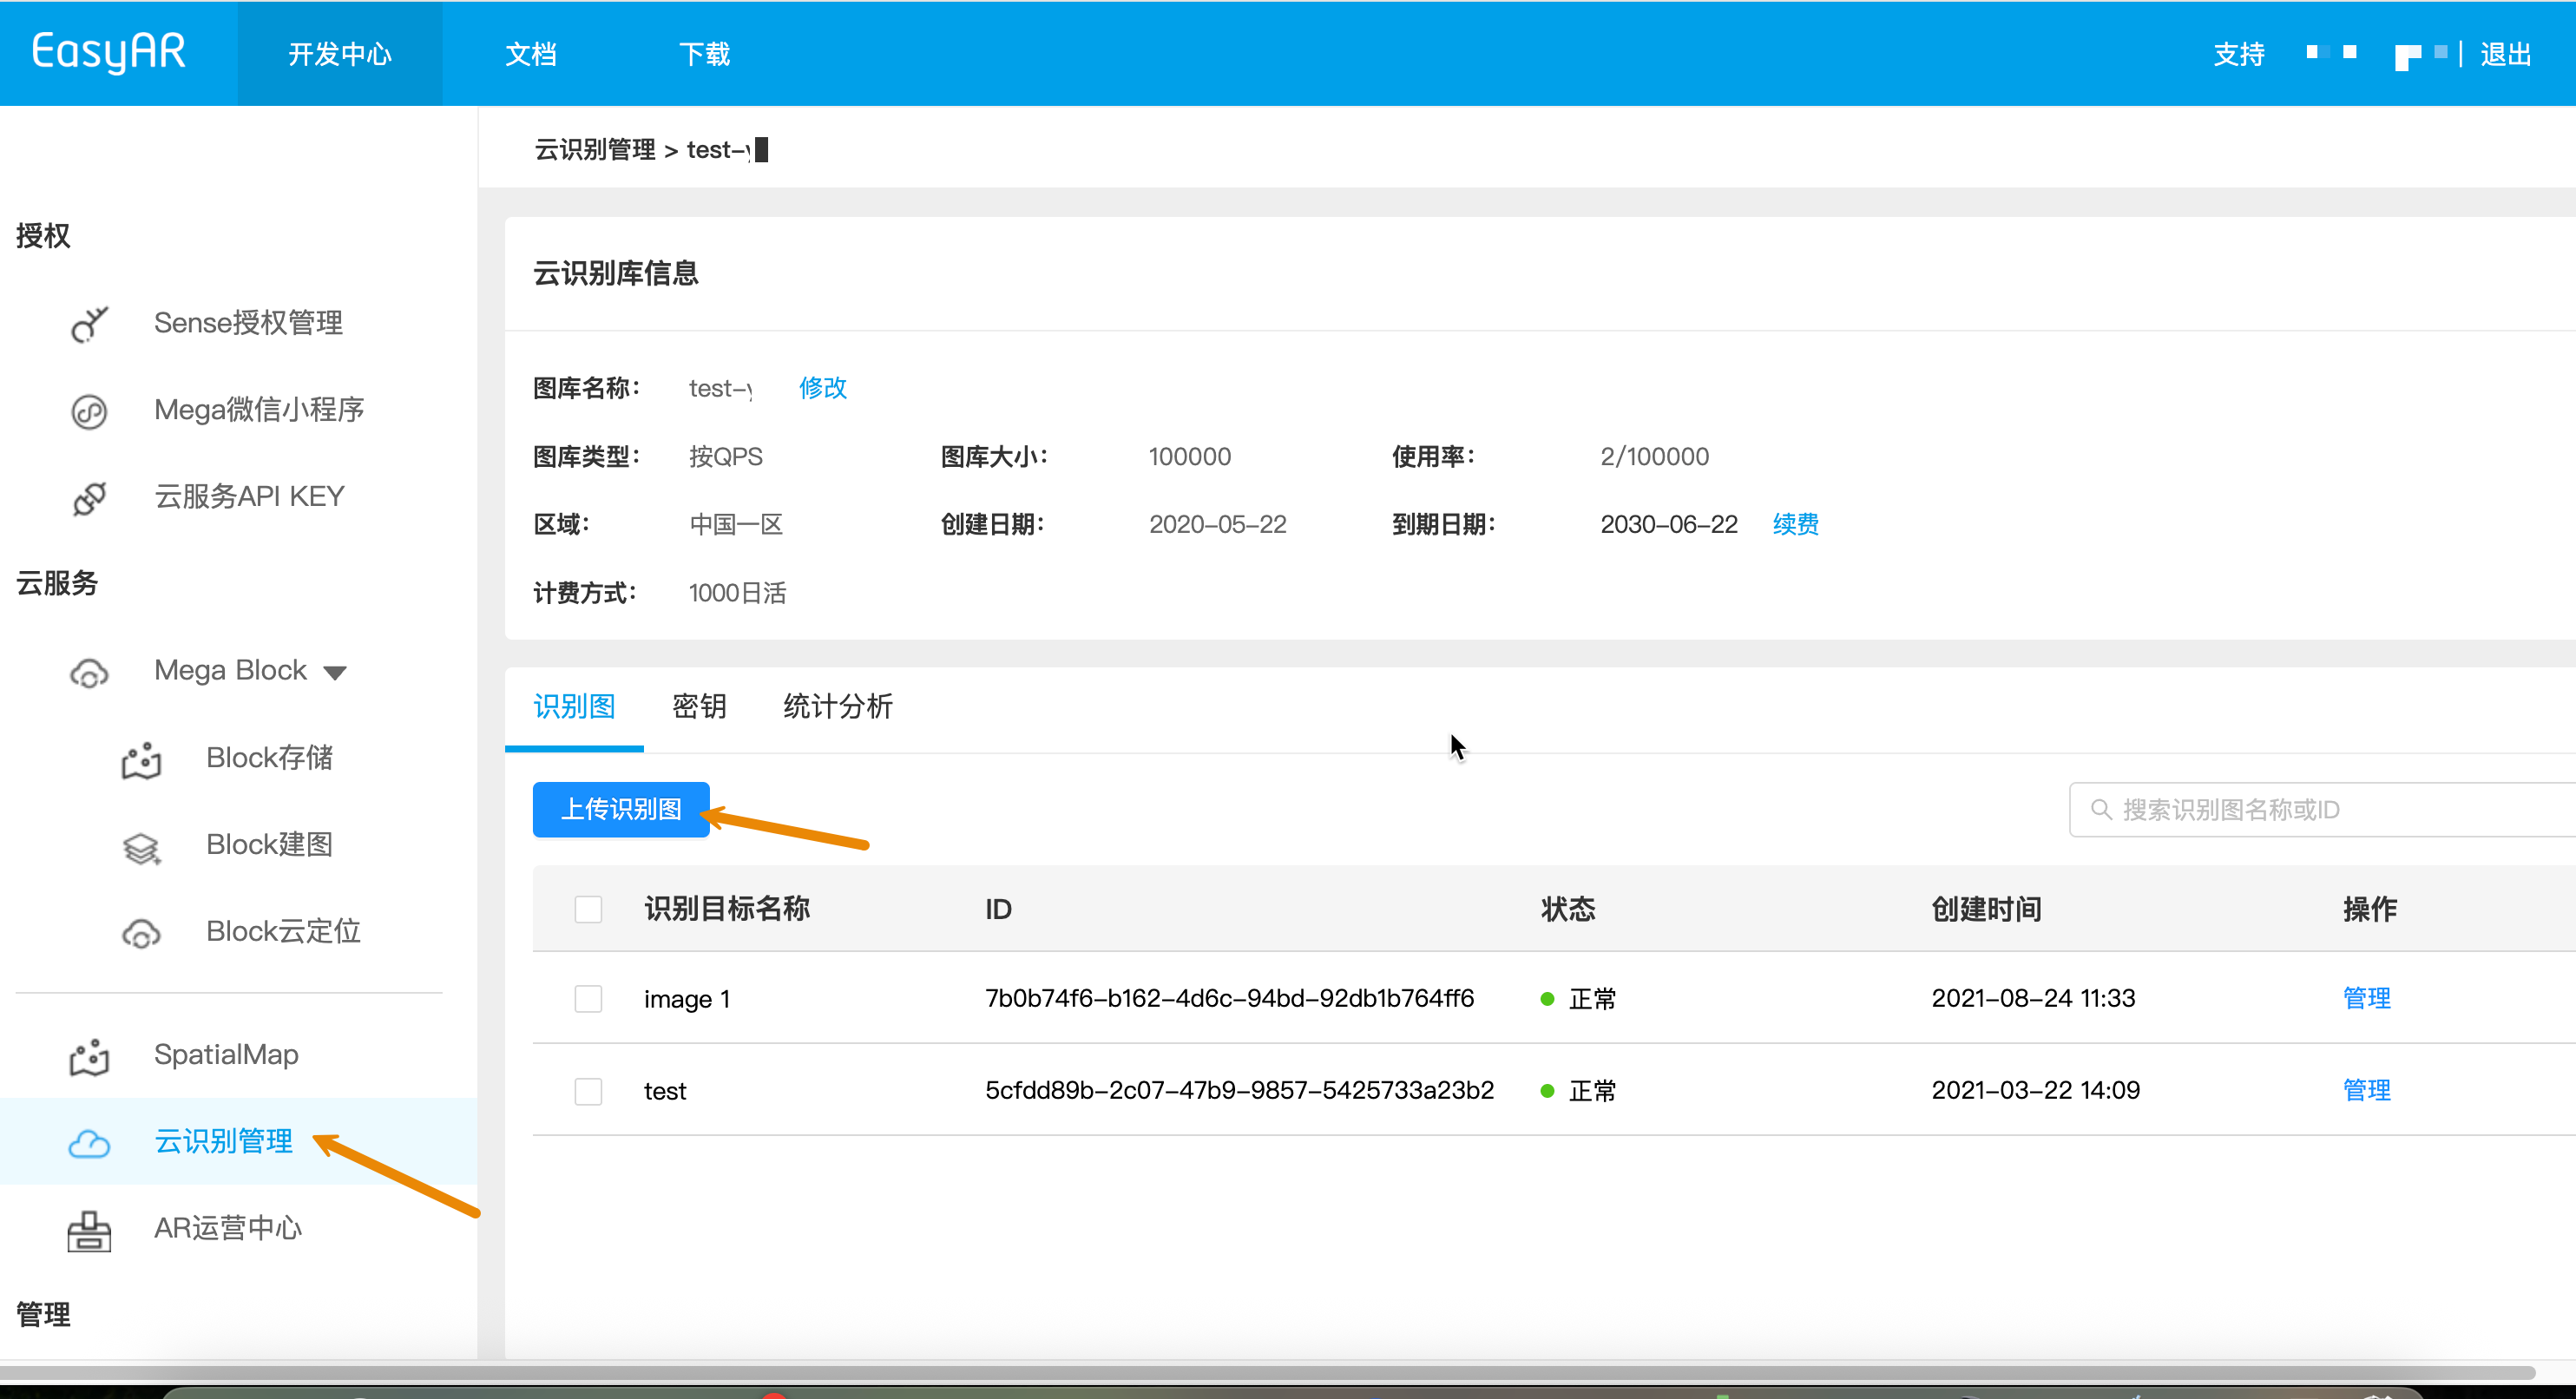
Suitable for the verification phase or maintaining a small number of target images. The Web management end adopts a "forced creation" mode, which does not automatically perform similarity checks, nor does it check the recognizability of images.
For large-scale management or integration into your own backend, use the Web Service REST API to create automatically.
Before initiating the request, please ensure to obtain the following resources (details in API call preparation checklist):
- First, convert the local target image to Base64 (macOS / Linux) and store the result in image_base64.txt
base64 -i ./target.jpg | tr -d '\n' > image_base64.txt
- Replace placeholders with actual parameters and execute the curl script
- Your-Server-side-URL → Actual API Host
- Your-Token → Actual API Key Authorization Token
- Your-CRS-AppId → Your appId
- demo_target → Target name
- size → Target image width (cm)
curl -X POST "https://<Your-Server-side-URL>/targets" \
  -H "Content-Type: application/json" \
  -H "Authorization: <YOUR-TOKEN>" \
  -d '{
    "appId": "<Your-CRS-AppId>",
    "image": "'"$(cat image_base64.txt)"'",
    "active": "1",
    "name": "demo_target",
    "size": "20",
    "type": "ImageTarget",
    "allowSimilar": "1"
  }'
Download java sample code
Import project via Maven
Step 1. Open relevant code file CreateTarget.java
Step 2. Modify global variables, replace authentication parameters from your checklist
- CRS AppId
- API Key / API Secret
- Server-end URL
- IMAGE_PATH : Target image file to be uploaded
public class CreateTarget {

    private static final String TARGET_MGMT_URL = "http://cn1.crs.easyar.com:8888";
    private static final String CRS_APPID       = "--here is your CRS AppId--";
    private static final String API_KEY         = "--here is your API Key--";
    private static final String API_SECRET      = "--here is your API Secret--";
    private static final String IMAGE_PATH      = "test_target_image.jpg";

    public String create(Auth auth, String imgPath) throws IOException{
        byte[] image = Files.readAllBytes(Paths.get(imgPath));
        if(image.length > Common.MAXIMUM_SIZE) {
            System.err.println("maximum image size is 2MB");
            System.exit(-1);
        }
        JSONObject params = new JSONObject()
                .put("name", "java-sdk-test")
                .put("image", Base64.getEncoder().encodeToString(image))
                .put("type","ImageTarget")
                .put("size", "20")
                .put("meta", "Your customized meta info");
        RequestBody requestBody = FormBody.create(MediaType.parse("application/json; charset=utf-8"),
                Auth.signParam(params, auth.getAppId(), auth.getApiKey(), auth.getApiSecret()).toString());
        Request request = new Request.Builder()
                .url(auth.getCloudURL() + "/targets")
                .post(requestBody)
                .build();
        return new OkHttpClient.Builder().readTimeout(120,TimeUnit.SECONDS).build().newCall(request).execute().body().string();
    }

    public static void main(String[] args) throws IOException {
        Auth accessInfo  =  new Auth(CRS_APPID, API_KEY, API_SECRET, TARGET_MGMT_URL);
        JSONObject createResponse = new JSONObject(new CreateTarget().create(accessInfo, IMAGE_PATH)).getJSONObject(Common.KEY_RESULT);
        System.out.println("created target: "+ createResponse.getString(Common.KEY_TARGETID));
    }
}
Step 3. Run Main
Download NodeJS sample code
Step 1. Configure keys.json file
- CRS AppId
- API Key / API Secret
{
  "appId": "--here is your appId for CRS App Instance for SDK 4--",
  "apiKey": "--here is your api key which is create from website and which has crs permission--",
  "apiSecret": "--here is your api secret which is create from website--"
}
Step 2. Run, specify test image, keys file, and Server-end URL
node bin/addTarget test.jpeg -t <Server-end-URL> -c keys.json
[Optional] Target image parameter code
Logic for adding target images, modify code file addTarget.js
Edit target image parameters, such as meta, target image name, etc. Corresponds to passing an anonymous target structure in the createTarget method
var argv = require('yargs')
    .usage('Usage: $0 [image] -t [host] -c [keys]')
    .demand(1)
    .default('t', 'http://localhost:8888').alias('t', 'host')
    .default('c', 'keys.json').alias('c', 'keys')
    .help('h').alias('h', 'help')
    .epilog('copyright 2015, sightp.com')
    .argv;

var fs = require('fs');

var imageFn = argv._[0];
var host = argv.host;
var keys = JSON.parse(fs.readFileSync(argv.keys));

var farmer = require('../farmer')(host, keys.appKey, keys.appSecret);

farmer.createTarget({
    'image': fs.readFileSync(imageFn).toString('base64'),
    'name':'test2',
    'allowSimilar': '1',
    'active':'1',
    'size':'20',
    'type':'imageTarget'
})
.then(function(resp) {
    console.log(resp.result.targetId);
})
.fail(function(err) {
    console.log(err);
});
createTarget calls the cloud service interface, sample code in farmer.js
function createTarget(target) {
    return Q.promise(function(resolve, reject) {
        request.post(host + '/targets')
        .send(signParams(target))
        .end(done(resolve, reject));
    });
}
Create new related code file create_target.py, modify global variables, then run
pip install requests
python create_target.py
import base64, hashlib, json, time, requests

APP_ID = "your_app_id"
API_KEY = "your_api_key"
API_SECRET = "your_api_secret"
IMAGE_PATH = "test.jpg"
API_HOST = "https://cn1-crs.easyar.com"

def sha256_hex(s: str) -> str:
    return hashlib.sha256(s.encode()).hexdigest()

image_b64 = base64.b64encode(open(IMAGE_PATH, "rb").read()).decode()
timestamp = int(time.time() * 1000)

sign_params = {
    "image": image_b64,
    "name": "demo_target",
    "size": "20",
    "meta": "",
    "type": "ImageTarget",
    "timestamp": timestamp,
    "appId": APP_ID,
    "apiKey": API_KEY
}

sign_str = "".join(f"{k}{sign_params[k]}" for k in sorted(sign_params)) + API_SECRET
print(sign_str)
signature = sha256_hex(sign_str)

body = dict(sign_params)
body["signature"] = signature

headers = {
    "Content-Type": "application/json",
    "appId": APP_ID
}

resp = requests.post(f"{API_HOST}/targets", headers=headers, json=body)
print(resp.text)
Download php sample code
Step 1. Open entry code demo.php
Step 2. Modify global variables, replace authentication parameters from your manifest
- CRS AppId
- API Key / API Secret
- Server-endURL
- imageFilePath : Path of target image file to upload
<?php
include 'EasyARClientSdkCRS.php';
$apiKey = 'API Key';
$apiSecret = 'API Secret';
$crsAppId = 'CRS AppId'
$crsCloudUrl = 'https://cn1-crs.easyar.com';
$imageFilePath = '1.jpg'

$sdk = new EasyARClientSdkCRS($apiKey, $apiSecret, $crsAppId, $crsCloudUrl);

$params = [
  'name' => 'image 1',
  'active' => '1',
  'size' => '1',
  'meta' => base64_encode('hello world'),
  'image' => base64_encode(file_get_contents($imageFilePath)),
];

$rs = $sdk->targetAdd($params);
if ($rs->statusCode == 0) {
  print_r($rs->result);
} else {
  print_r($rs);
}
Step 3. Run php demo.php
Cargo.toml:
[dependencies]
reqwest = { version = "0.11", features = ["json"] }
serde_json = "1"
sha2 = "0.10"
base64 = "0.21"
tokio = { version = "1", features = ["full"] }
main.rs:
use std::{fs, collections::BTreeMap};
use sha2::{Sha256, Digest};
use base64::Engine;
use reqwest::Client;
use std::time::{SystemTime, UNIX_EPOCH};

const APP_ID: &str = "your_app_id";
const API_KEY: &str = "your_api_key";
const API_SECRET: &str = "your_api_secret";
const IMAGE_PATH: &str = "test.jpg";
const API_HOST: &str = "https://cn1-crs.easyar.com";

fn sha256_hex(s: &str) -> String {
    let mut h = Sha256::new();
    h.update(s.as_bytes());
    format!("{:x}", h.finalize())
}

#[tokio::main]
async fn main() {
    let img = fs::read(IMAGE_PATH).unwrap();
    let image_b64 = base64::engine::general_purpose::STANDARD.encode(img);
    let timestamp = SystemTime::now()
        .duration_since(UNIX_EPOCH).unwrap()
        .as_millis();

    let mut sign = BTreeMap::new();
    sign.insert("image", image_b64);
    sign.insert("name", "demo_target".into());
    sign.insert("size", "20".into());
    sign.insert("meta", "".into());
    sign.insert("type", "ImageTarget".into());
    sign.insert("timestamp", timestamp.to_string());
    sign.insert("appId", APP_ID.into());
    sign.insert("apiKey", API_KEY.into());

    let mut raw = String::new();
    for (k, v) in &sign {
        raw.push_str(&format!("{}{}", k, v));
    }
    raw.push_str(API_SECRET);

    sign.insert("active", "1".into());
    sign.insert("signature", sha256_hex(&raw));

    let client = Client::new();
    let resp = client.post(format!("{}/targets", API_HOST))
        .header("Content-Type", "application/json")
        .header("appId", APP_ID)
        .json(&sign)
        .send().await.unwrap()
        .text().await.unwrap();

    println!("{}", resp);
}
cargo run
Create the relevant code file main.go, modify the global variables, and then run
go run main.go
main.go:
package main

import (
  "bytes"
  "crypto/sha256"
  "encoding/base64"
  "encoding/json"
  "fmt"
  "os"
  "sort"
  "net/http"
  "time"
)

const (
  AppID     = "your_app_id"
  ApiKey    = "your_api_key"
  ApiSecret = "your_api_secret"
  ImagePath = "test.jpg"
  ApiHost   = "https://cn1-crs.easyar.com"
)

func sha256Hex(s string) string {
  sum := sha256.Sum256([]byte(s))
  return fmt.Sprintf("%x", sum)
}

func main() {
  img, _ := os.ReadFile(ImagePath)
  imageB64 := base64.StdEncoding.EncodeToString(img)
  timestamp := time.Now().UnixMilli()

  sign := map[string]string{
    "image":     imageB64,
    "name":      "demo_target",
    "size":      "20",
    "meta":      "",
    "type":      "ImageTarget",
    "timestamp": fmt.Sprint(timestamp),
    "appId":     AppID,
    "apiKey":    ApiKey,
  }

  keys := make([]string, 0, len(sign))
  for k := range sign { keys = append(keys, k) }
  sort.Strings(keys)

  builder := ""
  for _, k := range keys {
    builder += k + sign[k]
  }
  builder += ApiSecret

  signature := sha256Hex(builder)
  sign["signature"] = signature

  body, _ := json.Marshal(sign)

  req, _ := http.NewRequest("POST", ApiHost+"/targets", bytes.NewReader(body))
  req.Header.Set("Content-Type", "application/json")

  resp, _ := http.DefaultClient.Do(req)
  defer resp.Body.Close()

  buf := new(bytes.Buffer)
  buf.ReadFrom(resp.Body)
  fmt.Println(buf.String())
}
Create .NET console project.
dotnet new console
dotnet run
using System;
using System.IO;
using System.Net.Http;
using System.Security.Cryptography;
using System.Text;
using System.Text.Json;
using System.Collections.Generic;
using System.Linq;

class Program
{
    const string APP_ID = "your_app_id";
    const string API_KEY = "your_api_key";
    const string API_SECRET = "your_api_secret";
    const string IMAGE_PATH = "test.jpg";
    const string API_HOST = "https://cn1-crs.easyar.com";

    static string Sha256(string s)
    {
        return Convert.ToHexString(
            SHA256.HashData(Encoding.UTF8.GetBytes(s))
        ).ToLower();
    }

    static void Main()
    {
        var imageB64 = Convert.ToBase64String(File.ReadAllBytes(IMAGE_PATH));
        var timestamp = DateTimeOffset.UtcNow.ToUnixTimeMilliseconds();

        var sign = new SortedDictionary<string, string> {
            ["image"] = imageB64,
            ["name"] = "demo_target",
            ["size"] = "20",
            ["type"] = "ImageTarget",
            ["timestamp"] = timestamp.ToString(),
            ["appId"] = APP_ID,
            ["apiKey"] = API_KEY
        };

        var builder = string.Concat(sign.Select(p => p.Key + p.Value)) + API_SECRET;
        sign["signature"] = Sha256(builder);

        var json = JsonSerializer.Serialize(sign);
        var client = new HttpClient();

        var resp = client.PostAsync(
            API_HOST + "/targets",
            new StringContent(json, Encoding.UTF8, "application/json")
        ).Result;

        Console.WriteLine(resp.Content.ReadAsStringAsync().Result);
    }
}
- Runtime environment
- Unity 2020 LTS or higher
- Scripting Backend: Mono or IL2CPP
- API Compatibility Level: .NET Standard 2.1 (recommended)
Step 1: Prepare image file
- Create directories in the Unity project:
Assets/
└── StreamingAssets/
|    └── target.jpg
└── Scripts/
     └── CreateImageTarget.cs
- According to the Assets directory name
- Create the script CreateImageTarget.cs, copy the sample code below
- Prepare a test image for the image target
using System;
using System.IO;
using System.Text;
using UnityEngine;
using UnityEngine.Networking;
using System.Collections;

public class CreateImageTarget : MonoBehaviour
{
    [Header("Config")]
    public string apiUrl = "https://Your-Server-end-URL" + "/targets";
    public string authorizationToken = "YOUR API KEY AUTH TOKEN";
    public string imageFilePath = "target.jpg";   // StreamingAssets
    public string crsAppId = "<Your-CRS-AppId>";

    private void Start()
    {
        StartCoroutine(CreateTarget());
    }

    private IEnumerator CreateTarget()
    {
        // Read image file (Unity StreamingAssets)
        string fullPath = Path.Combine(Application.streamingAssetsPath, imageFilePath);

        if (!File.Exists(fullPath))
        {
            Debug.LogError($"Image file not found: {fullPath}");
            yield break;
        }

        byte[] imageBytes = File.ReadAllBytes(fullPath);
        string imageBase64 = Convert.ToBase64String(imageBytes);

        TargetRequestBody body = new TargetRequestBody
        {
            appId = crsAppId,
            image = imageBase64,
            active = "1",
            name = "unity_target",
            size = "20",
            meta = "created from unity",
            type = "ImageTarget",
            allowSimilar = "1"
        };

        string json = JsonUtility.ToJson(body);

        // UnityWebRequest
        UnityWebRequest request = new UnityWebRequest(apiUrl, "POST");
        byte[] jsonBytes = Encoding.UTF8.GetBytes(json);

        request.uploadHandler = new UploadHandlerRaw(jsonBytes);
        request.downloadHandler = new DownloadHandlerBuffer();
        request.SetRequestHeader("Content-Type", "application/json");
        request.SetRequestHeader("Authorization", authorizationToken);

        yield return request.SendWebRequest();

        if (request.result == UnityWebRequest.Result.Success)
        {
            Debug.Log("Create target success:");
            Debug.Log(request.downloadHandler.text);
        }
        else
        {
            Debug.LogError("Create target failed:");
            Debug.LogError(request.error);
            Debug.LogError(request.downloadHandler.text);
        }
    }

    [Serializable]
    private class TargetRequestBody
    {
        public string appId;
        public string image;
        public string active;
        public string name;
        public string size;
        public string meta;
        public string type;
        public string allowSimilar;
    }
}
- In Unity Editor:
- Create an empty GameObject
- Name it TargetUploader
- Drag the CreateImageTarget script onto this object
Step 3: Configure parameters (Inspector)
Step 4: Run
- Click Play
- Check the result in Console:
- Success: Returns JSON (including targetId)
- Failure: HTTP/error message